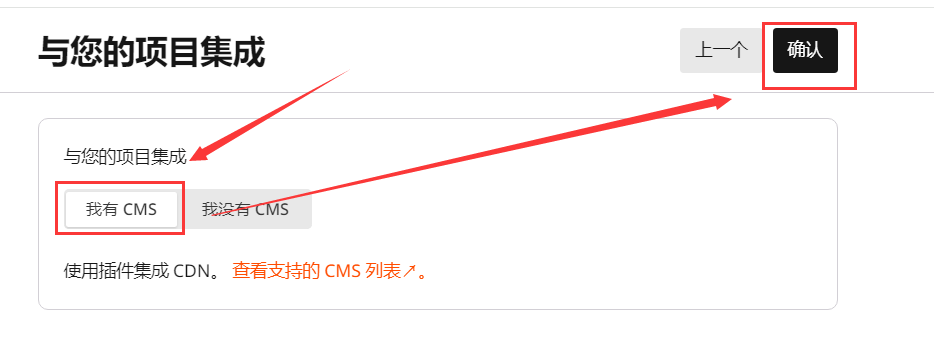
全新版本完全升级,集百家之所长,力求打造最强大的 Edgetunnel 解决方案!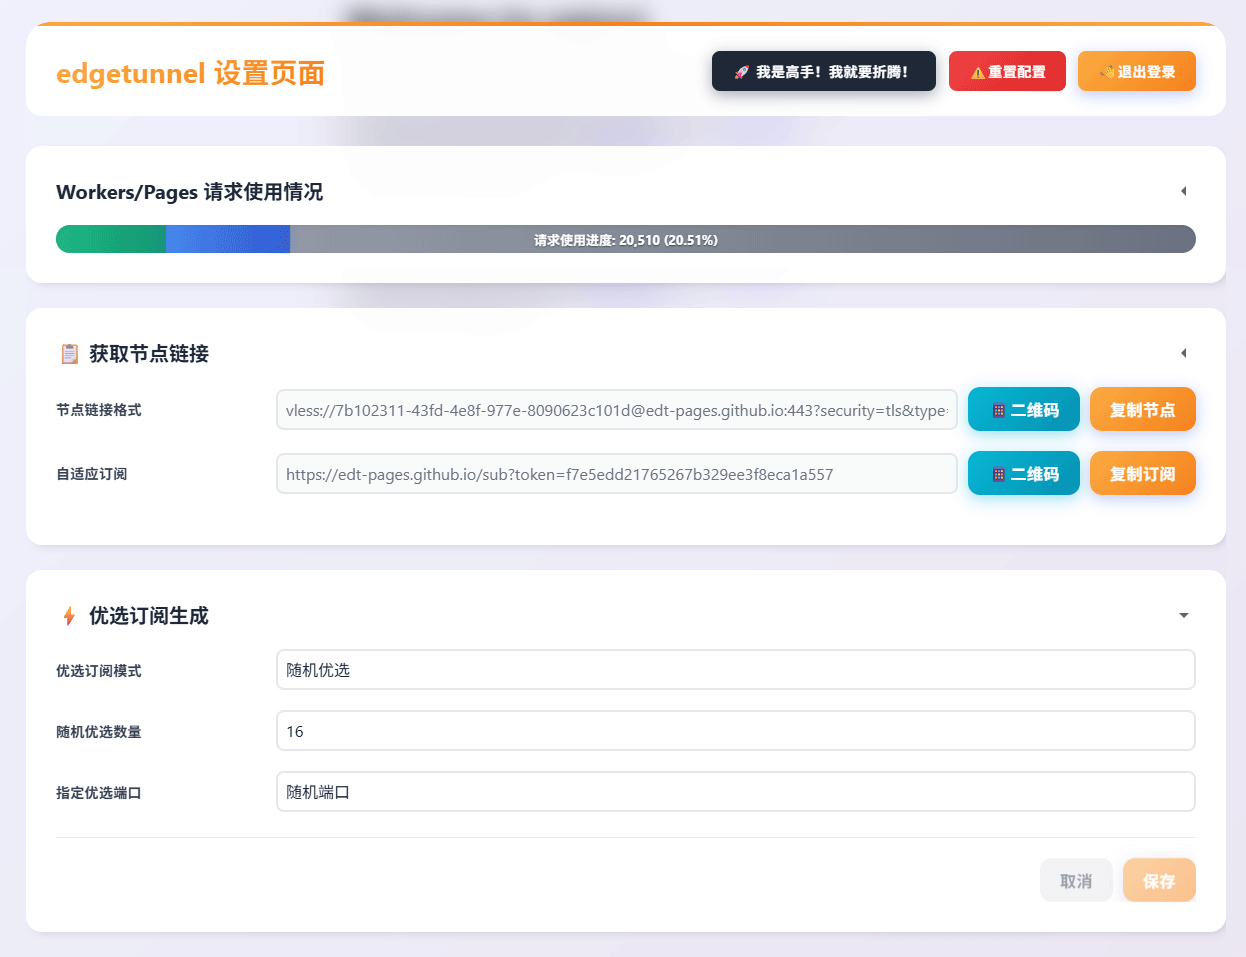
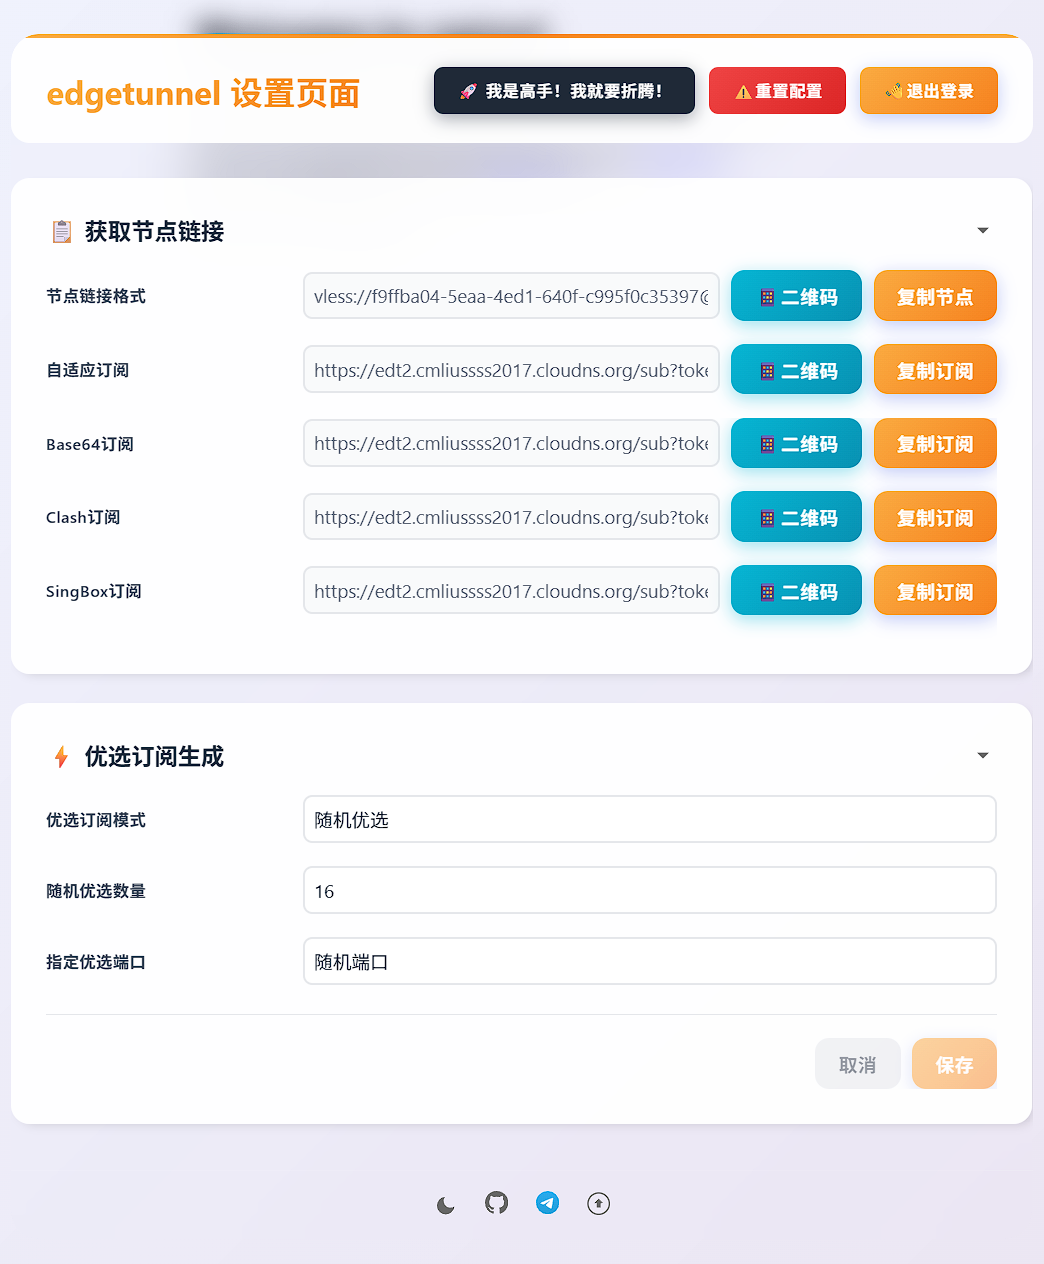
Demo面板预览:Edgetunnel2.0 WebUI
「 🚀 点击展开 详细更新内容 」
✨ 有哪些改进呢?
- 全新传输架构:Edgetunnel 2.0 采用了全新的传输架构,提升了兼容和稳定性。
- 更简化的配置流程:新增了 WebUI用户界面,修改配置无需改动变量重试部署,点击保存即刻生效。
- 多协议支持:一次部署,在线切换VLESS、Trojan传输协议,满足不同用户的需求。
- 内置三网优选IP,根据三网自动分配优选IP,优选IP想要多少就有多少!
- 自定义优选 支持 在线优选,自选落地国家,手机浏览器一点就跑,跑完就用!
- 感谢 白嫖哥 提供的服务支持在线优选功能
- 自定义优选 支持 优选API 接入,搭配自动化实时优选!
- 反代除了支持ProxyIP,还支持SOCKS5/HTTP出口(启用全局代理,即可实现链式代理效果)!
- 感谢 AK大佬 提供的SOCKS5/HTTP服务
- 感谢 OTC大佬 提供的SOCKS5/HTTP服务
- 配置 Telegram Bot 通知设置,即可实时获取项目访问登录订阅等消息;
- 配置 CF Account ID/API Token 通知设置,即可实时获取当天 Workers/Pages 请求使用情况;
- 添加 日志中心,查看所有可疑登录订阅操作;
…太多太多的新功能太多了,这里就不一一赘述,望自行探索!
🛠️ 部署教程
支持 Workers、Pages GitHub、Pages 上传 三种部署方式,本教程将以 Pages 上传 方式为例,因为该方式部署无需任何门槛。
如需了解其他部署方式,请自行查看:https://github.com/cmliu/edgetunnel 项目文档
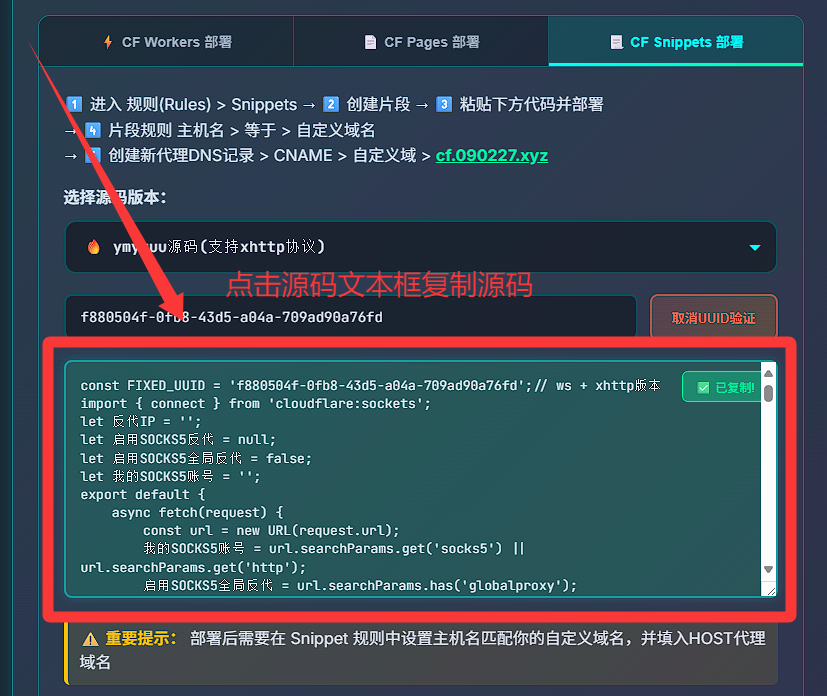
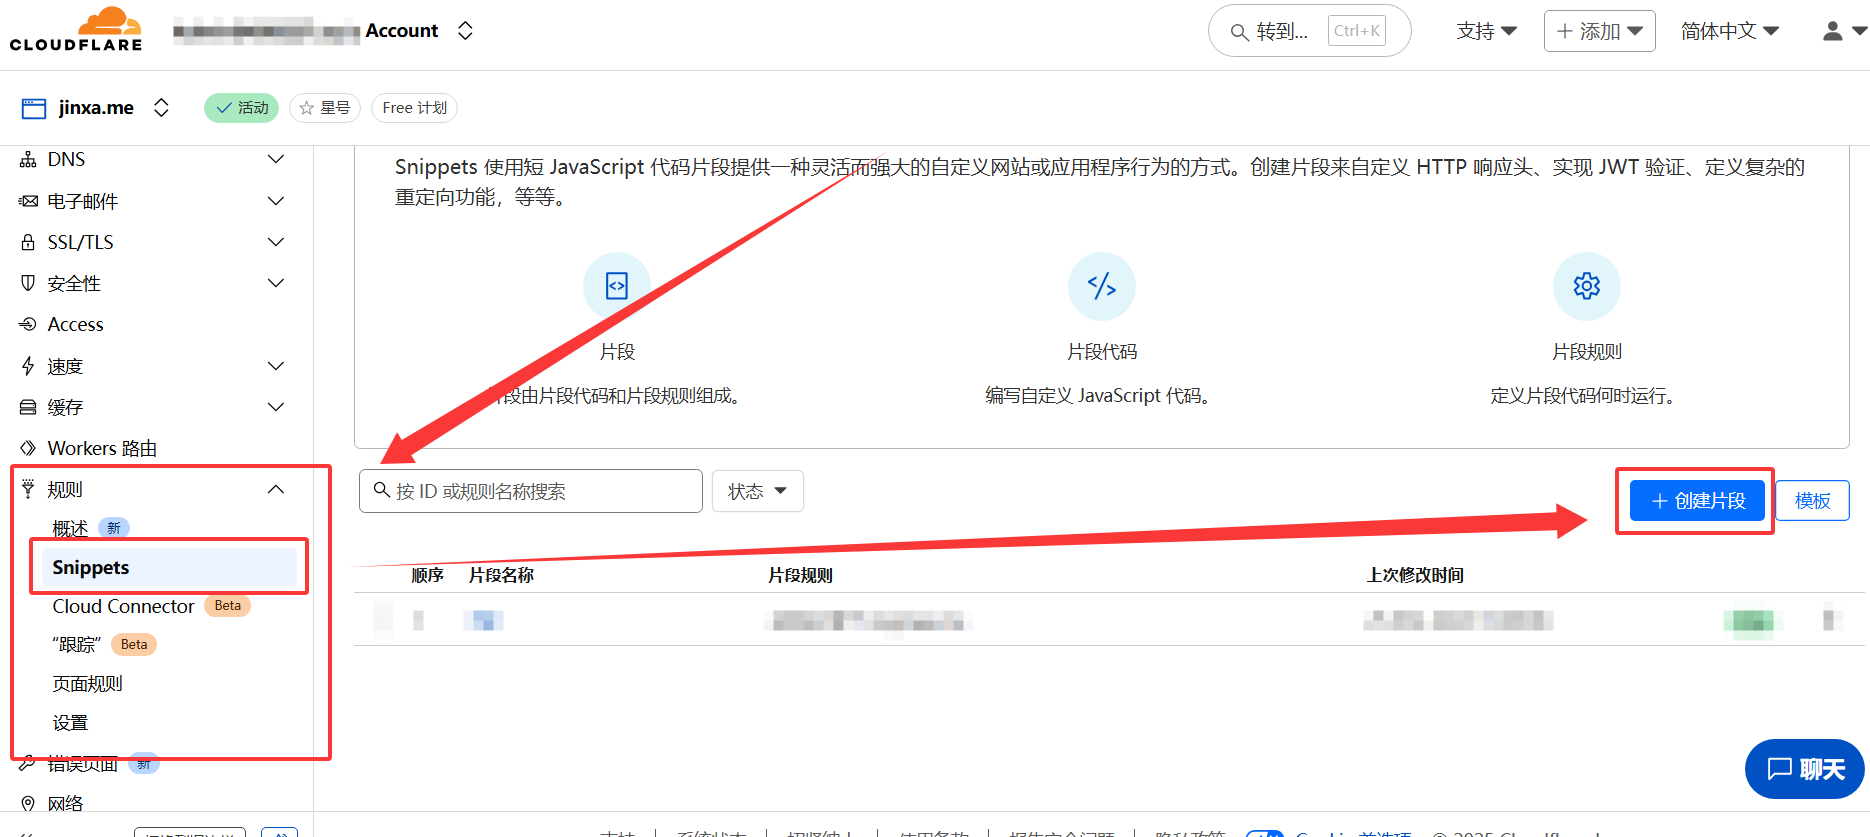
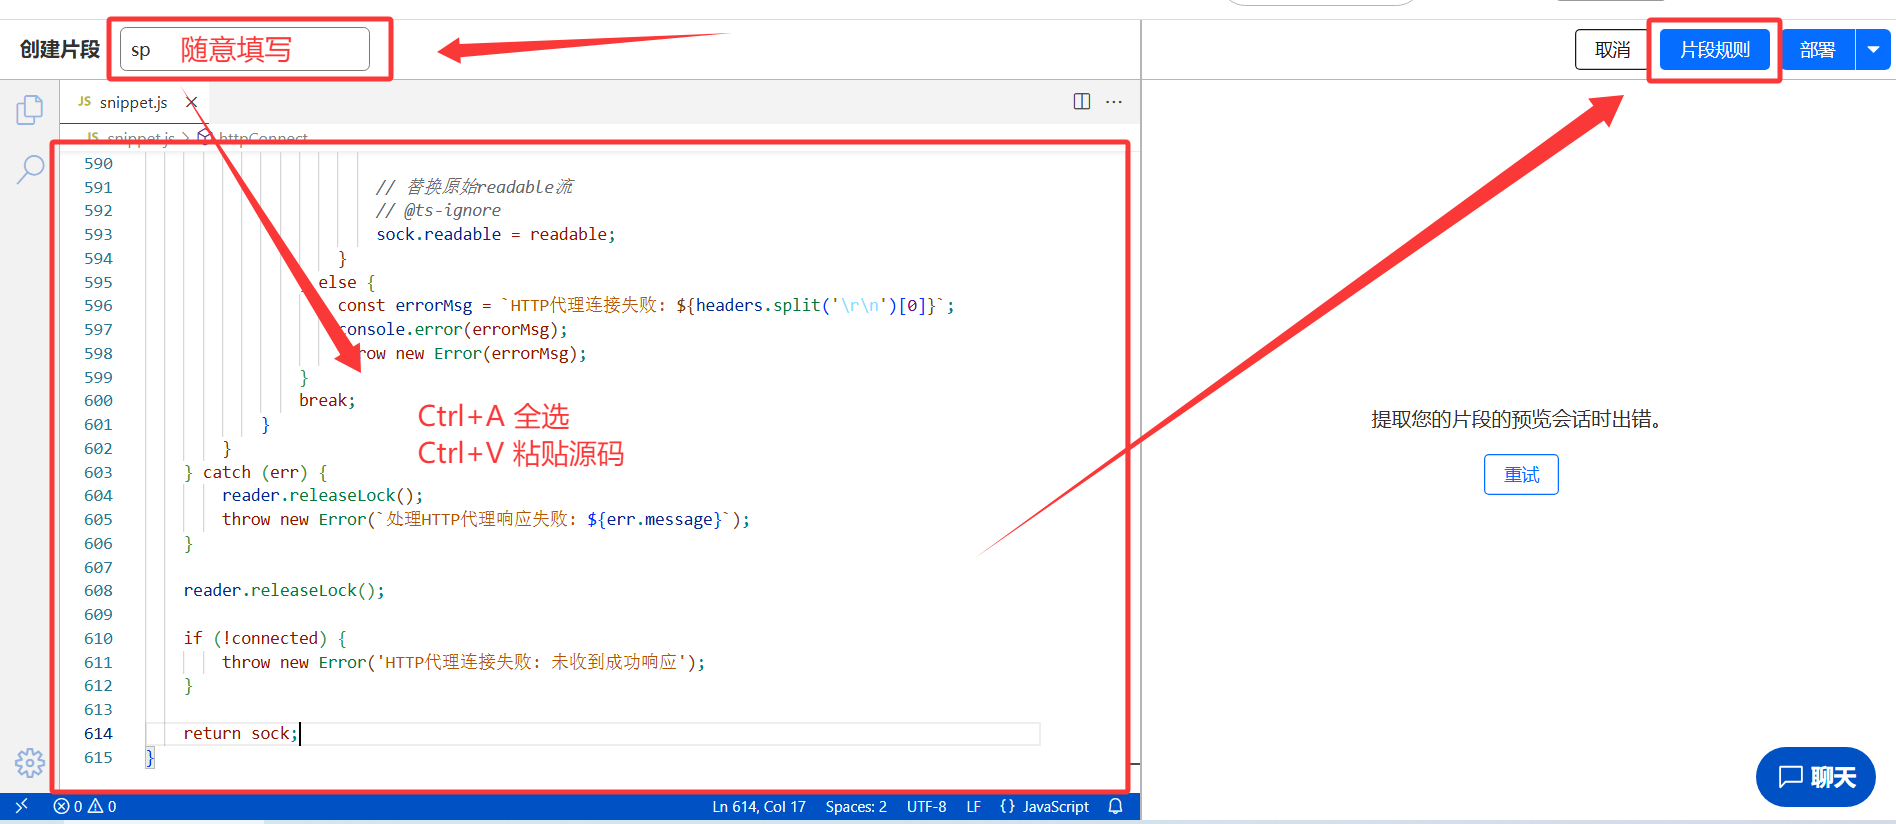
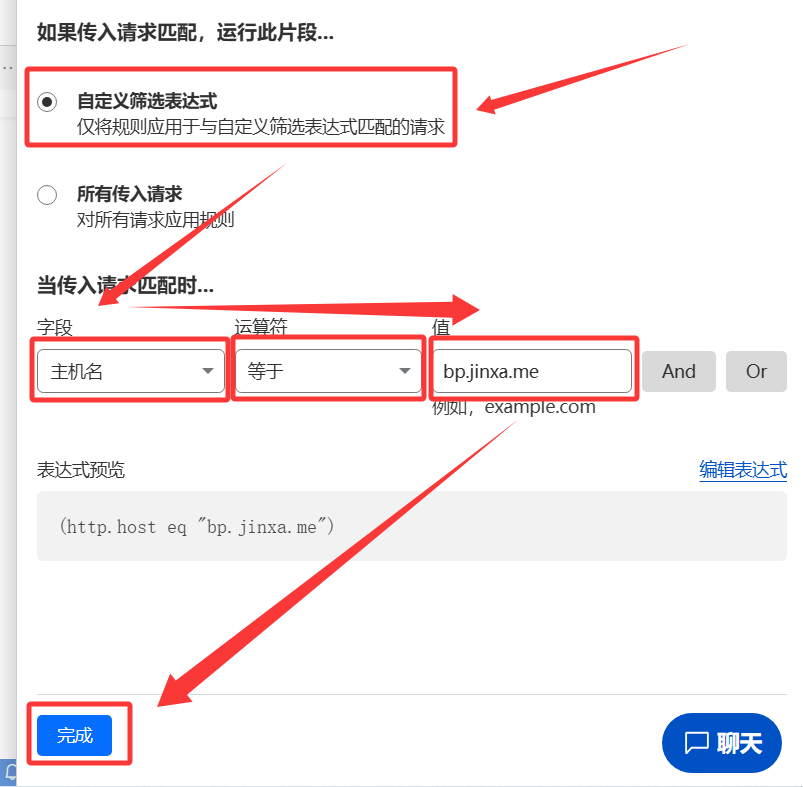
「 🚀 点击展开 Pages 上传部署 图文教程 」
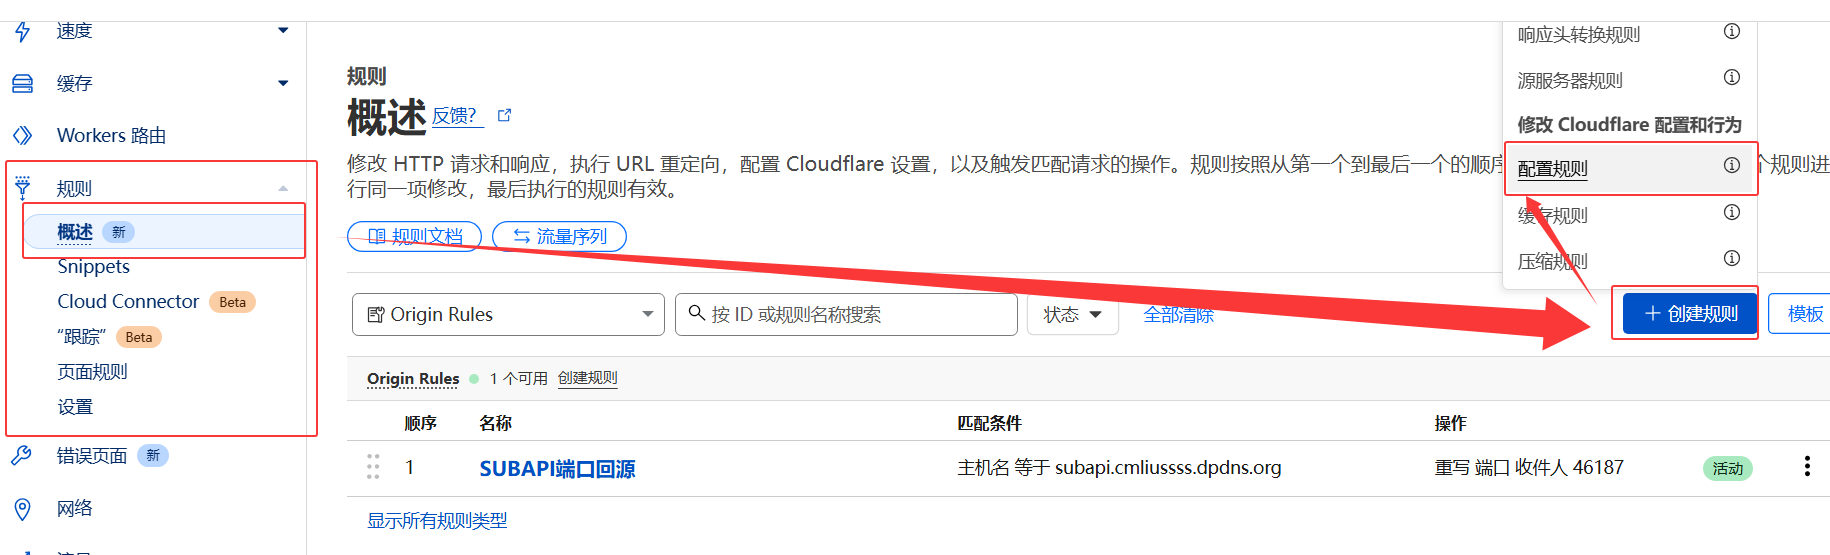
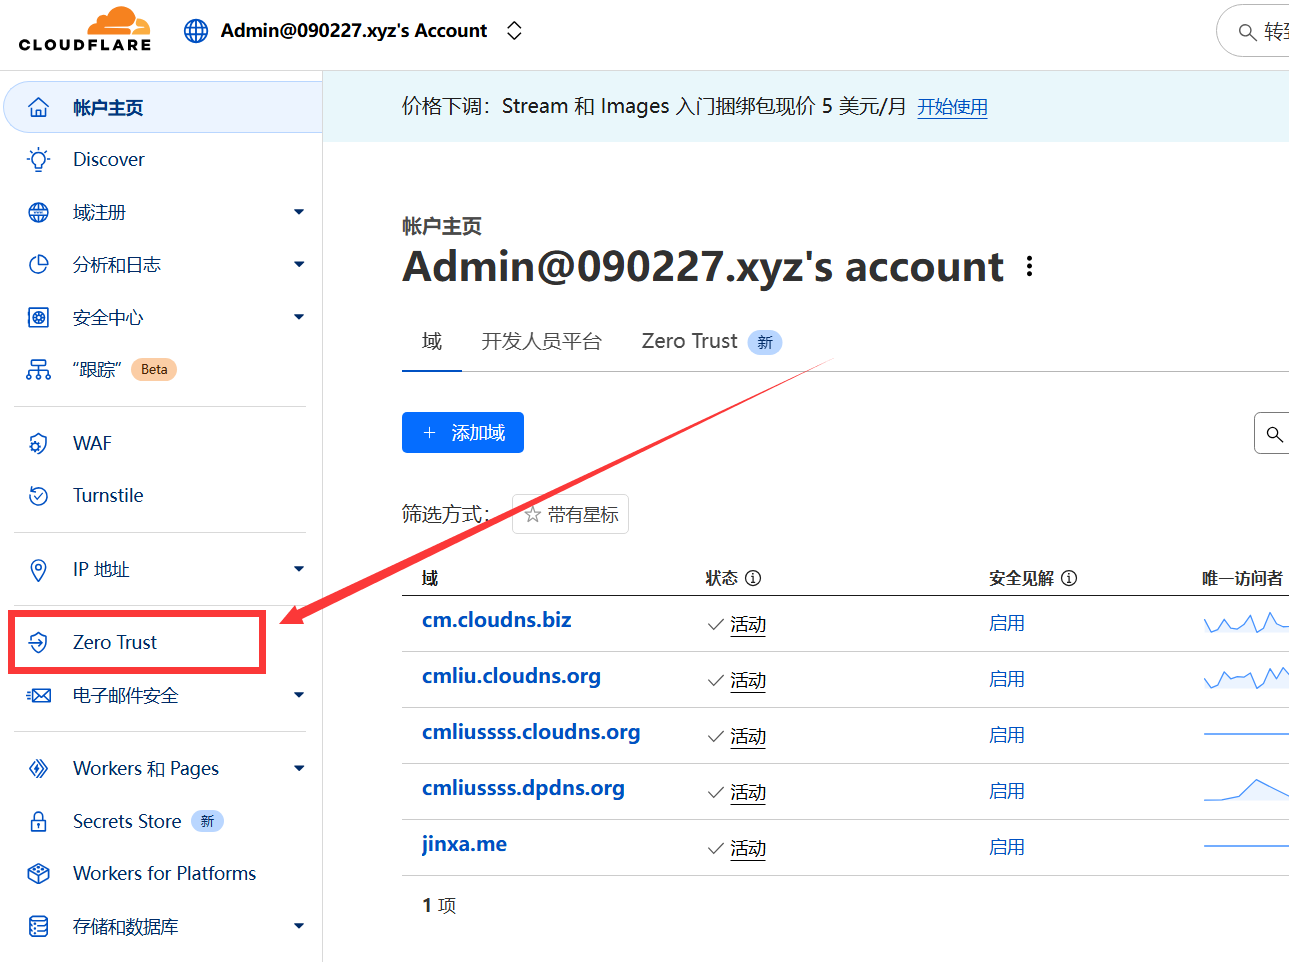
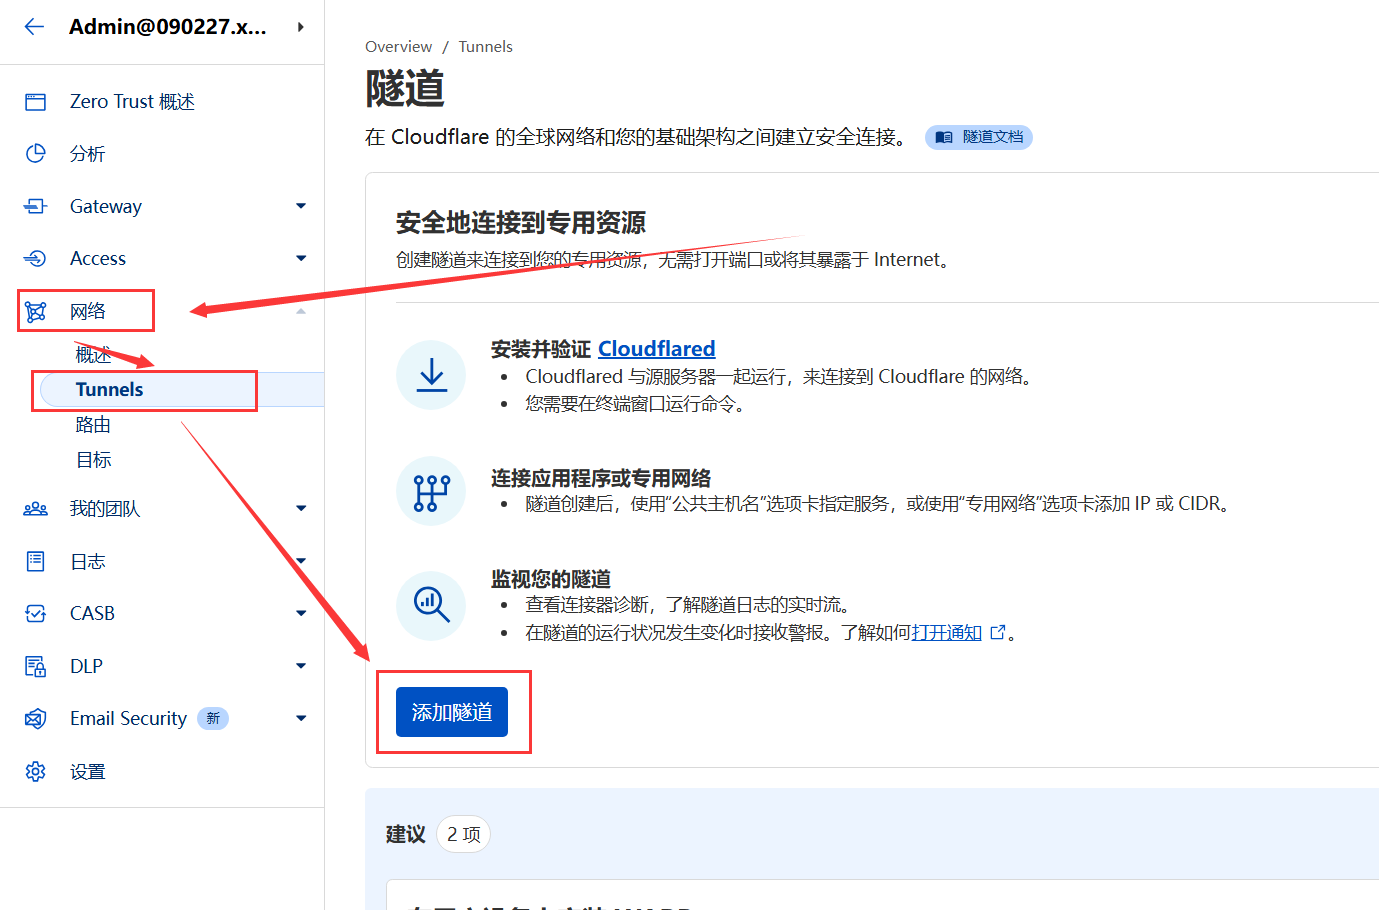
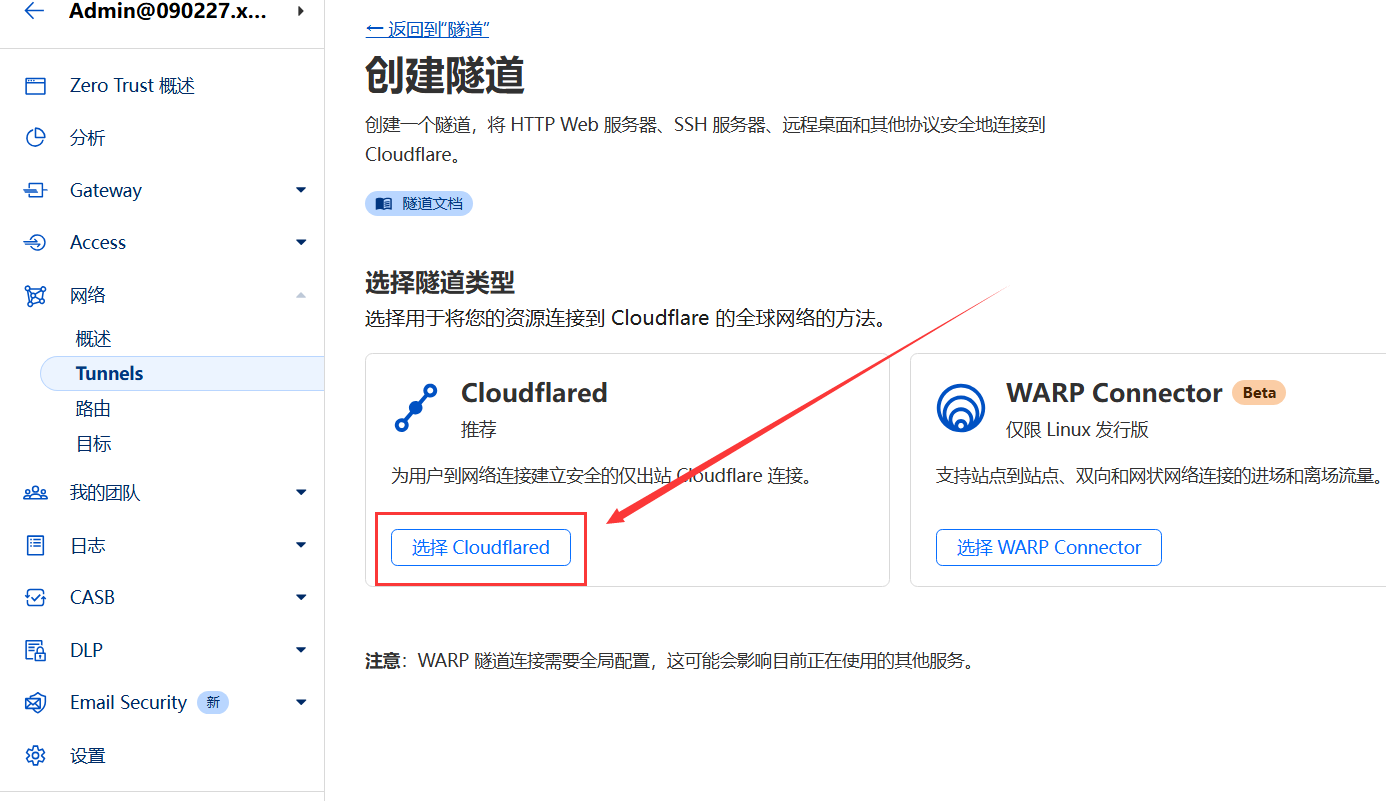
1️⃣ 创建 Pages 应用程序
点击 direct-upload-demo.zip 下载 Cloudflare Pages 演示项目压缩包备用;
准备一个 Cloudflare 账号,点击
计算和AI>Workers 和 Pages>创建应用程序;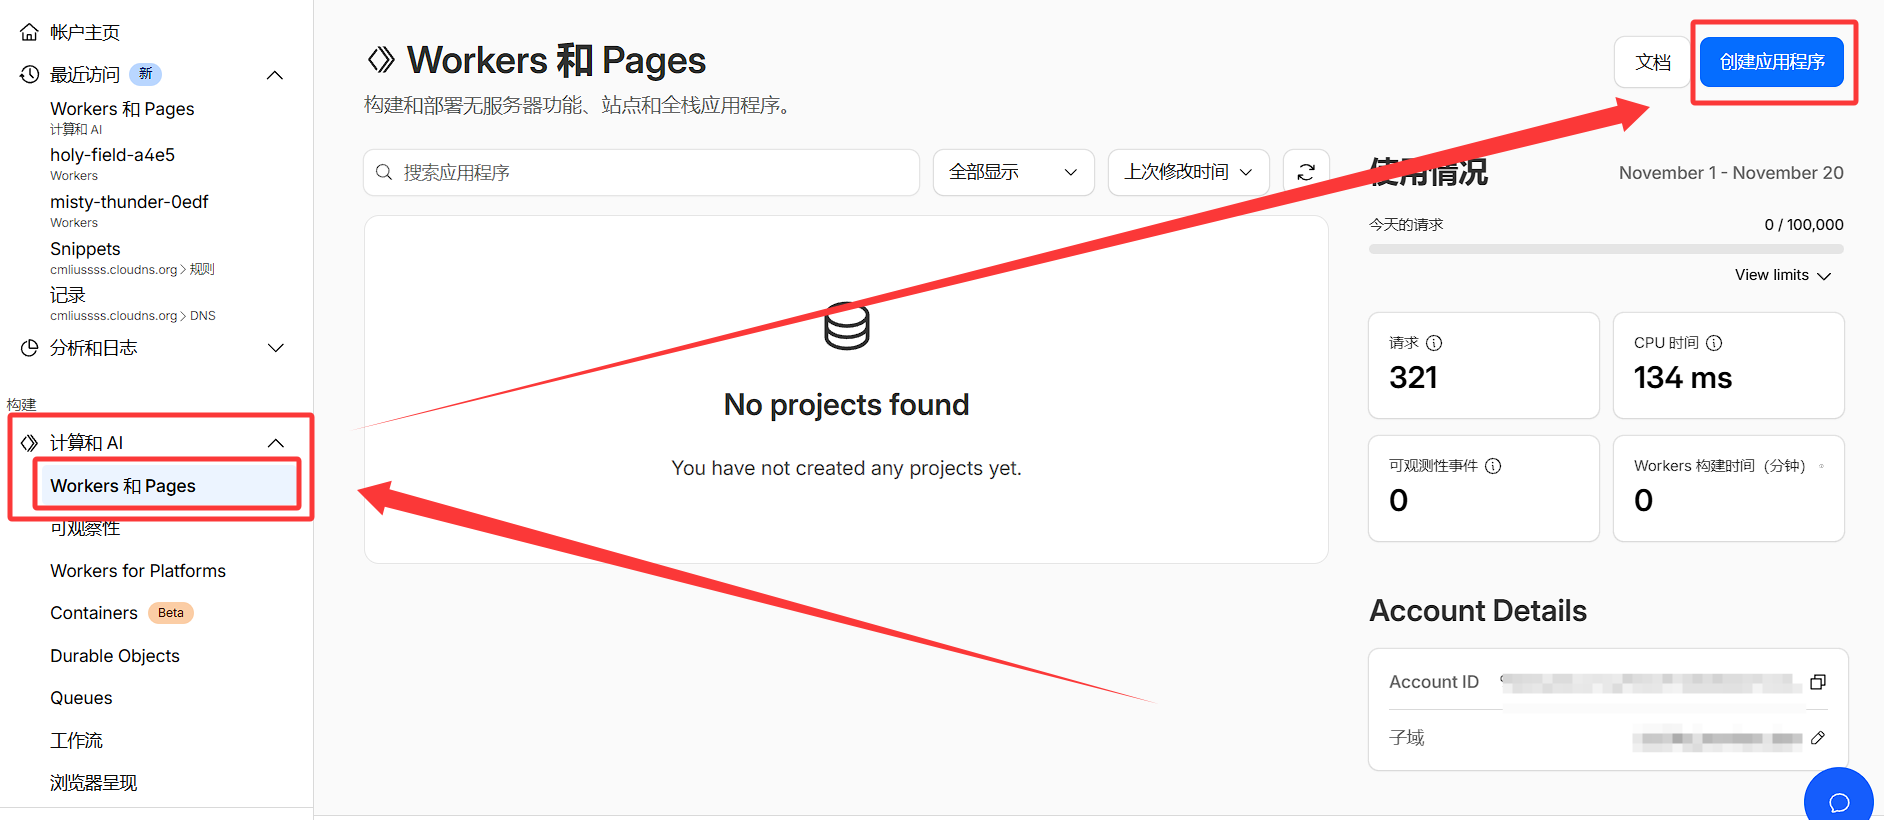
或
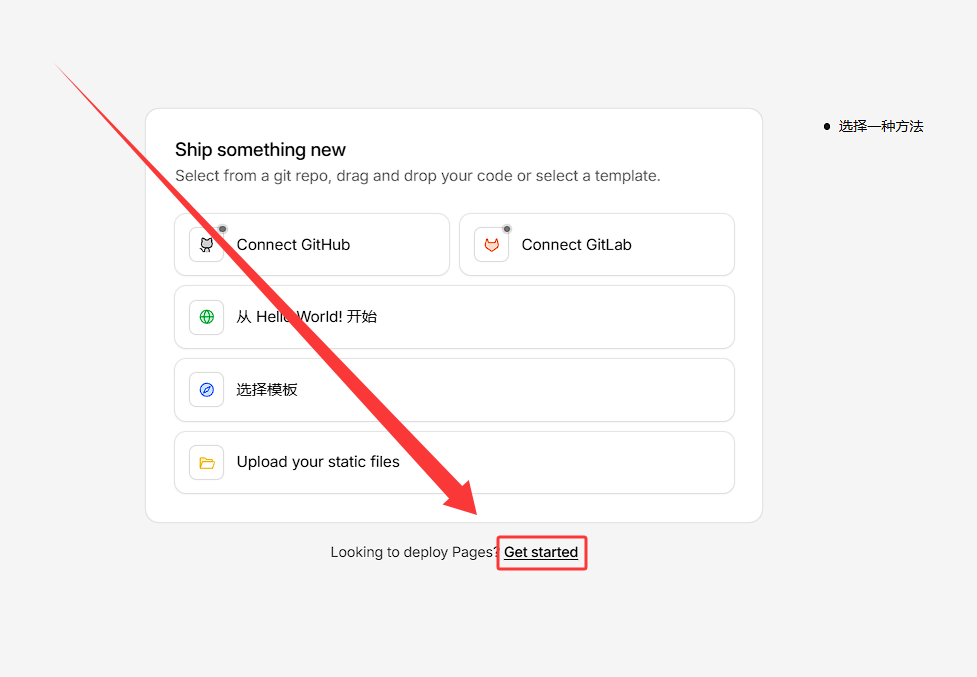
选择
Pages选项卡,点击拖放文件>开始使用;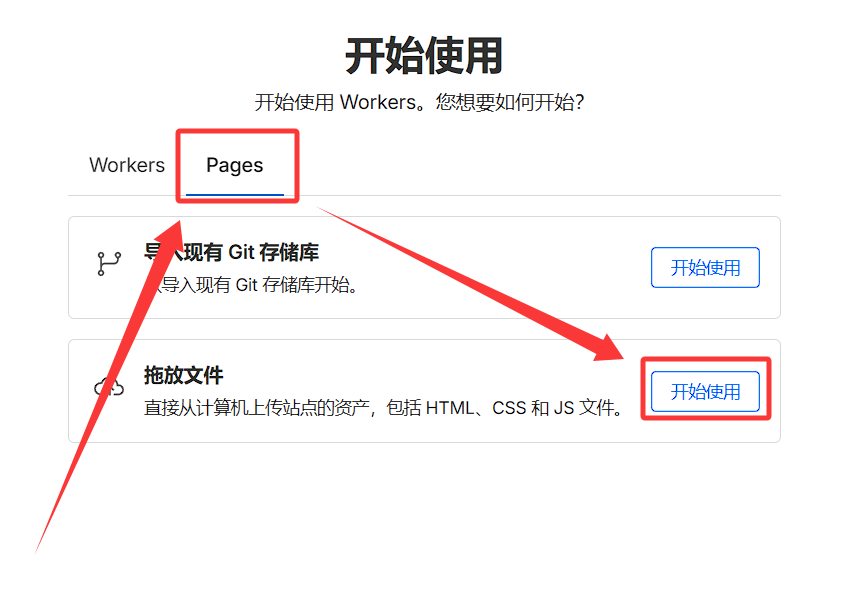
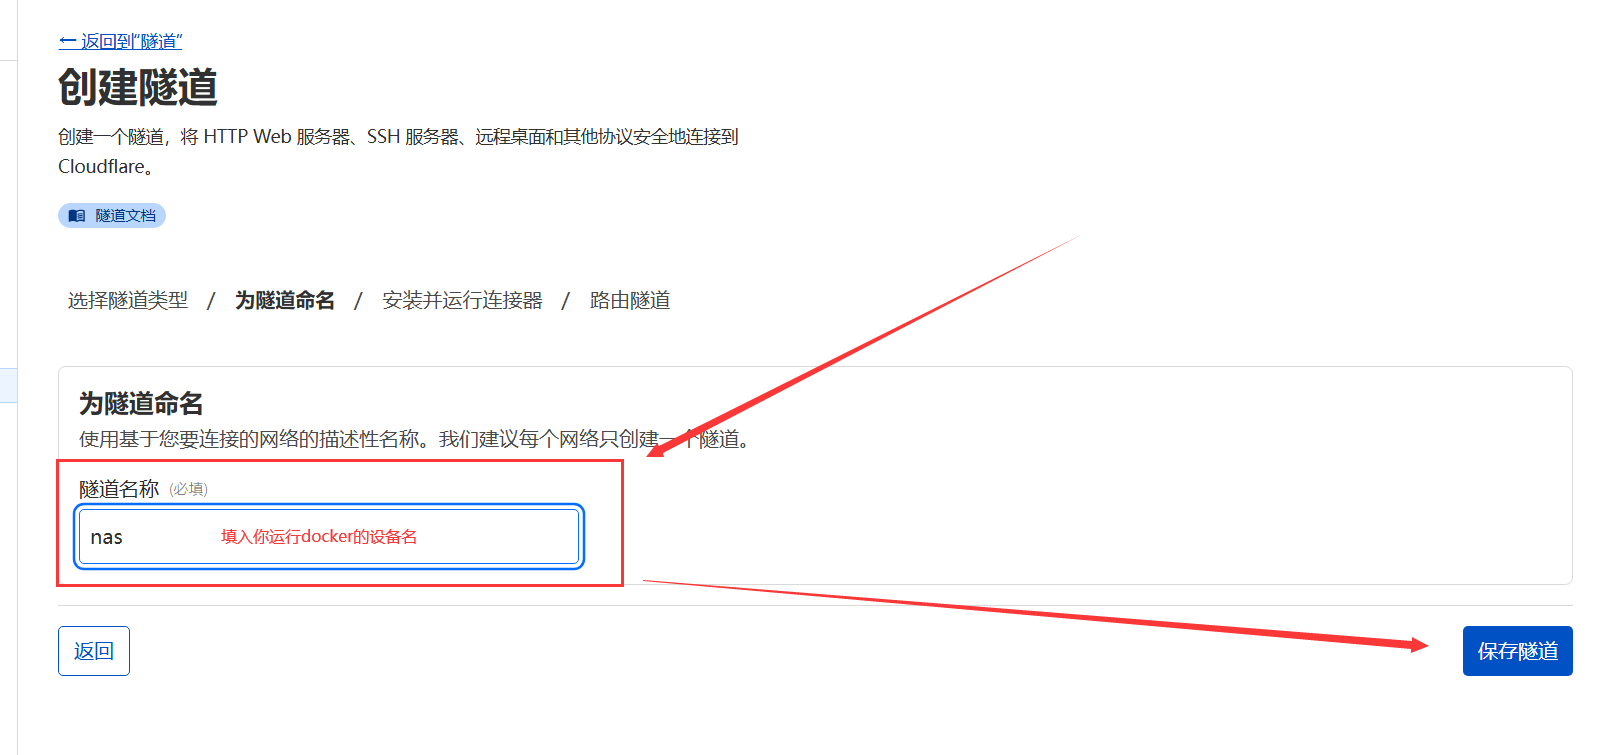
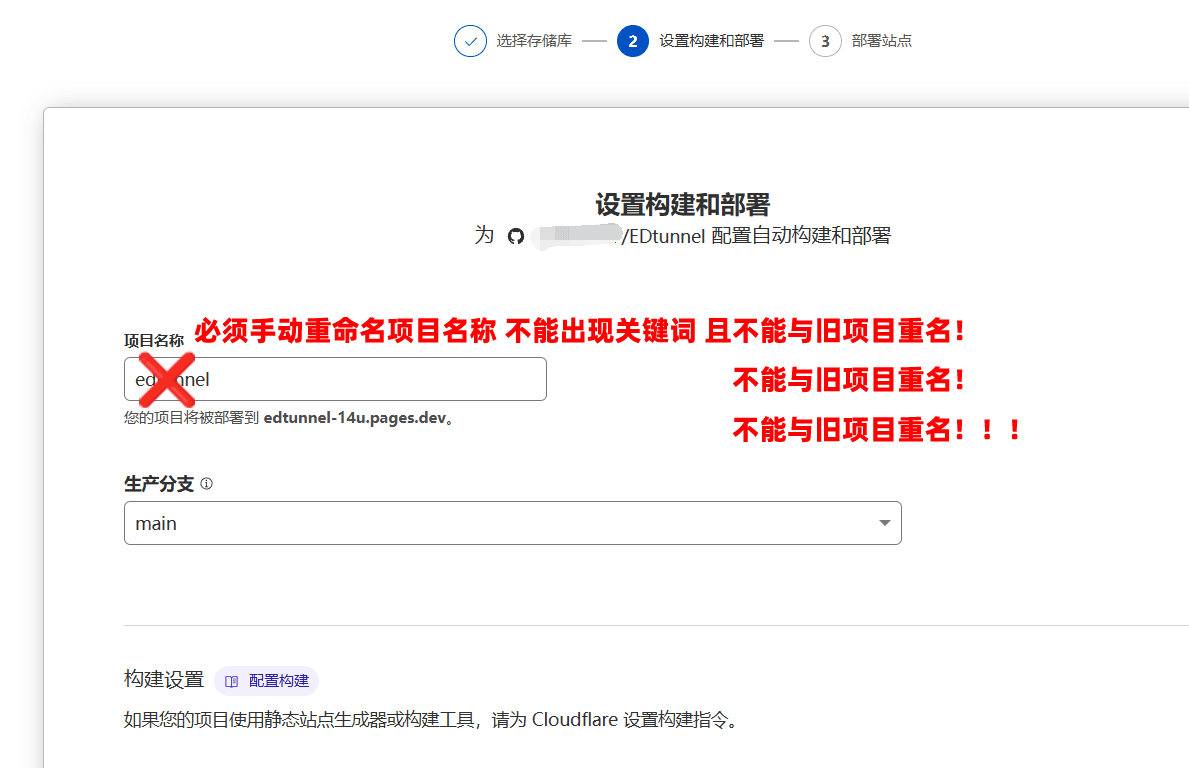
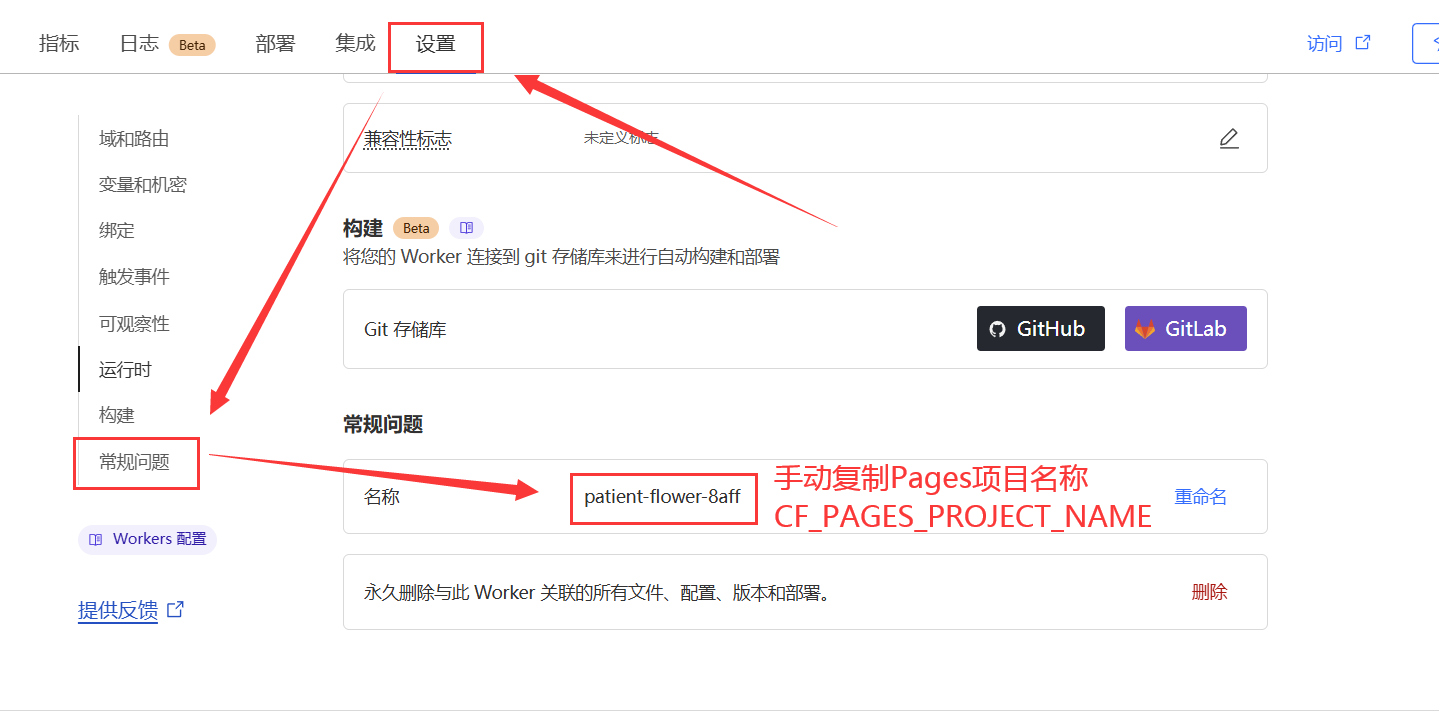
项目名称 填写任意值,但必须是全新的名字,避免出现1101错误,推荐末尾补上任意数字,如
edt123123123;
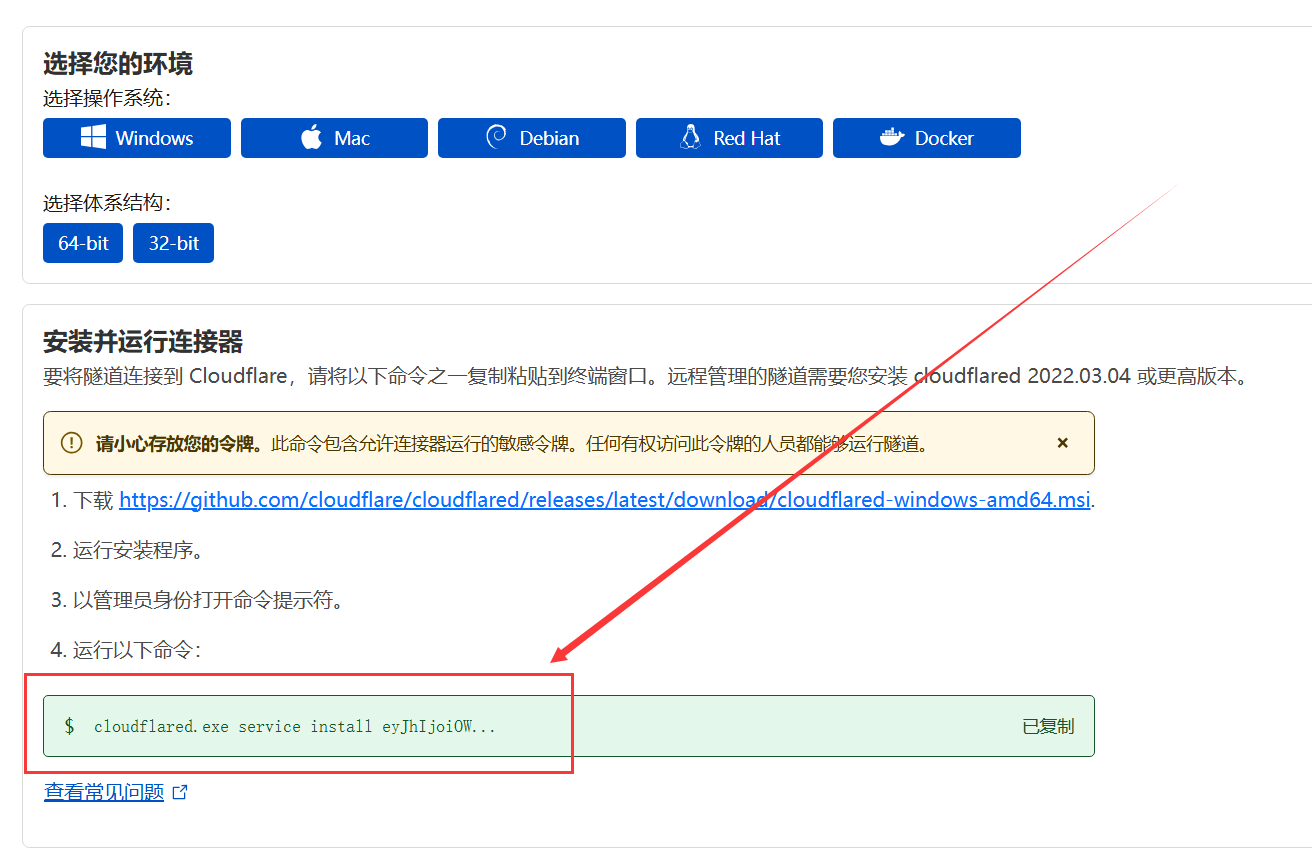
点击
从计算机中选择>上传压缩文件,选择第一步下载的direct-upload-demo.zip压缩包,等待上传完成;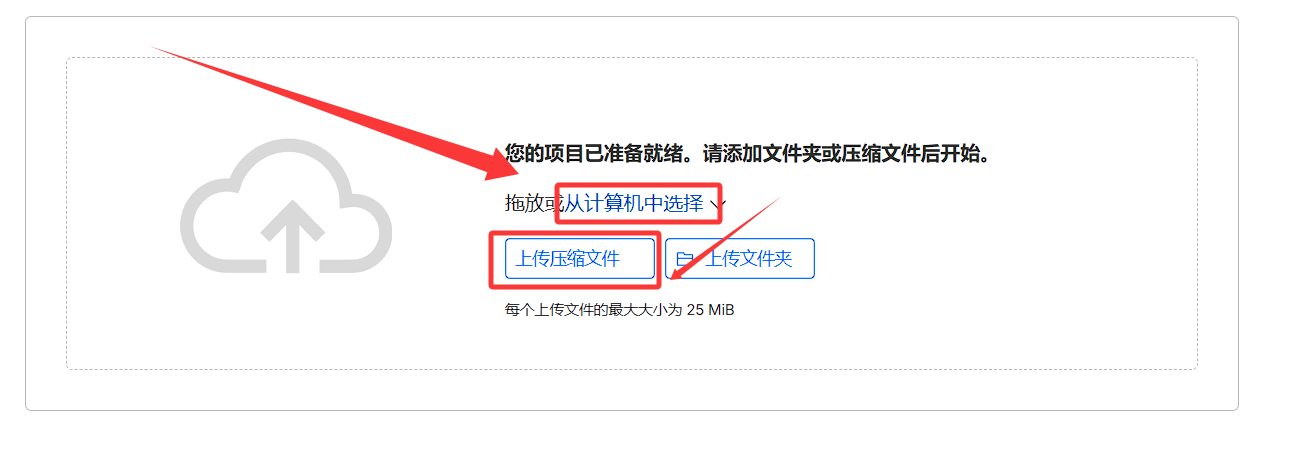
点击
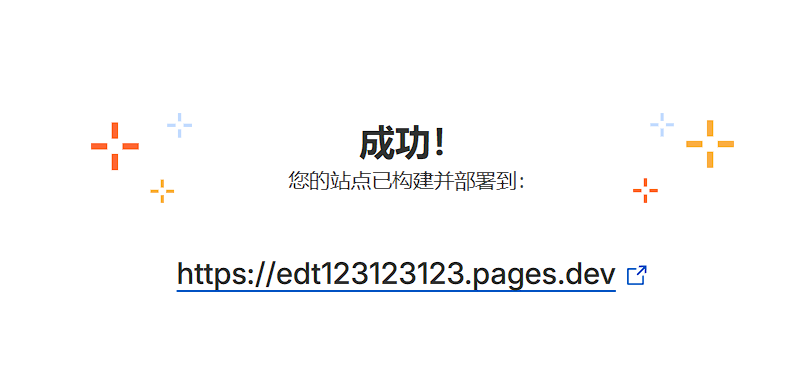
部署站点,等待部署完成;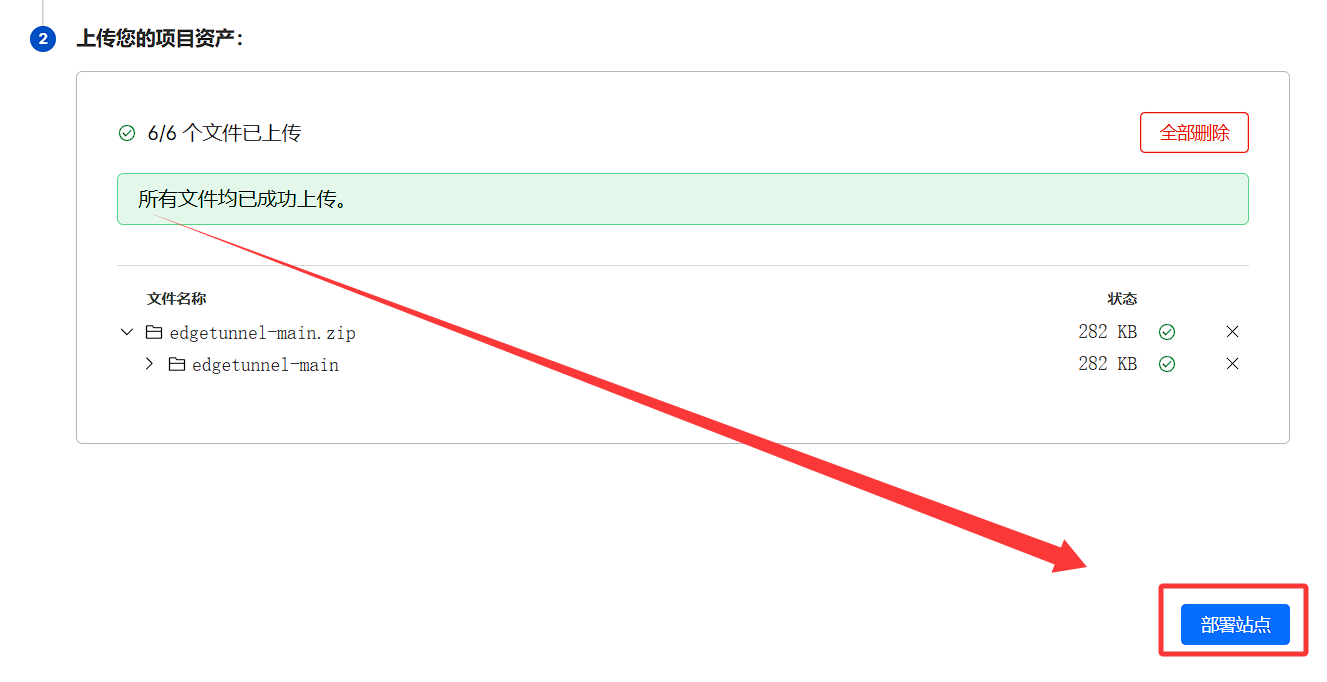
提示成功,代表初始化部署完成!点击
继续处理项目进入下一步设置变量绑定KV的操作;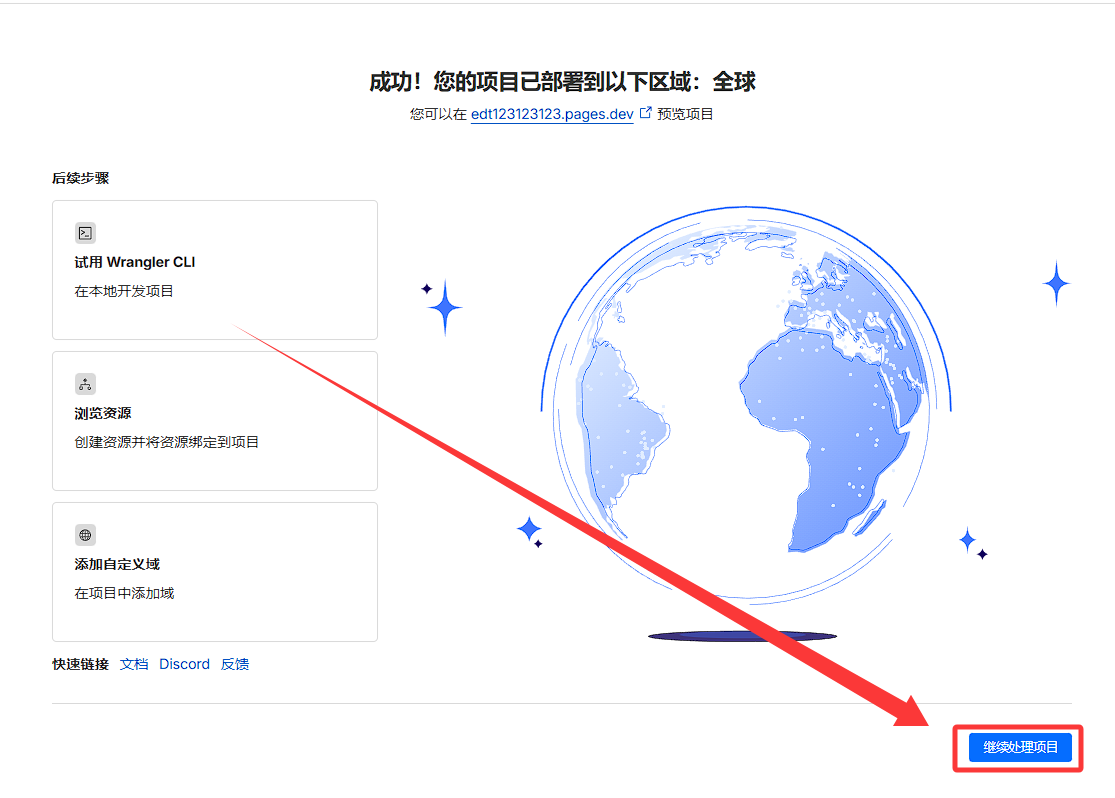
2️⃣ 设置管理员变量
进入项目设置页面,点击
设置选项卡,添加变量和机密: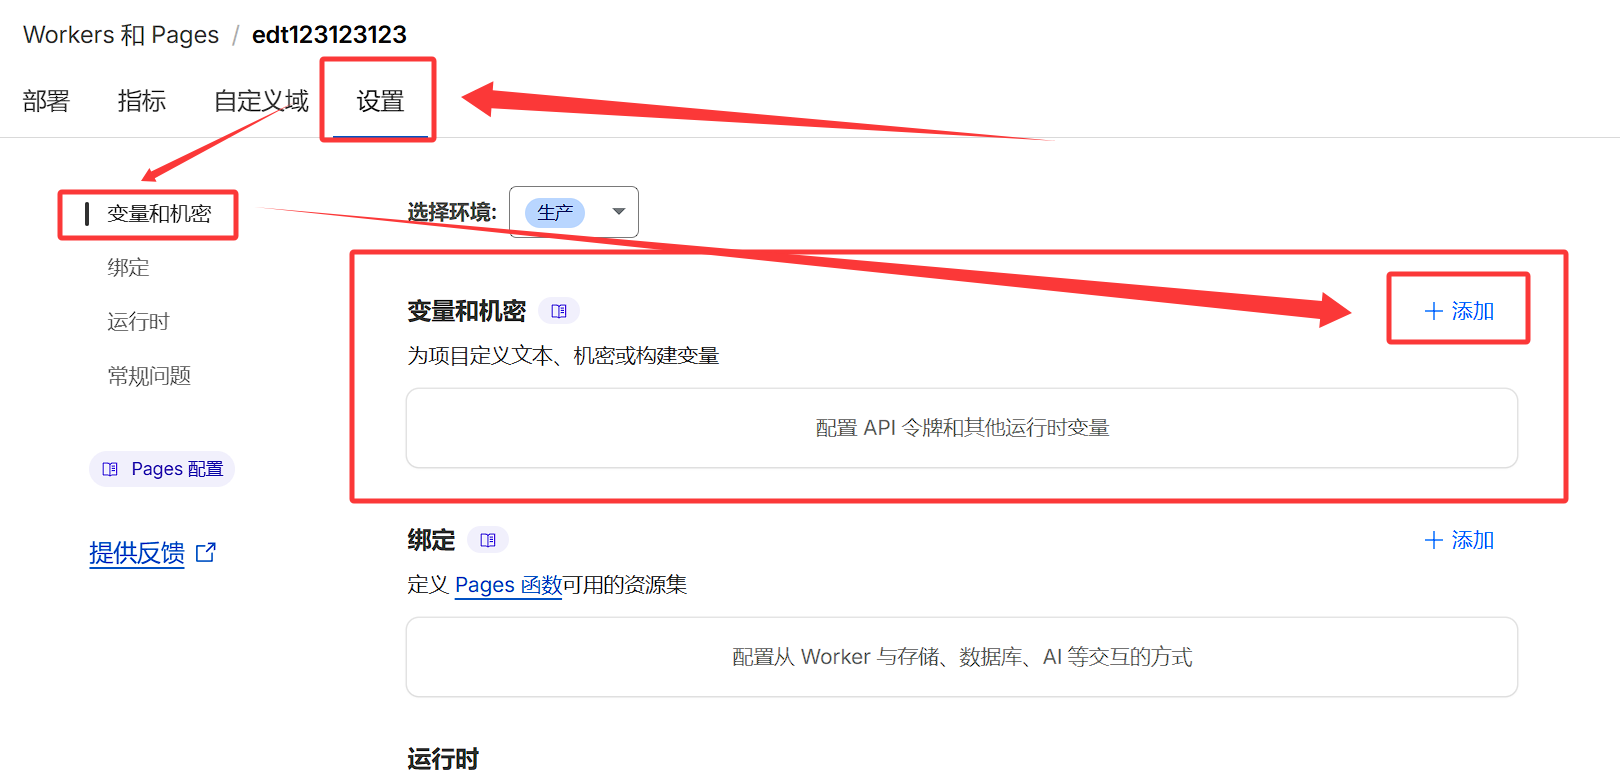
点击
+ 添加,类型文本变量名称ADMIN变量,变量值为WebUI管理员密码,建议设置复杂密码,避免被暴力破解;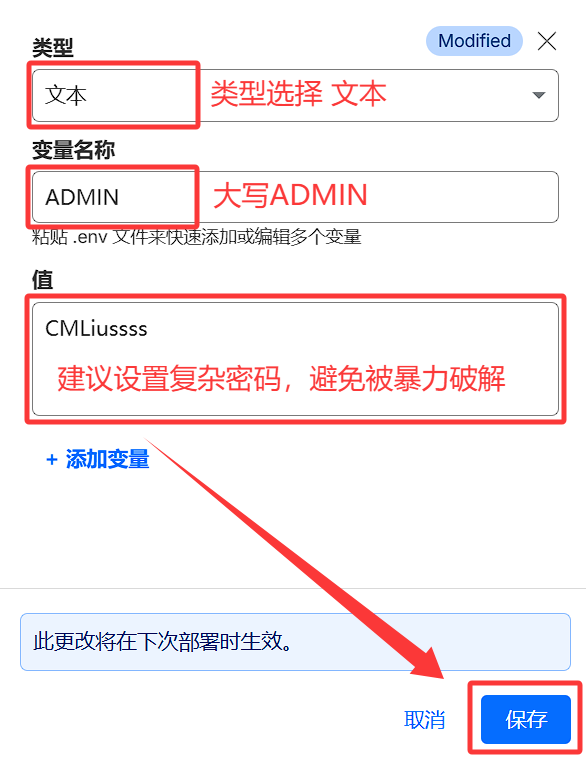
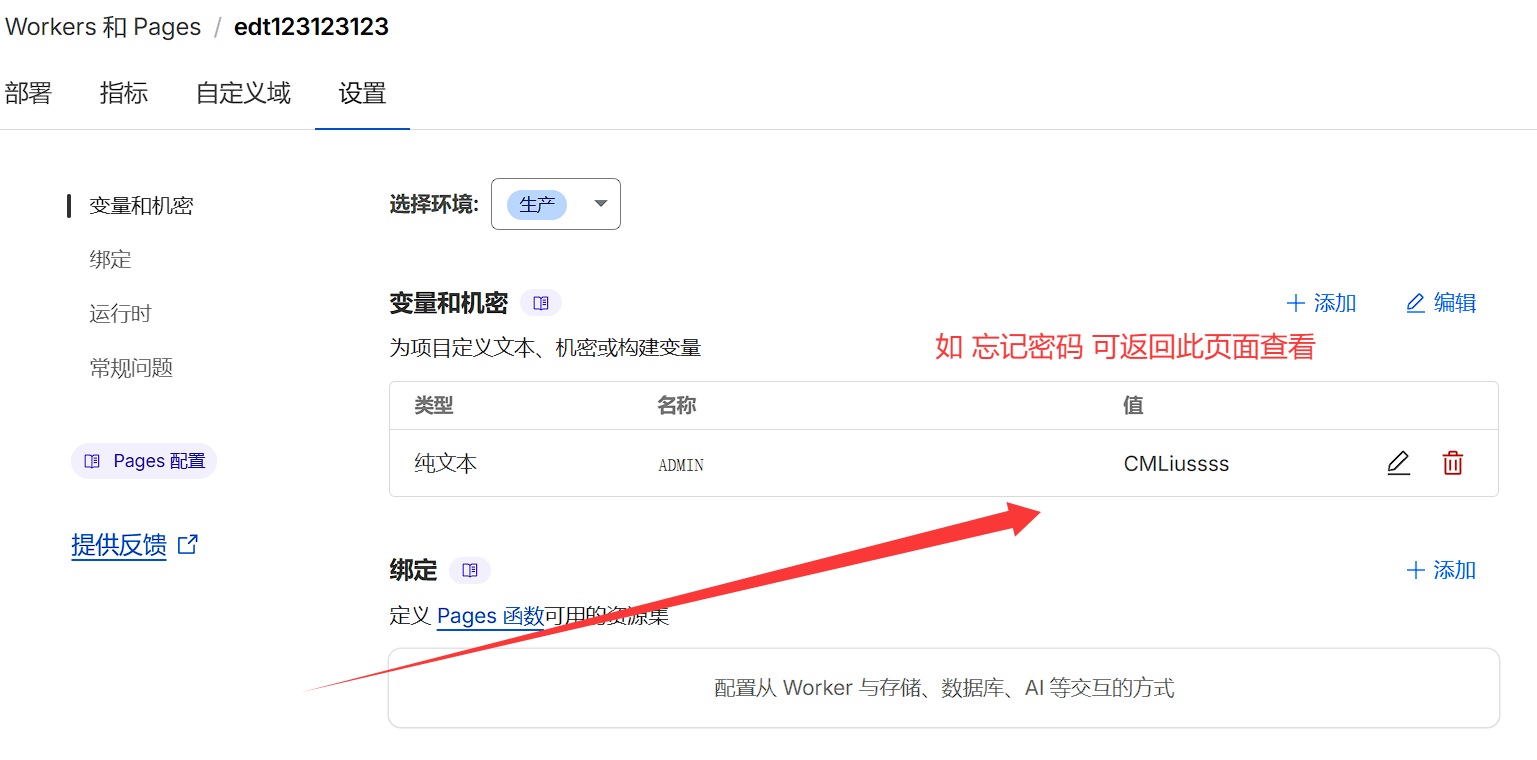
变量即可设置完成,如忘记密码可返回此页面查看
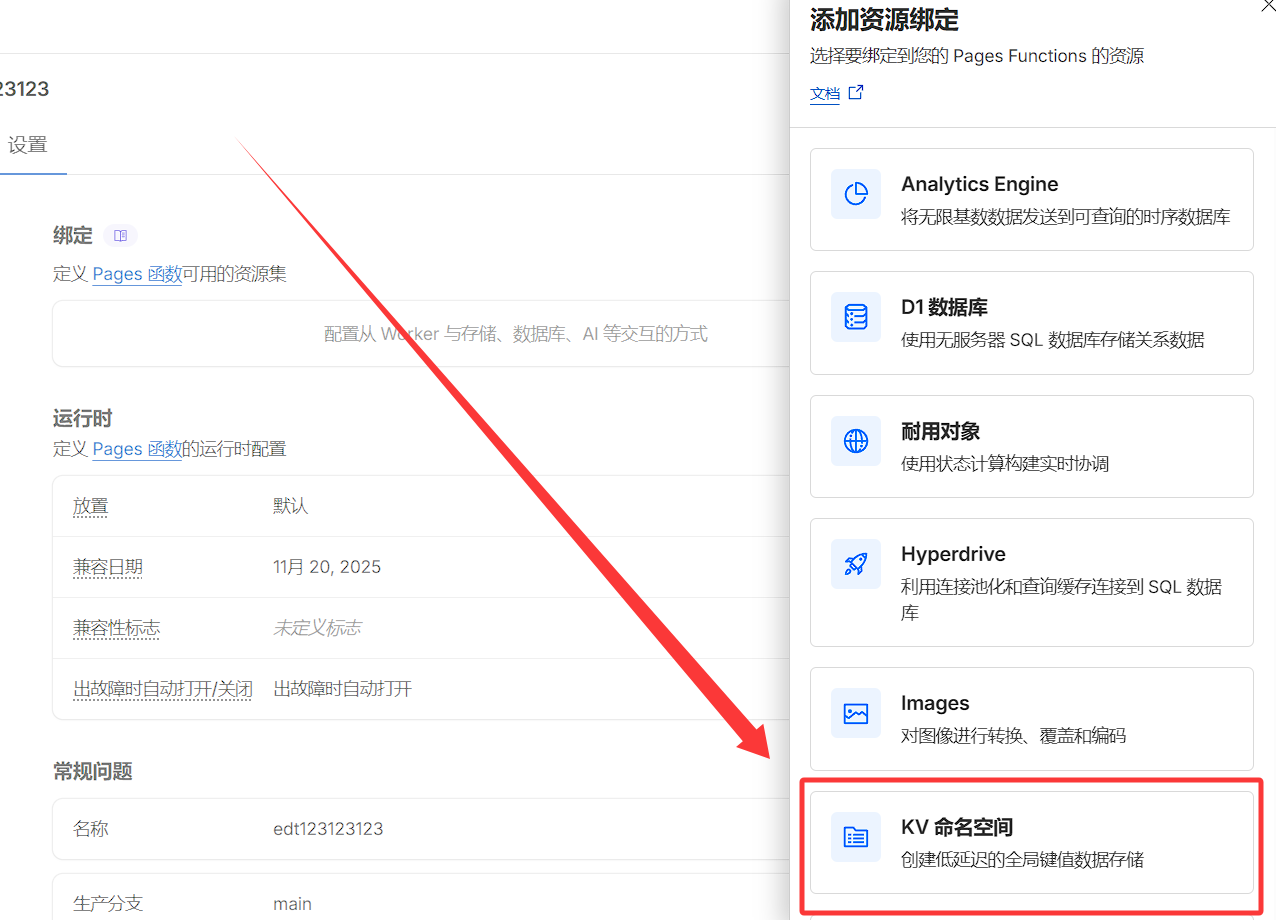
3️⃣ 绑定 KV 命名空间
点击
存储和数据库>Workers KV>+ Create Instance创建一个命名空间;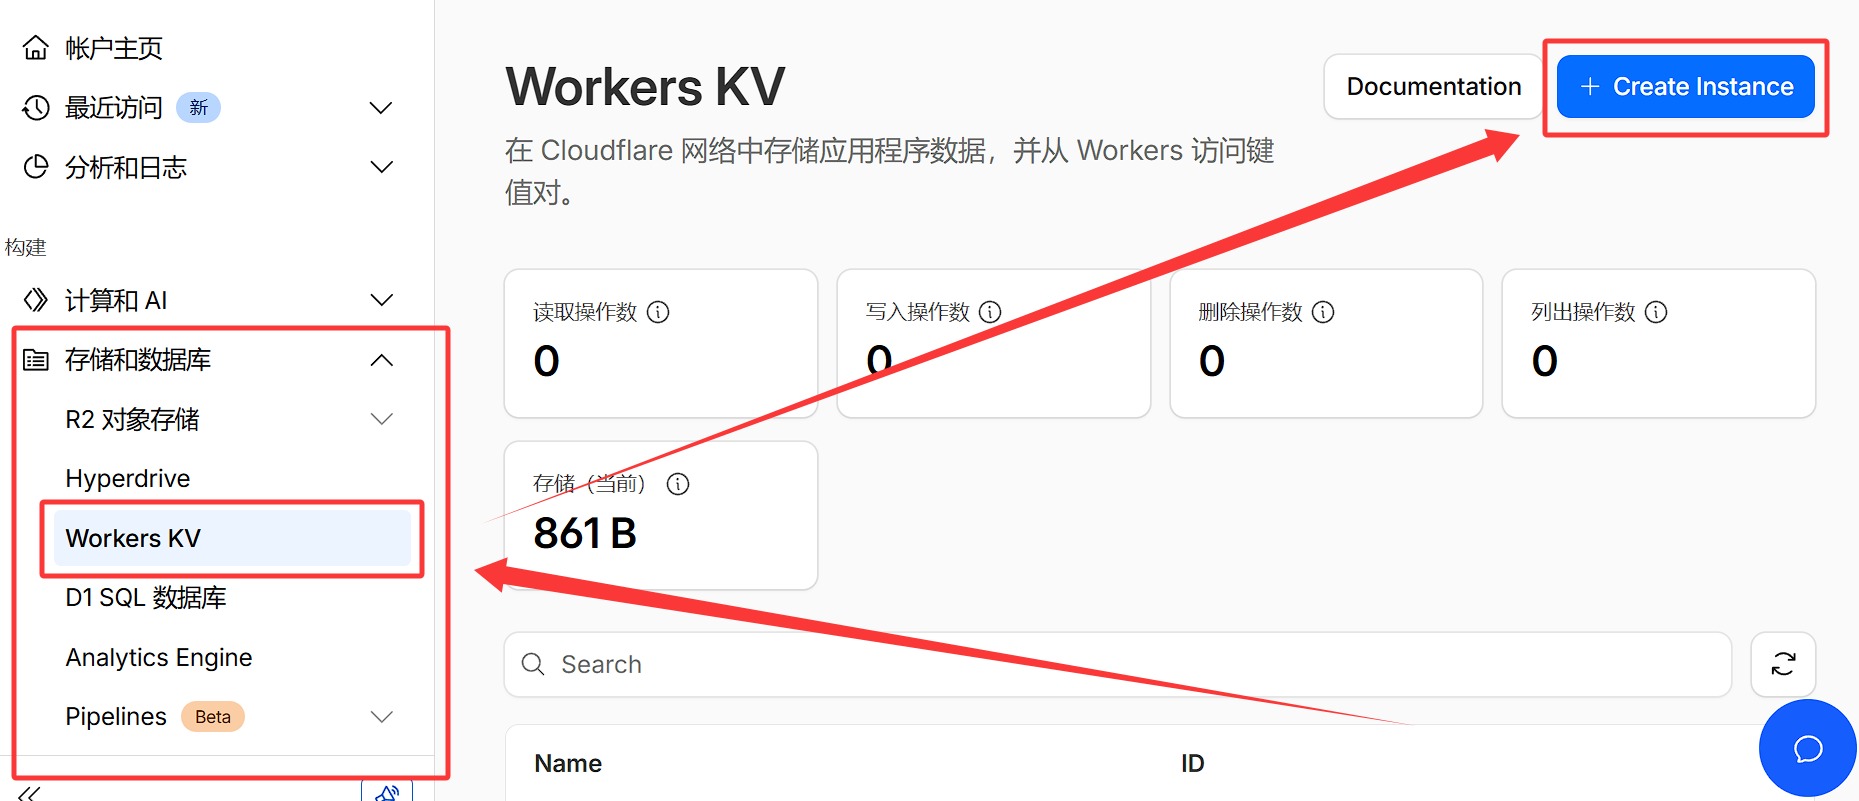
命名空间名称可自定义,建议命名为
EDT2以便区分,点击创建完成创建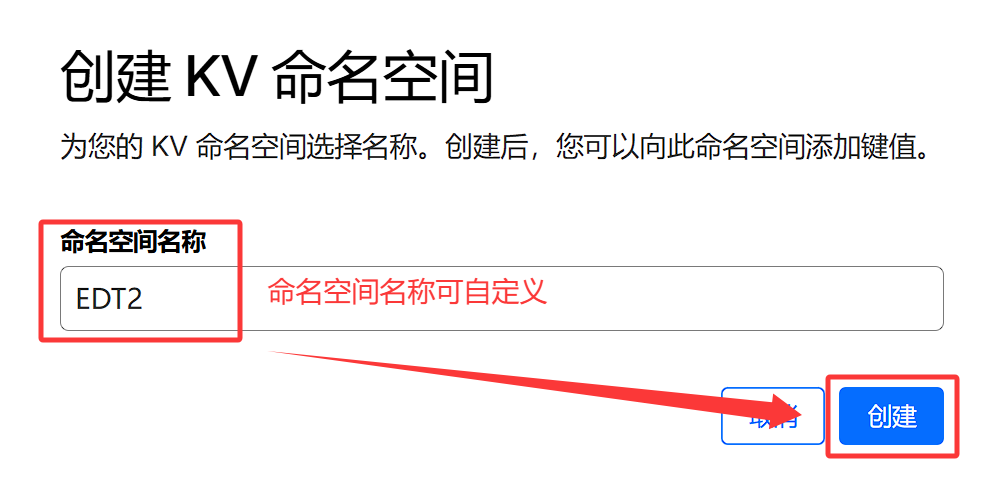
返回项目设置页面,点击
设置>绑定>+ 添加>KV 命名空间;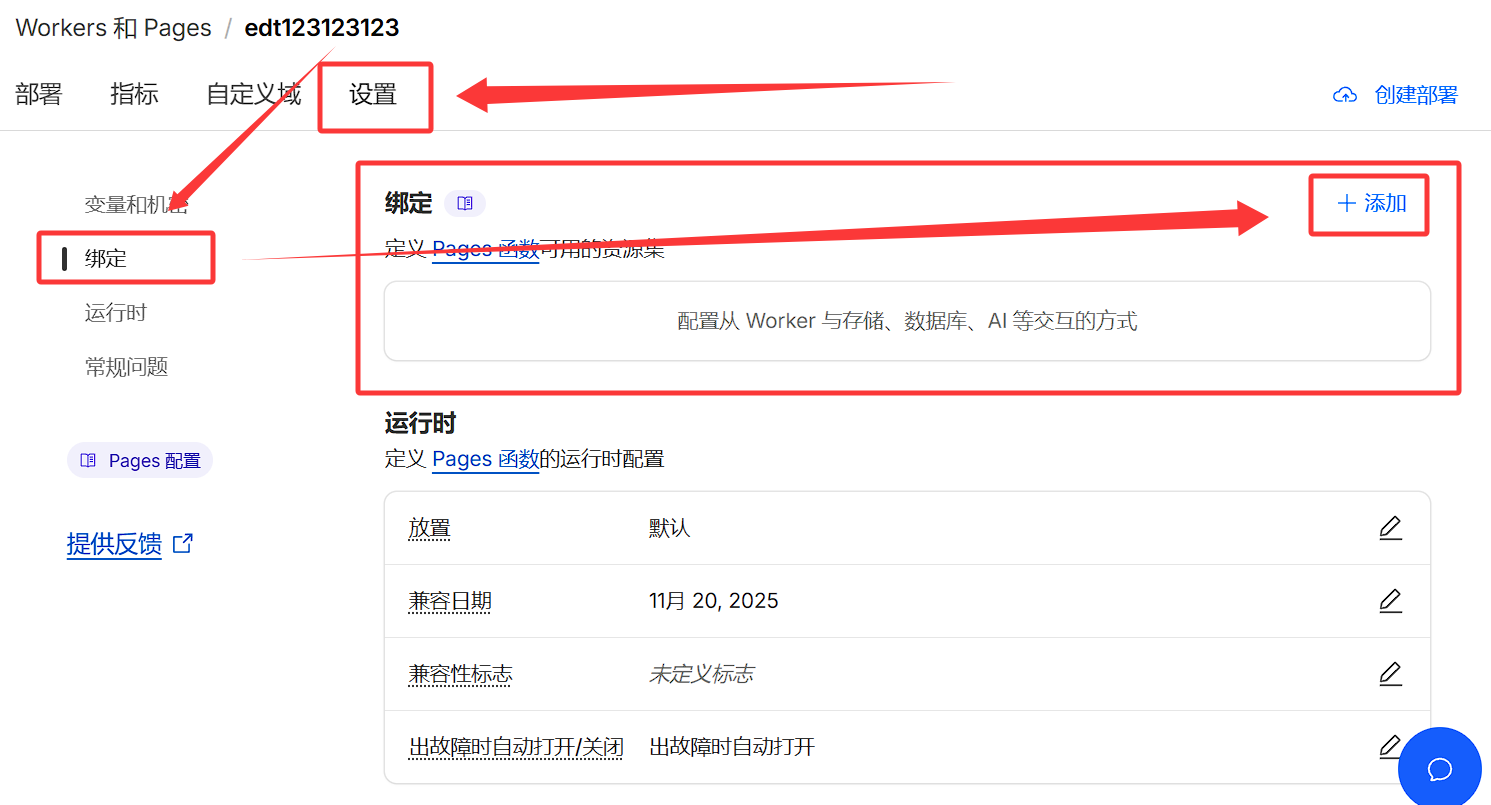
变量名称必须填写大写 KV ,命名空间选择刚刚创建的
EDT2,点击保存完成绑定;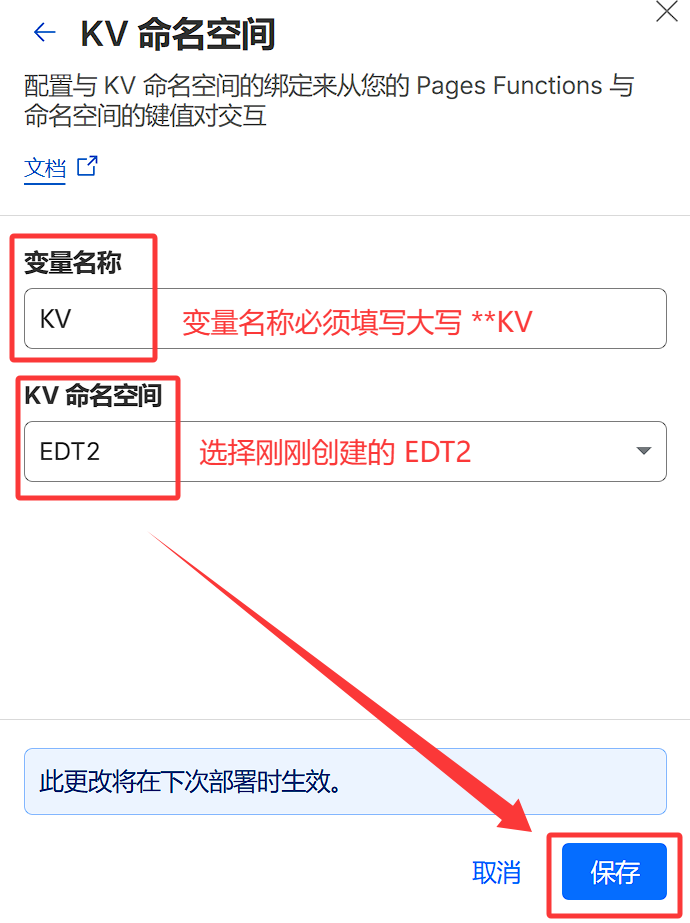
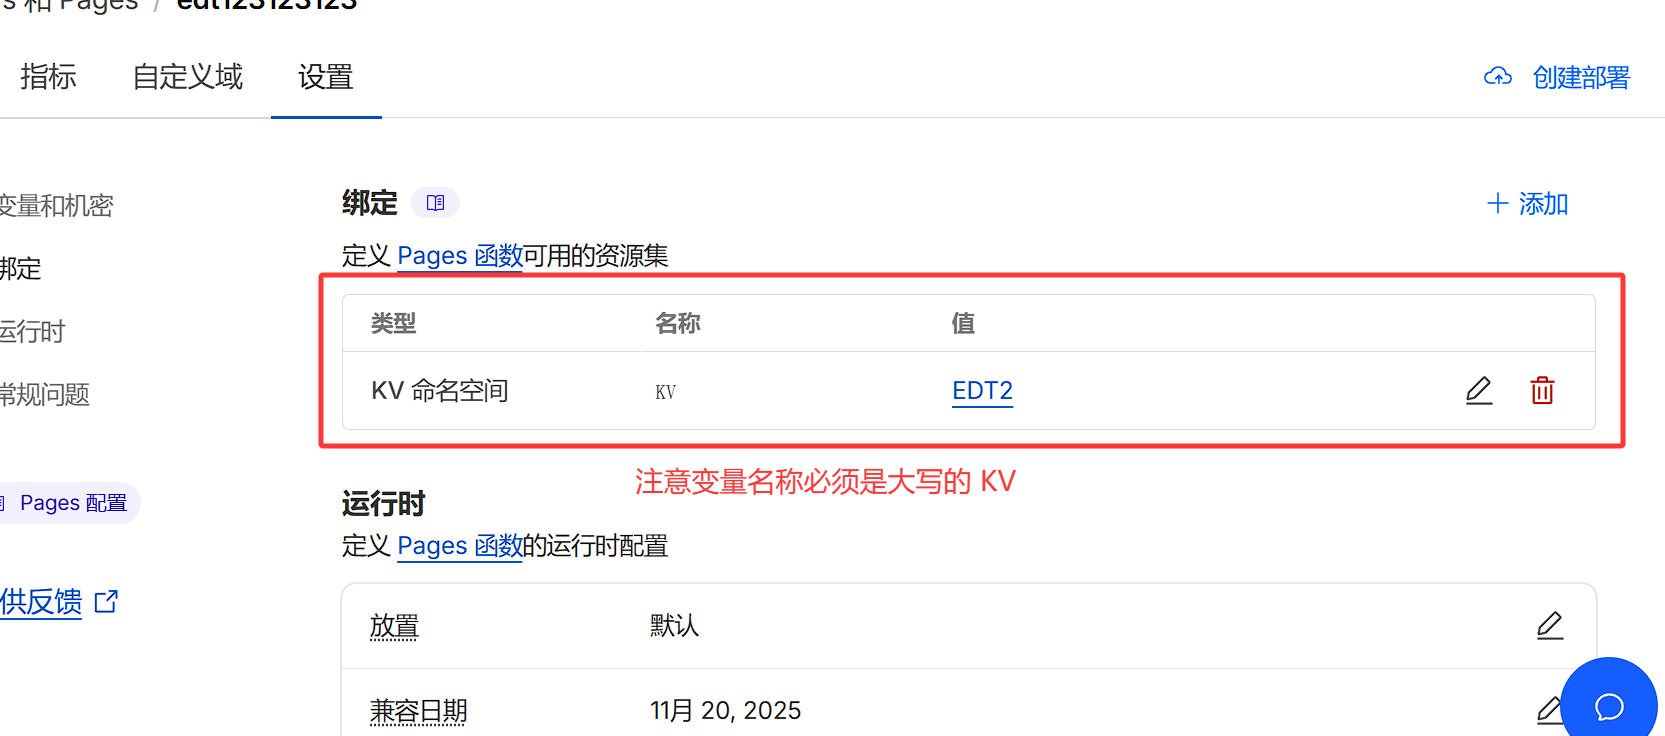
返回项目设置页面,确认绑定成功;
4️⃣ 重试部署,使其变量生效!
点击 edgetunnel-main.zip 下载最新版本项目压缩包备用;
点击右上角
创建部署,上传上一步刚刚下载的edgetunnel-main.zip压缩包;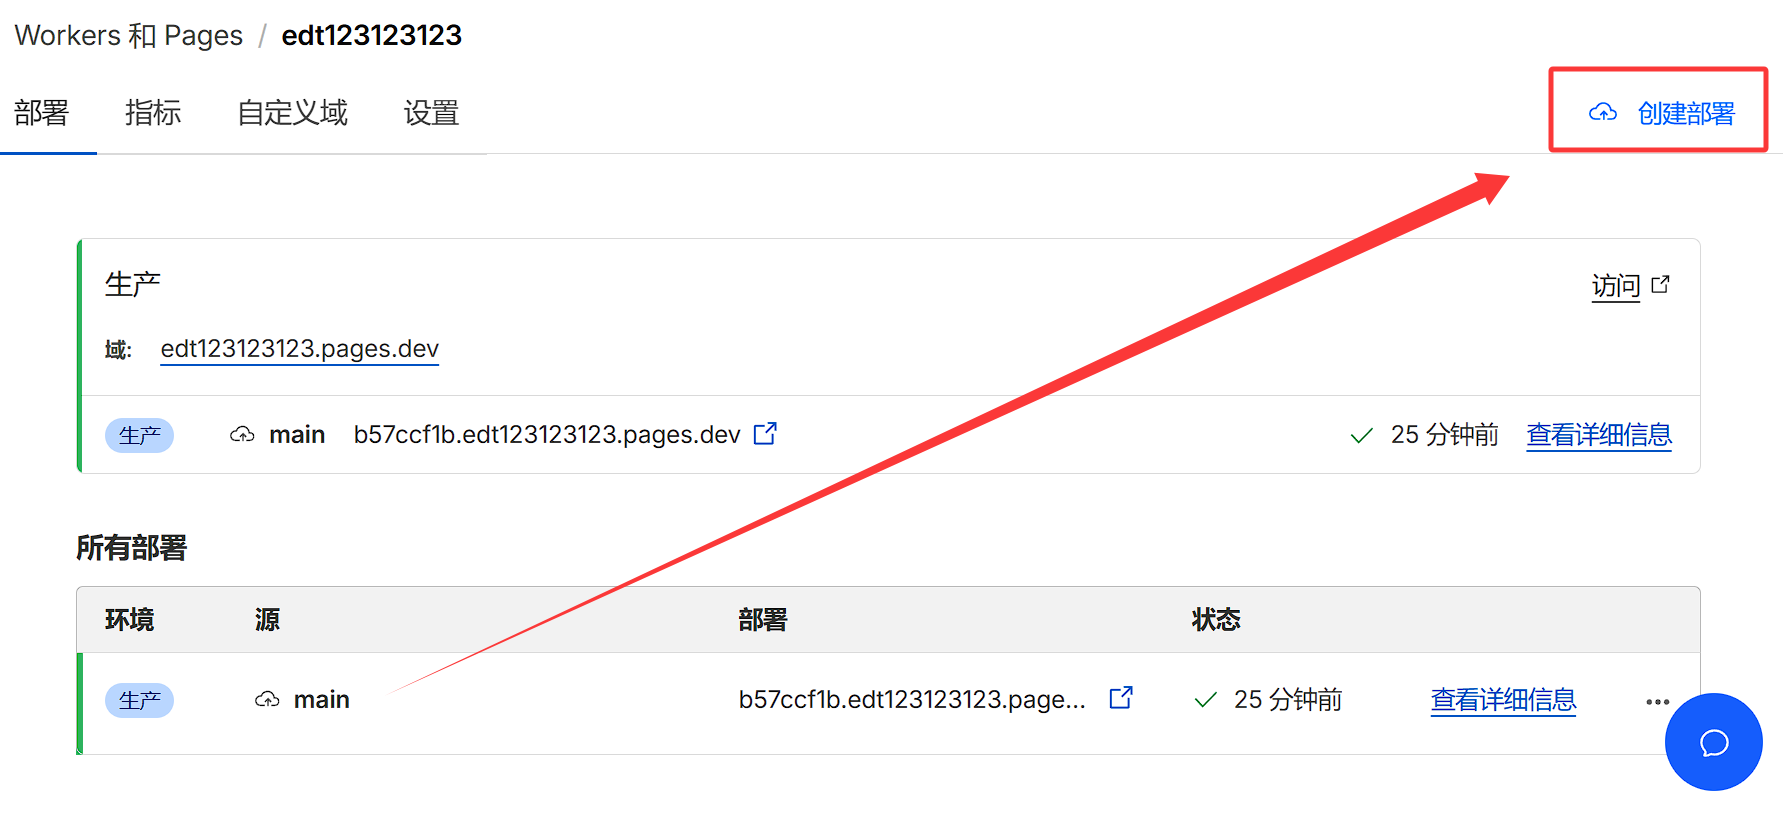
部署环境选择
生产,点击从计算机中选择>上传压缩文件,选择第一步下载的edgetunnel-main.zip压缩包,等待上传完成;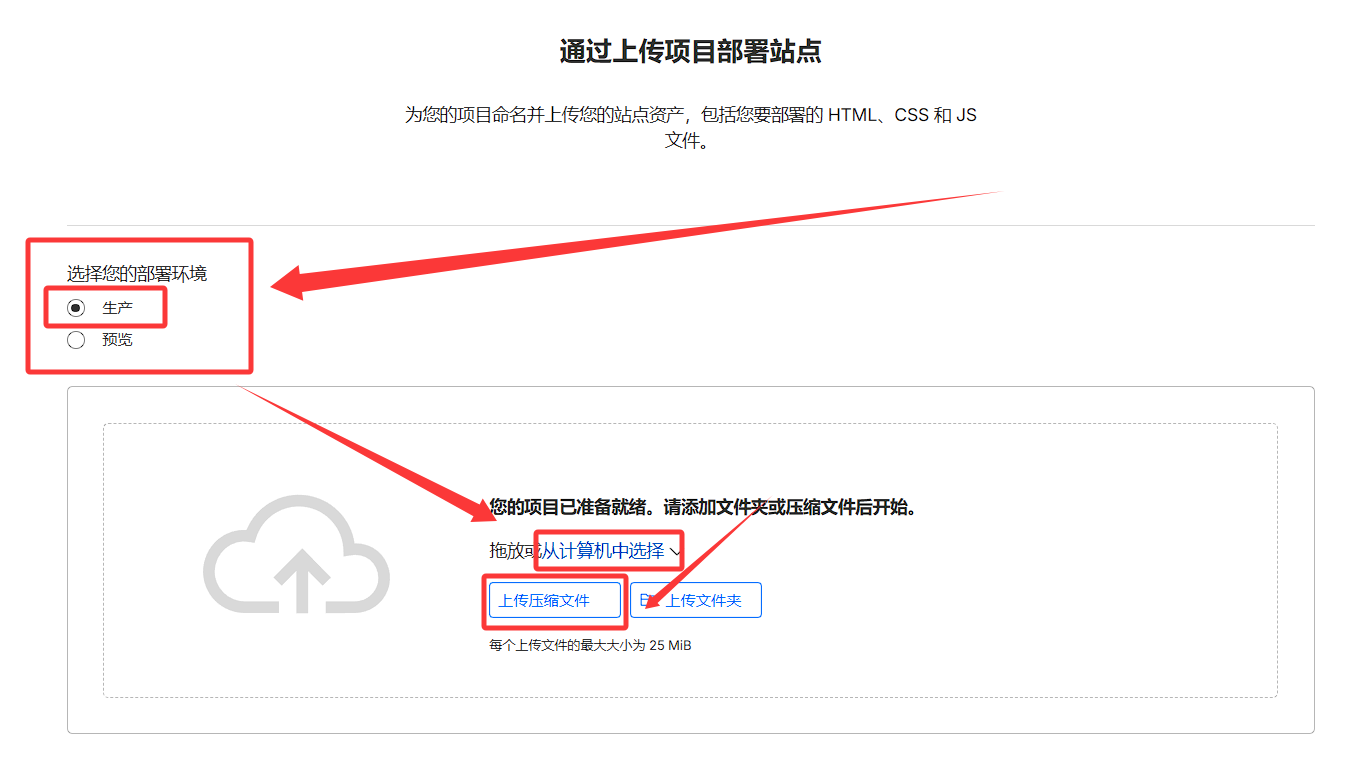
点击
保存并部署,等待部署完成;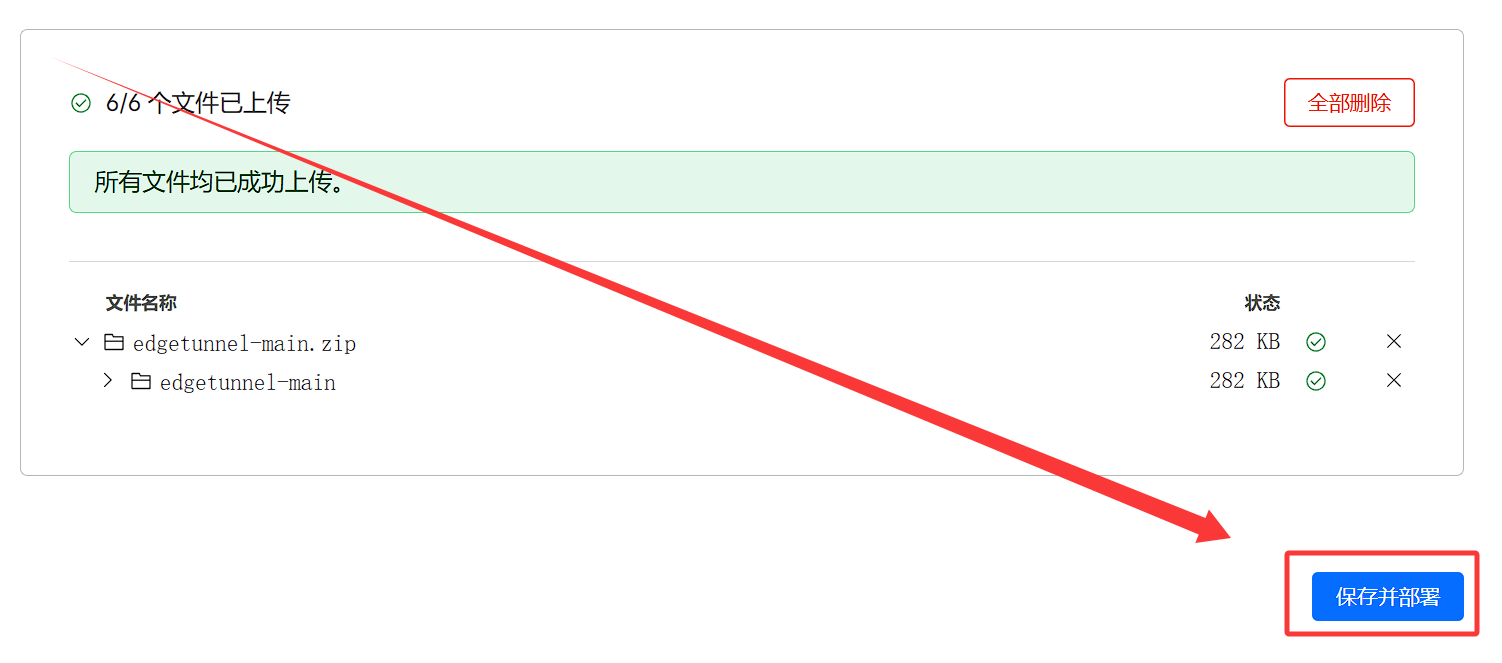
- 注意:如需修改管理员密码,修改完变量之后必须重新上传部署,否则变量无法生效!
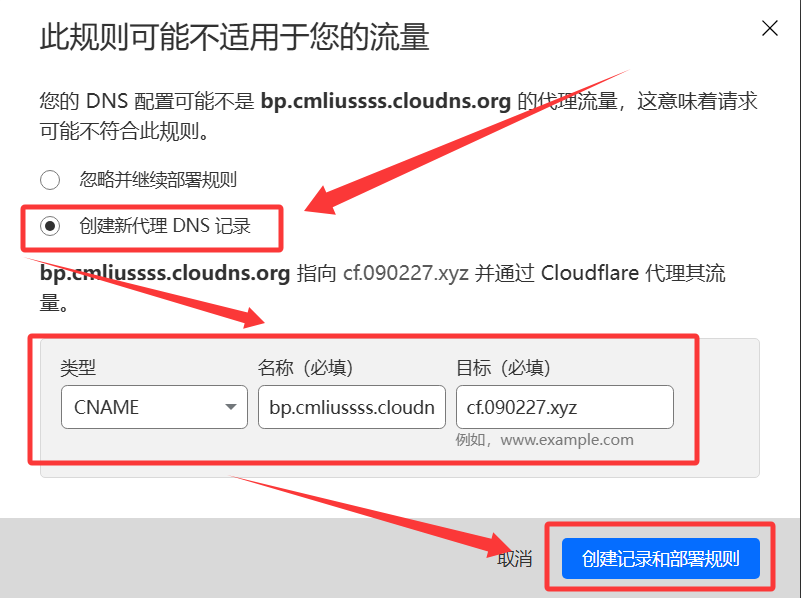
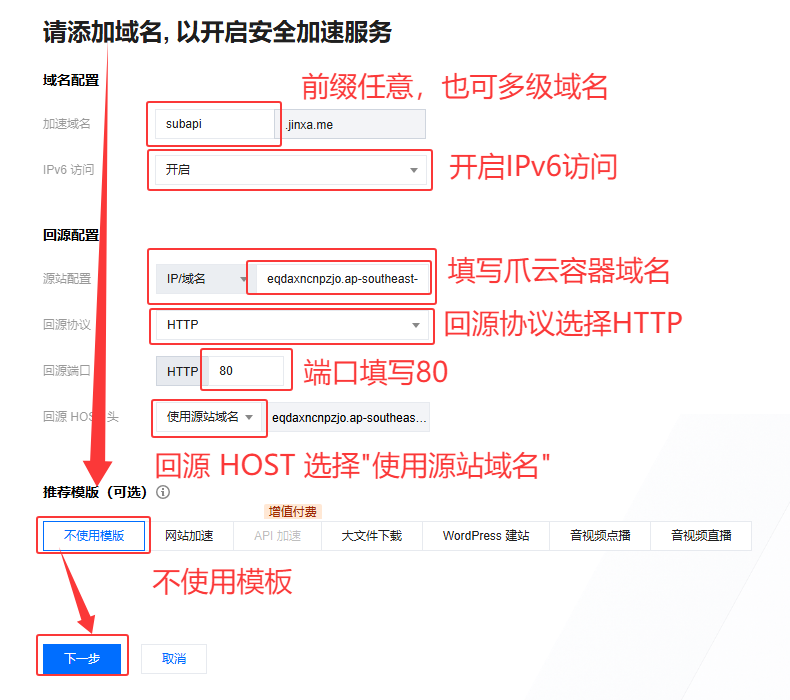
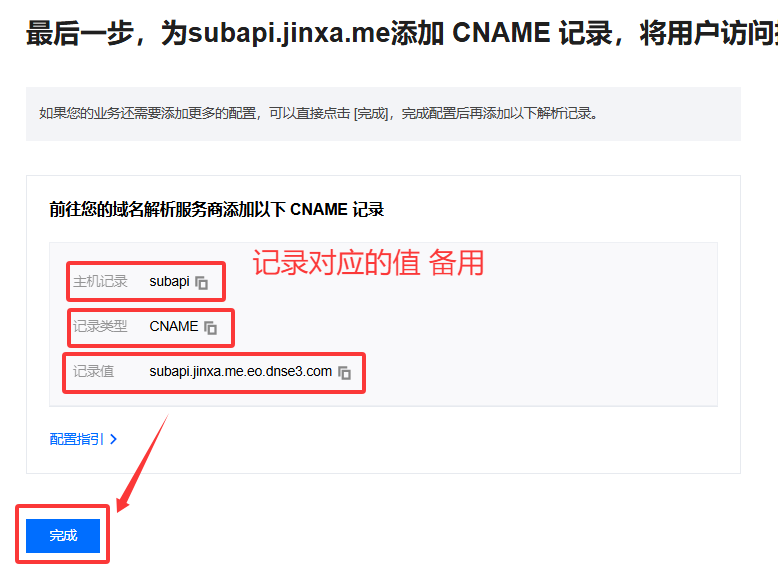
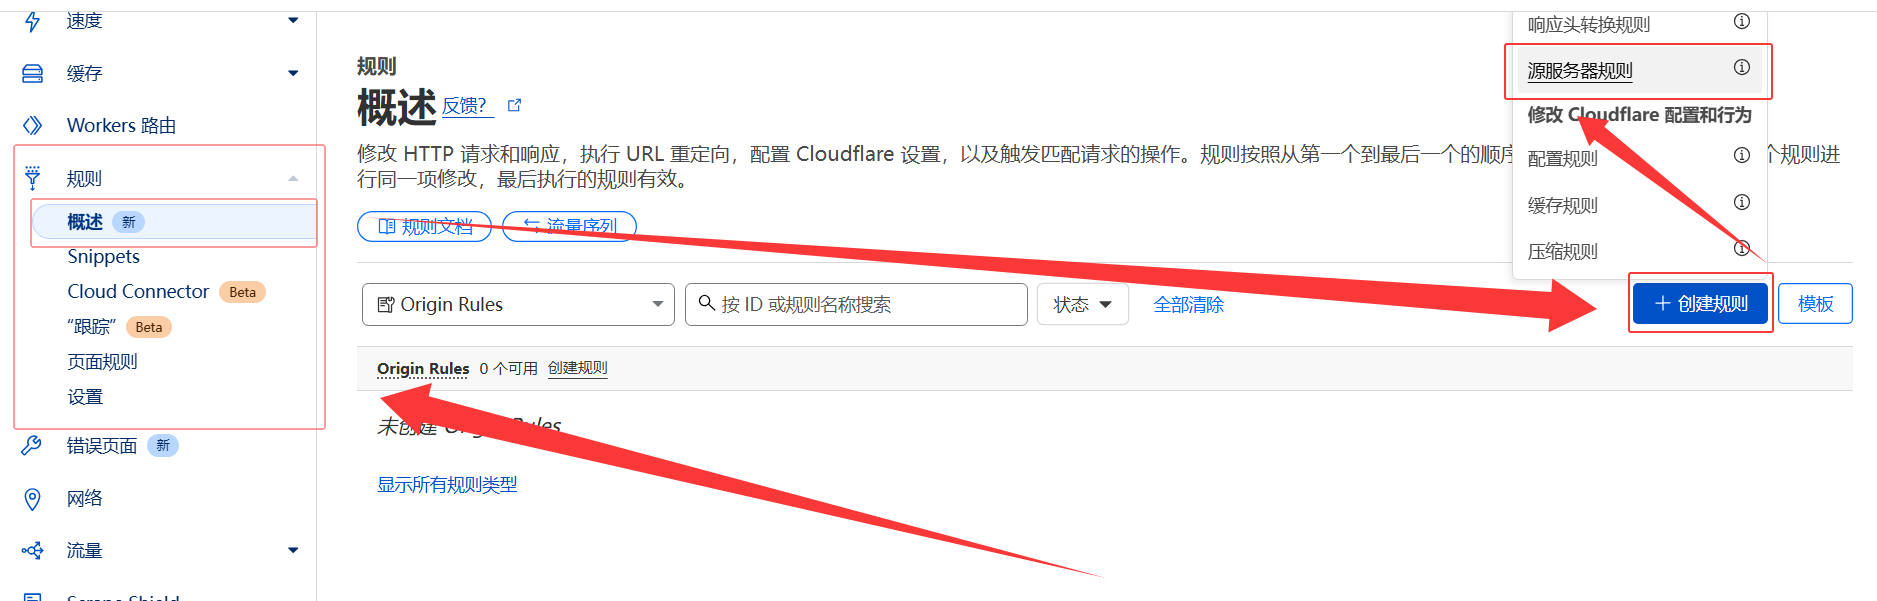
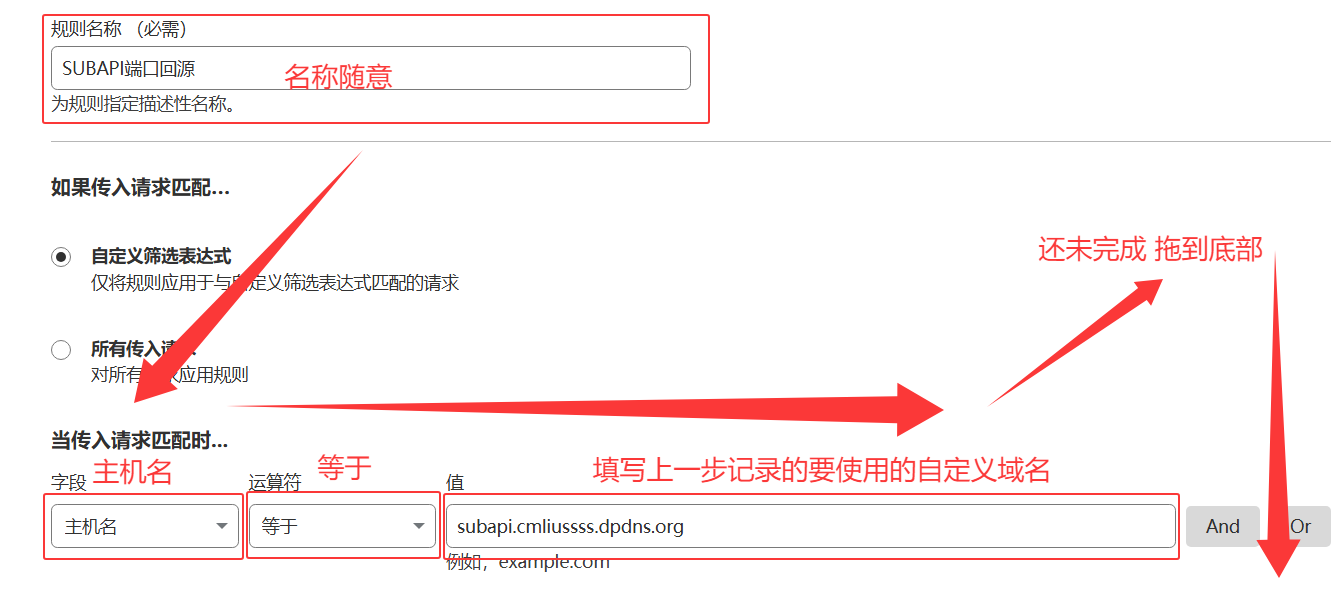
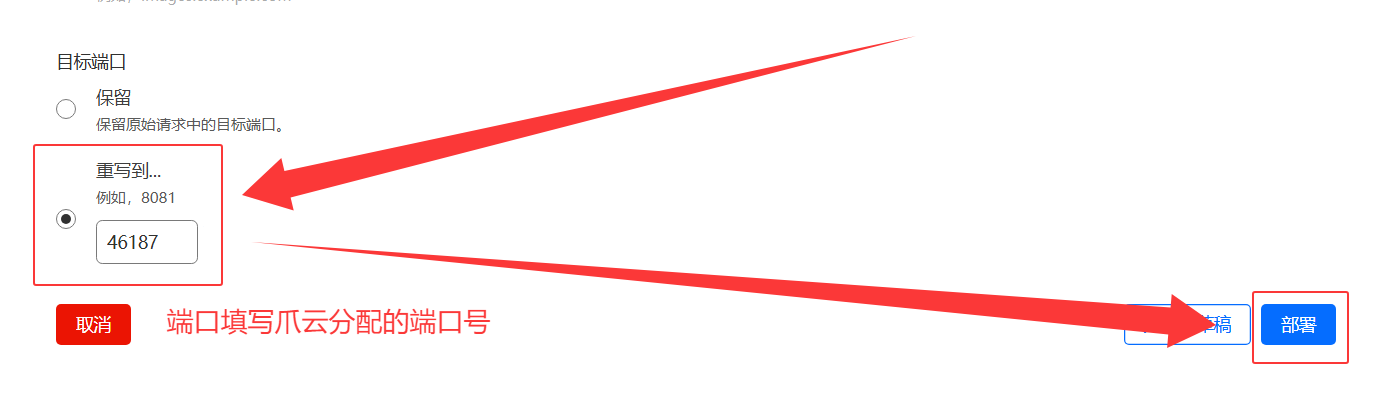
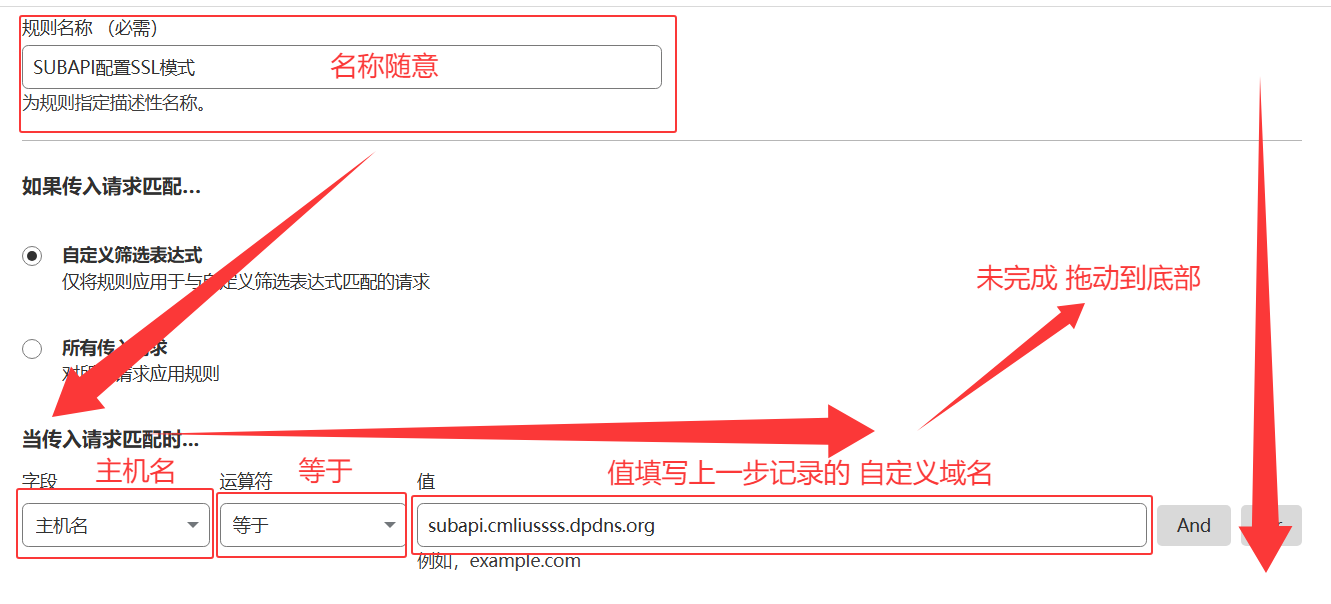
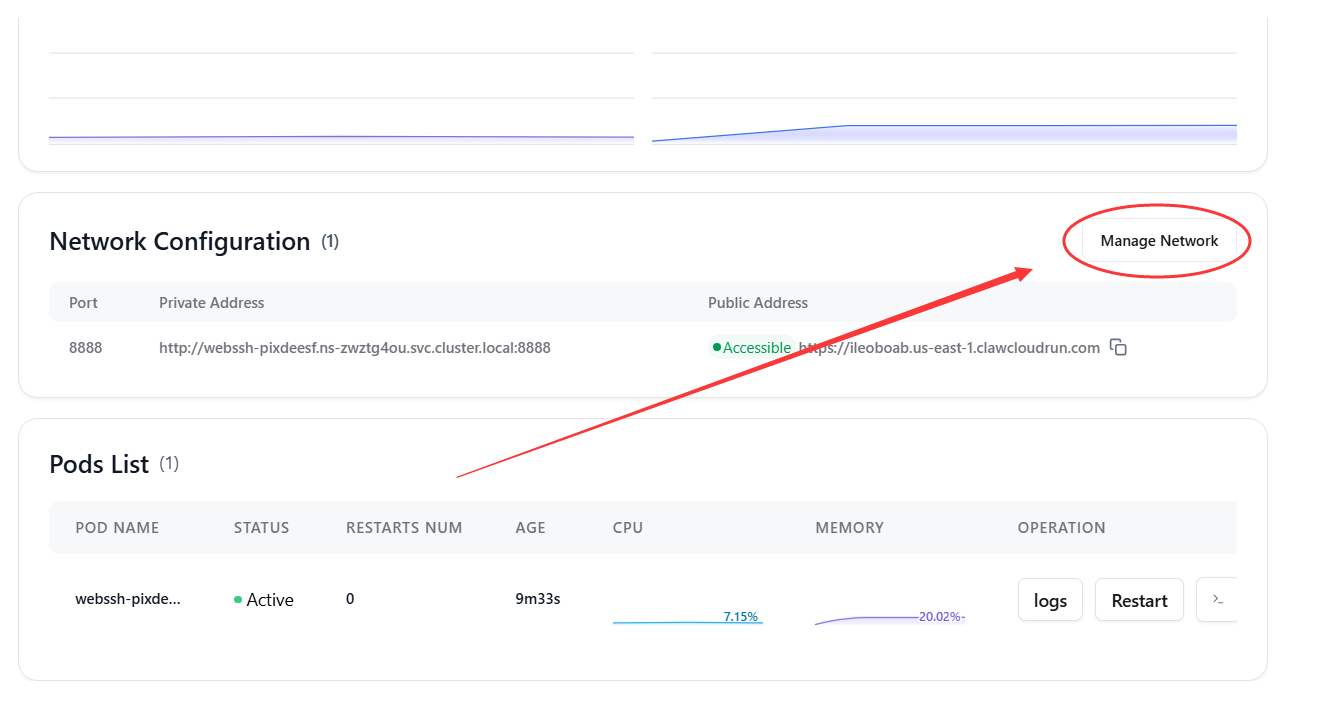
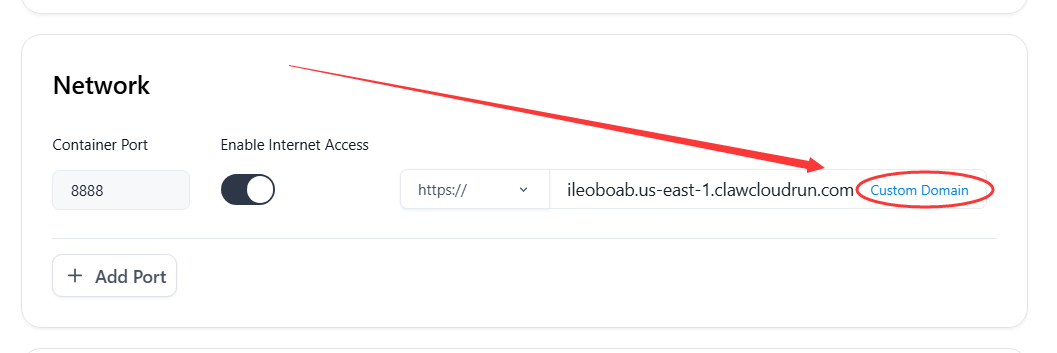
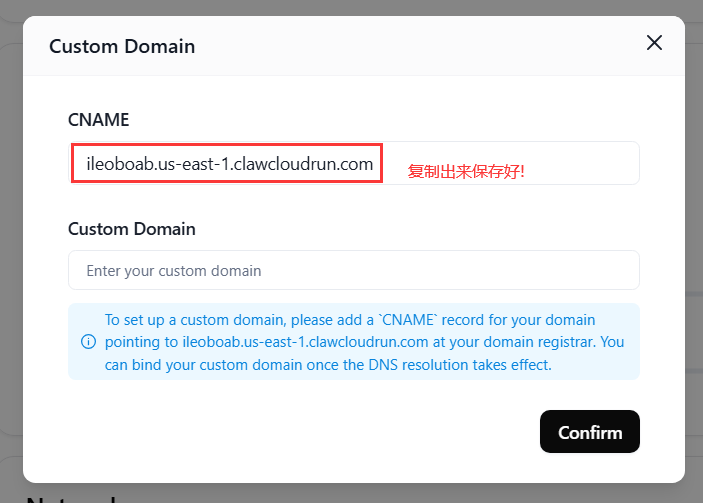
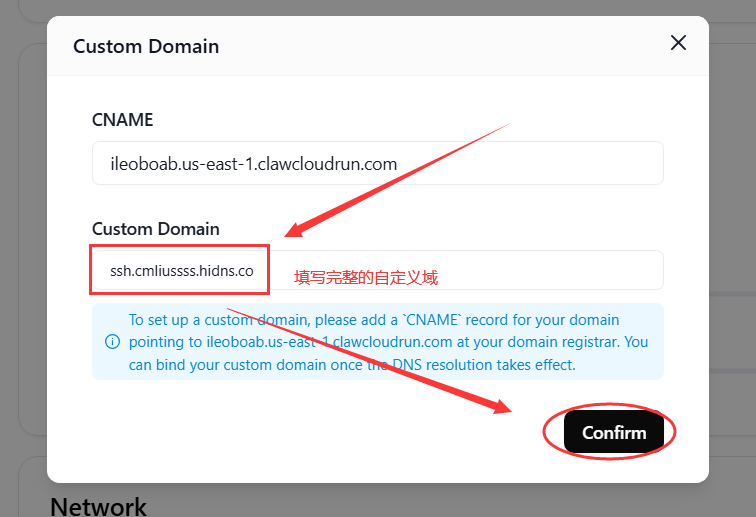
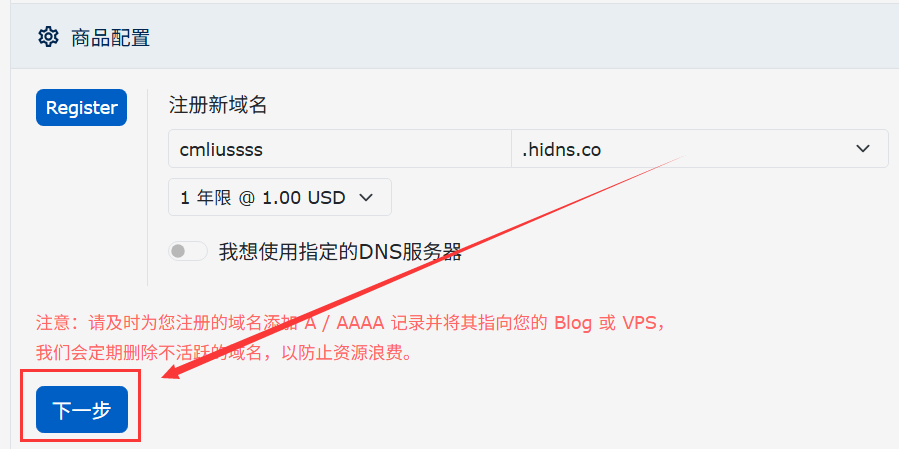
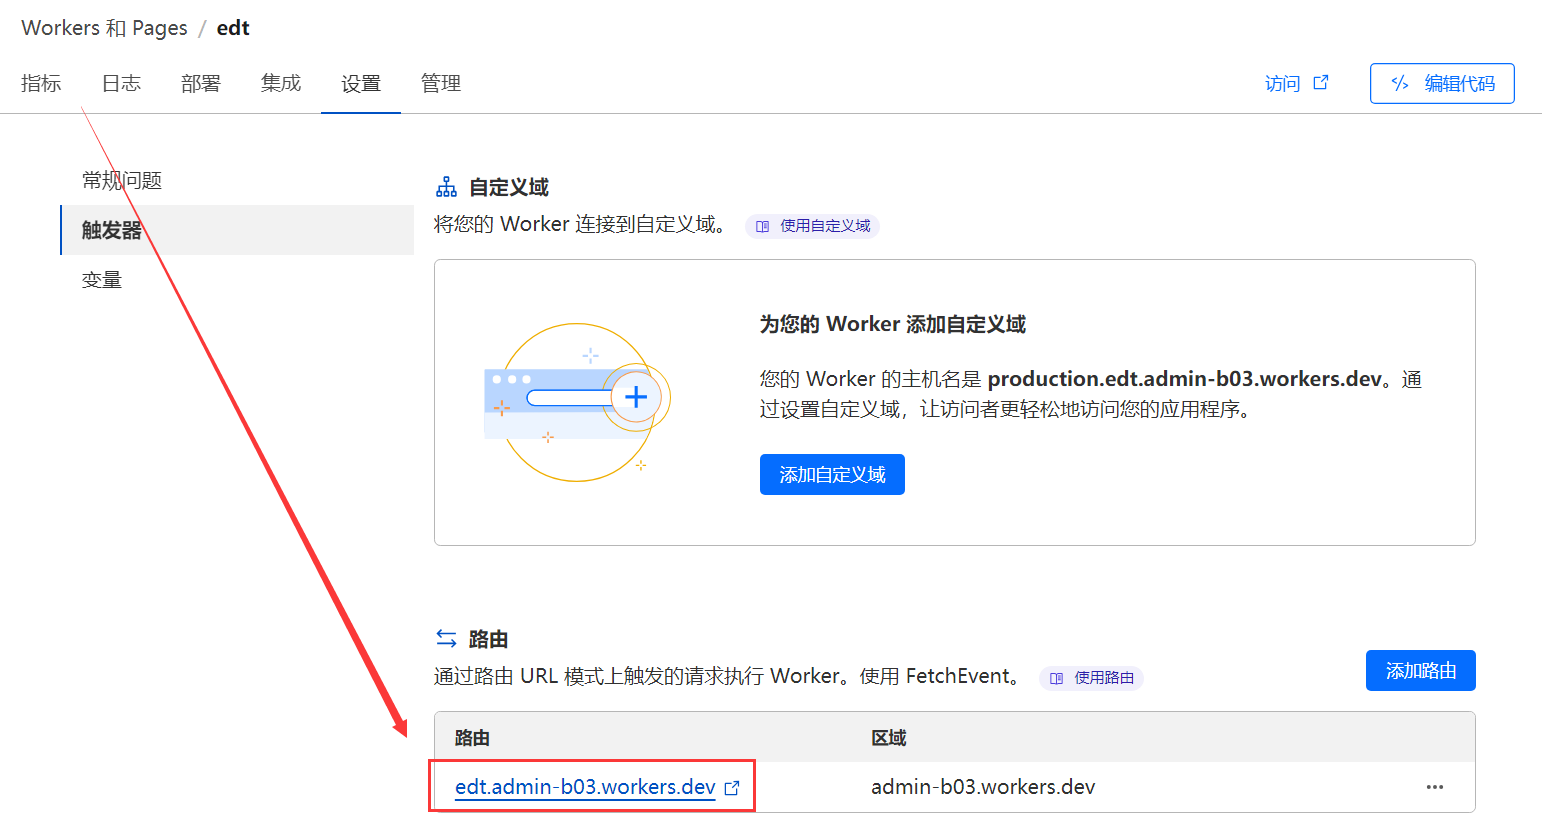
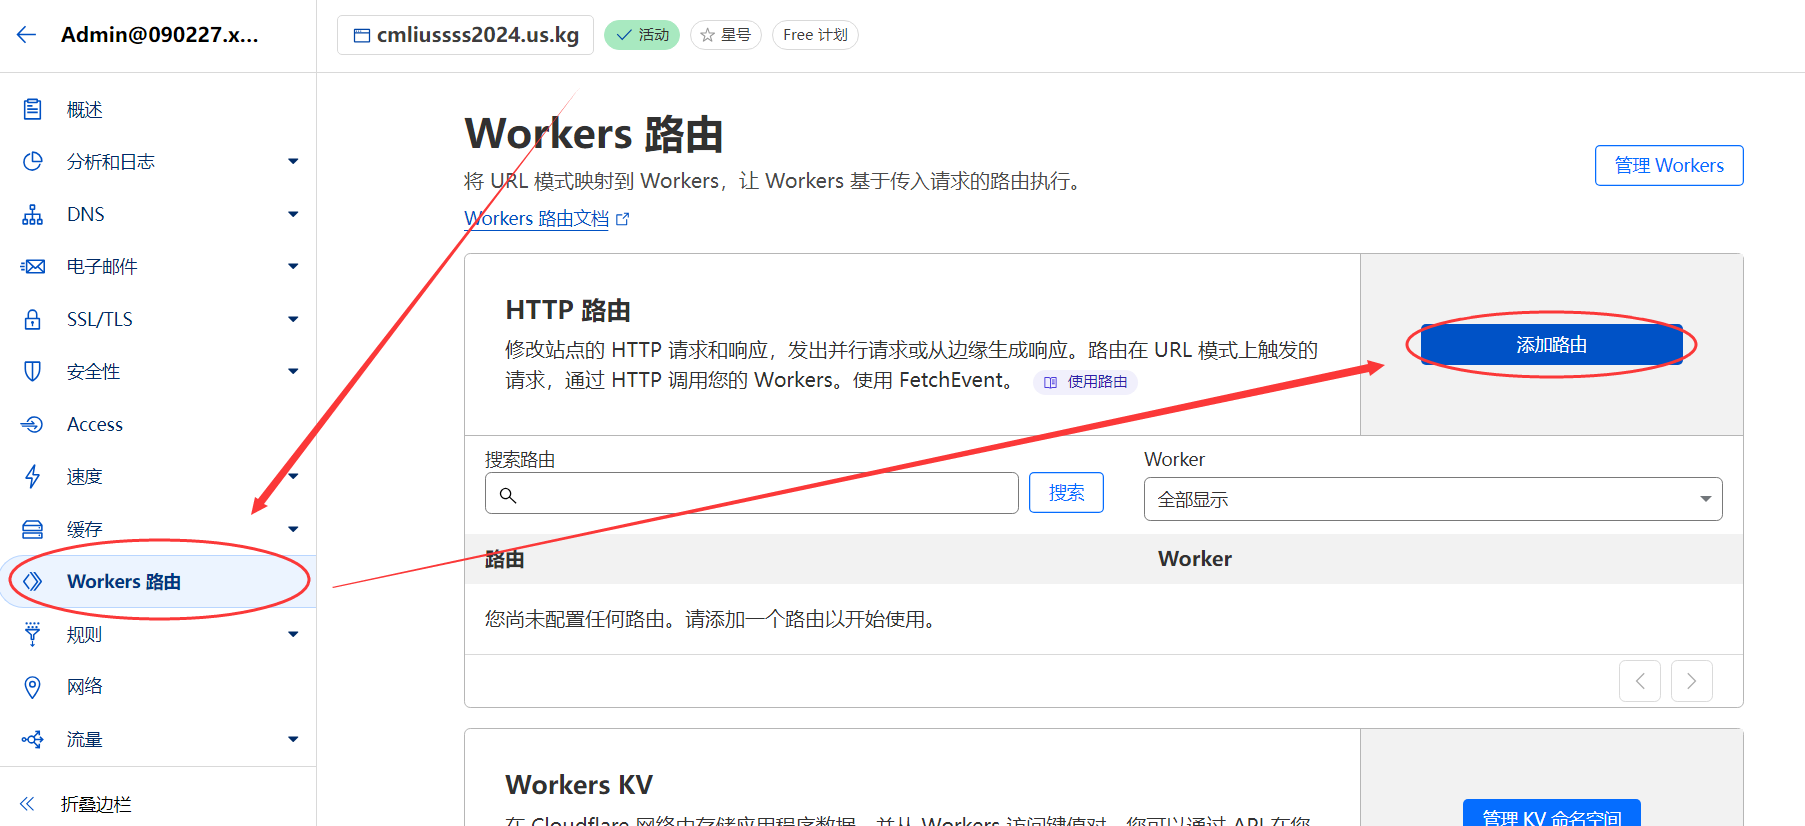
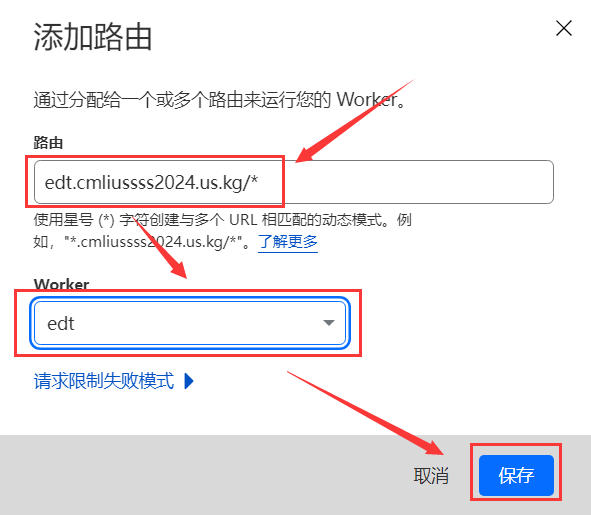
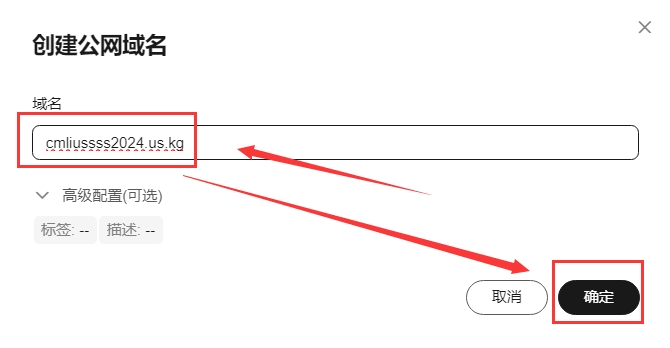
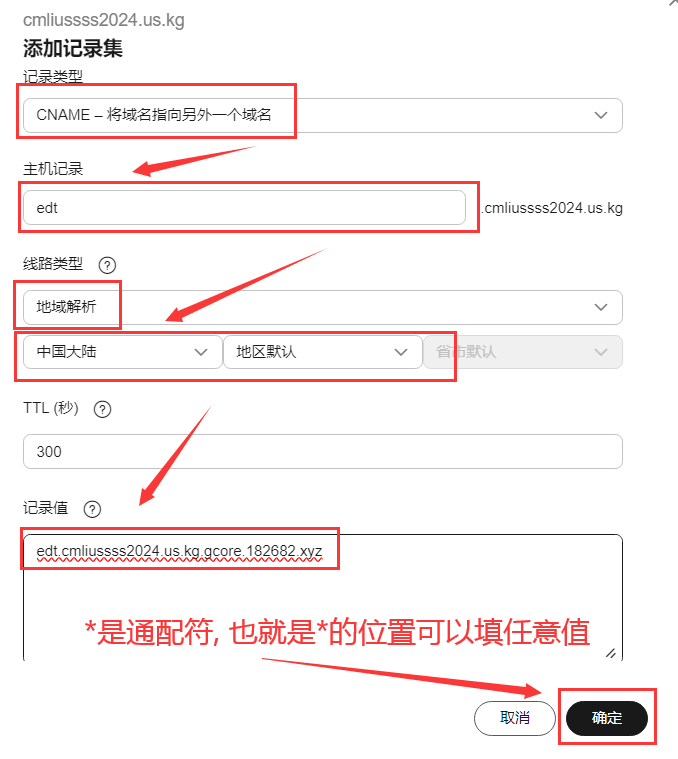
5️⃣ 绑定 自定义域名
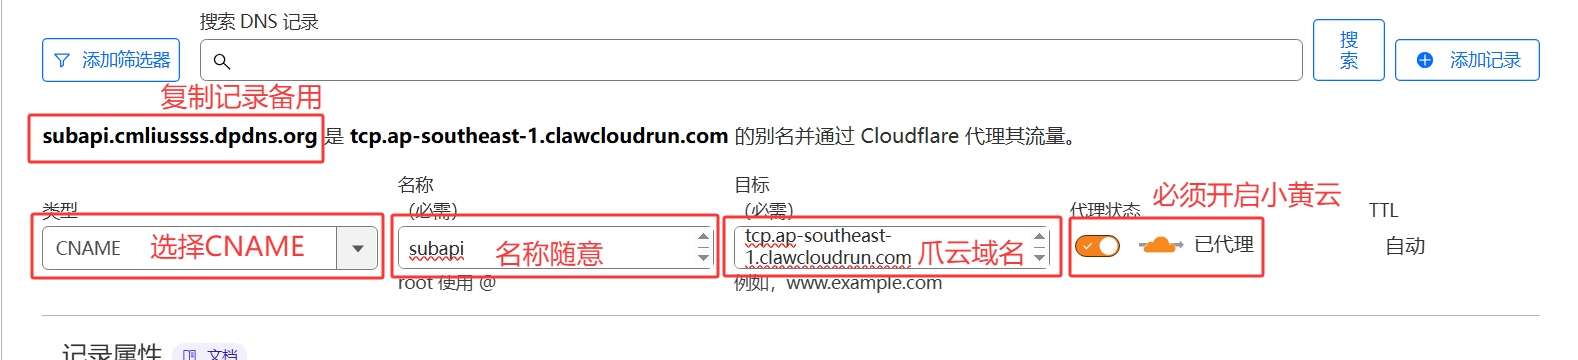
- 可免费注册的CNAME域名
- DNSHE:https://www.dnshe.com/ 部分域名可托管CF,邀请码:
CY483A4A4B - DigitalPlat: https://domain.digitalplat.org/ 部分域名可托管CF
- ClouDNS:https://www.cloudns.net/index/lang/chs
- dynv6:https://dynv6.com/
- ZoneABC:https://zoneabc.net/
- DNSHE:https://www.dnshe.com/ 部分域名可托管CF,邀请码:
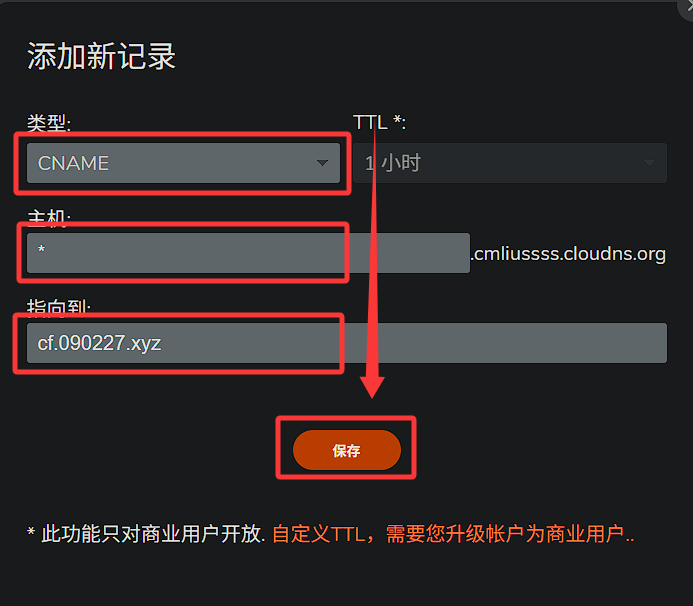
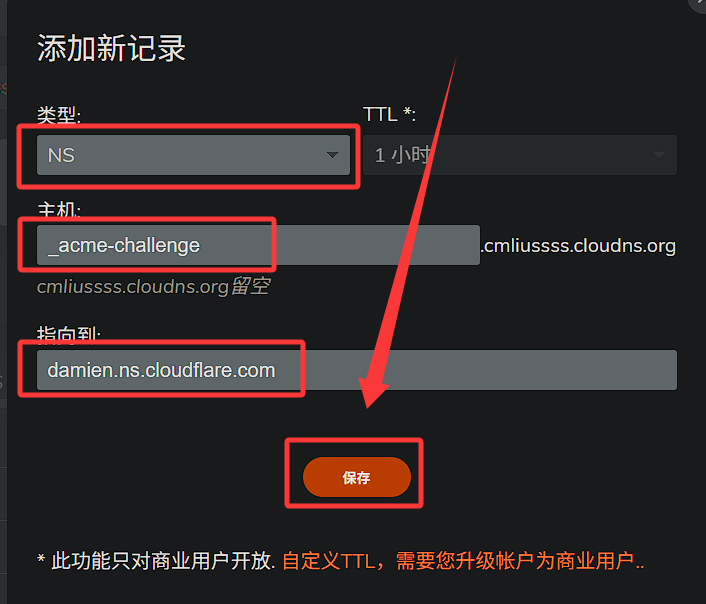
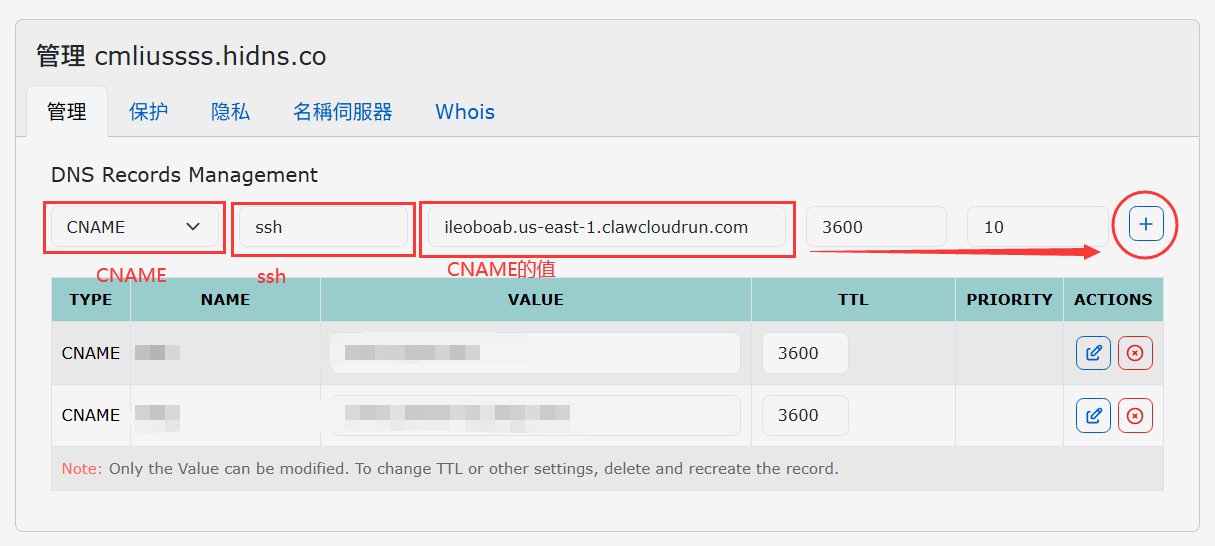
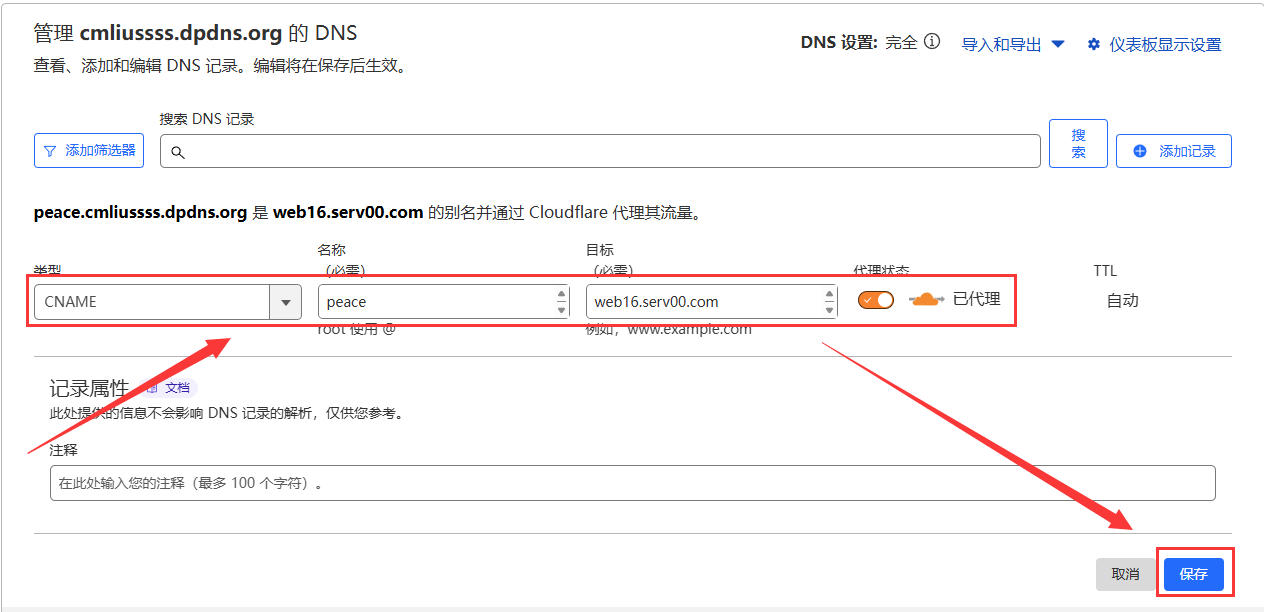
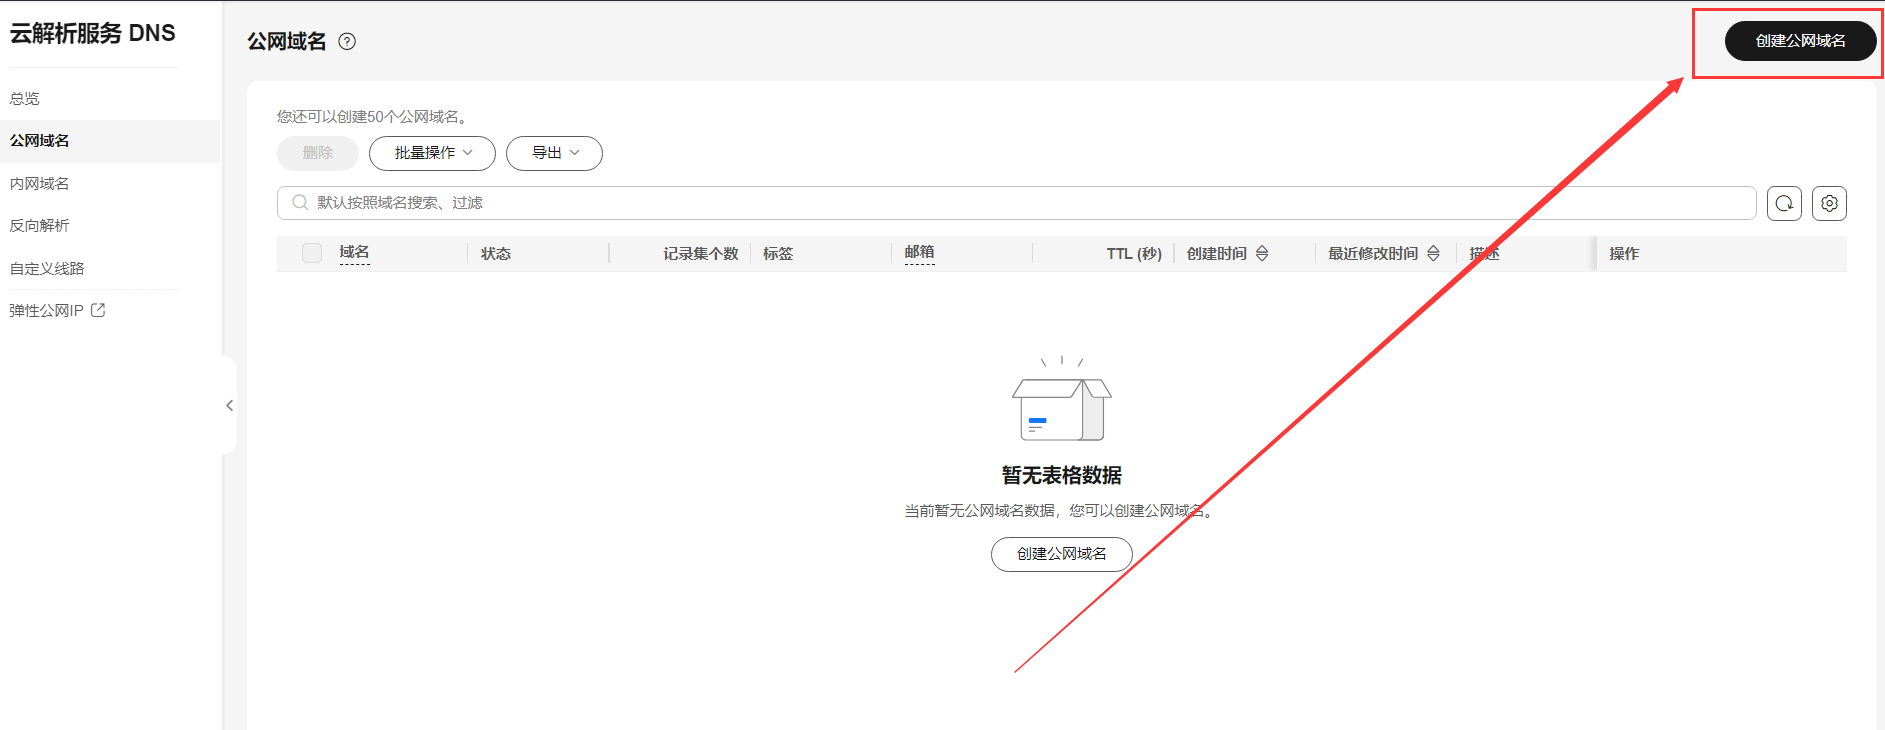
若无域名可使用以上免费域名注册商注册一个CNAME域名使用,图文教程使用ClouDNS域名演示:
进入 Pages 应用程序,点击
自定义域选项卡,点击设置自定义域;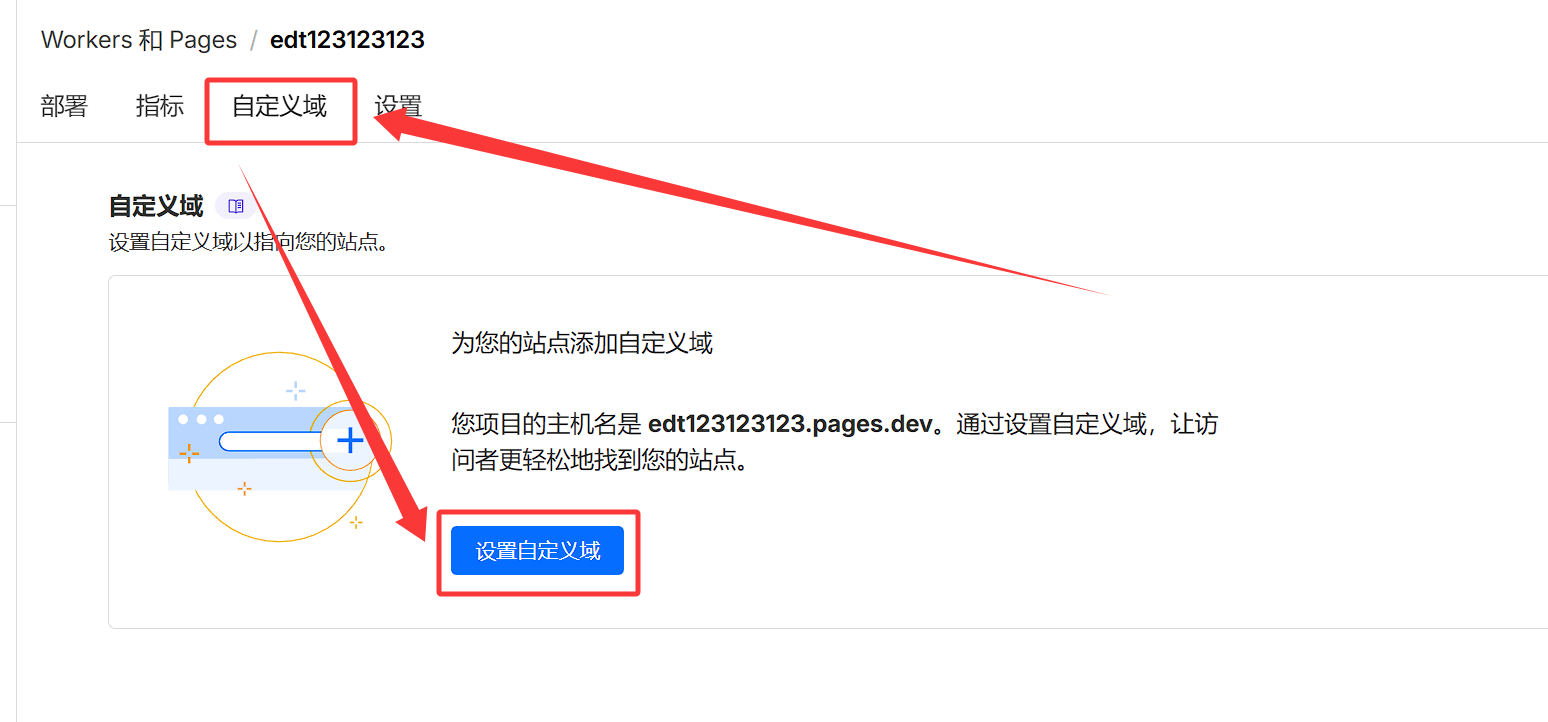
添加自定义域
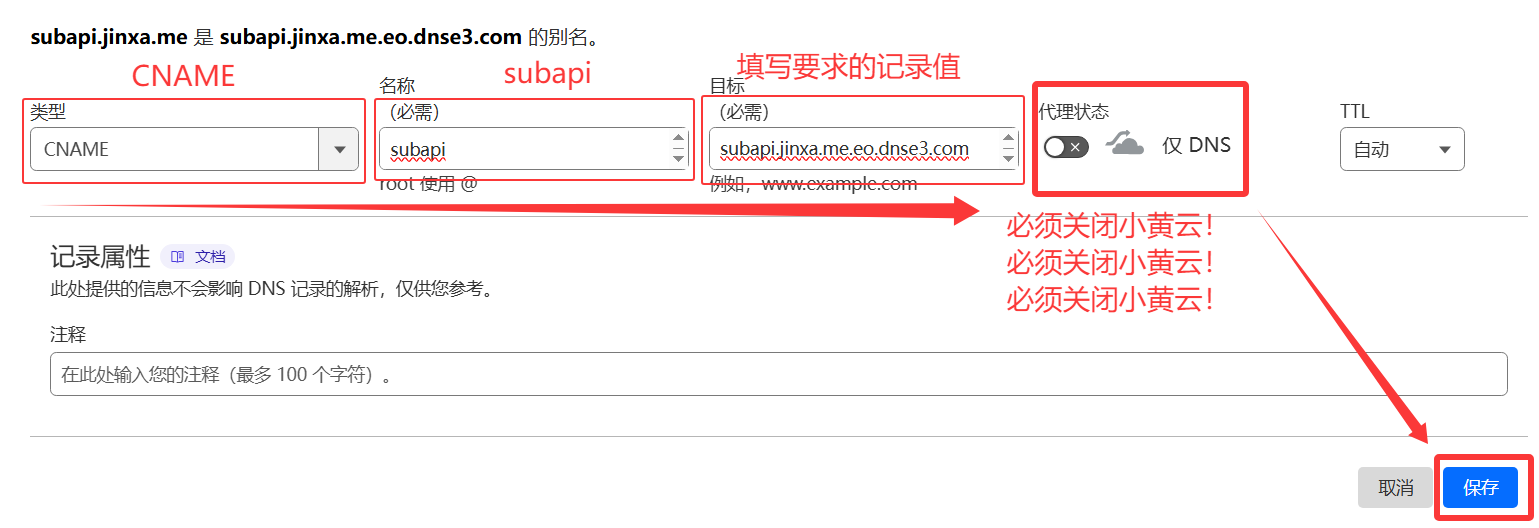
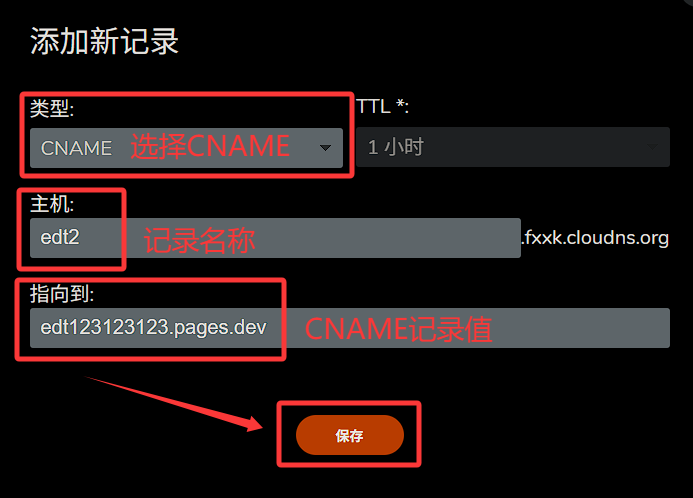
- 注意!你的域名如果是 fxxk.cloudns.org ,则必须必须必须多加一级域名,例如 edt2.fxxk.cloudns.org
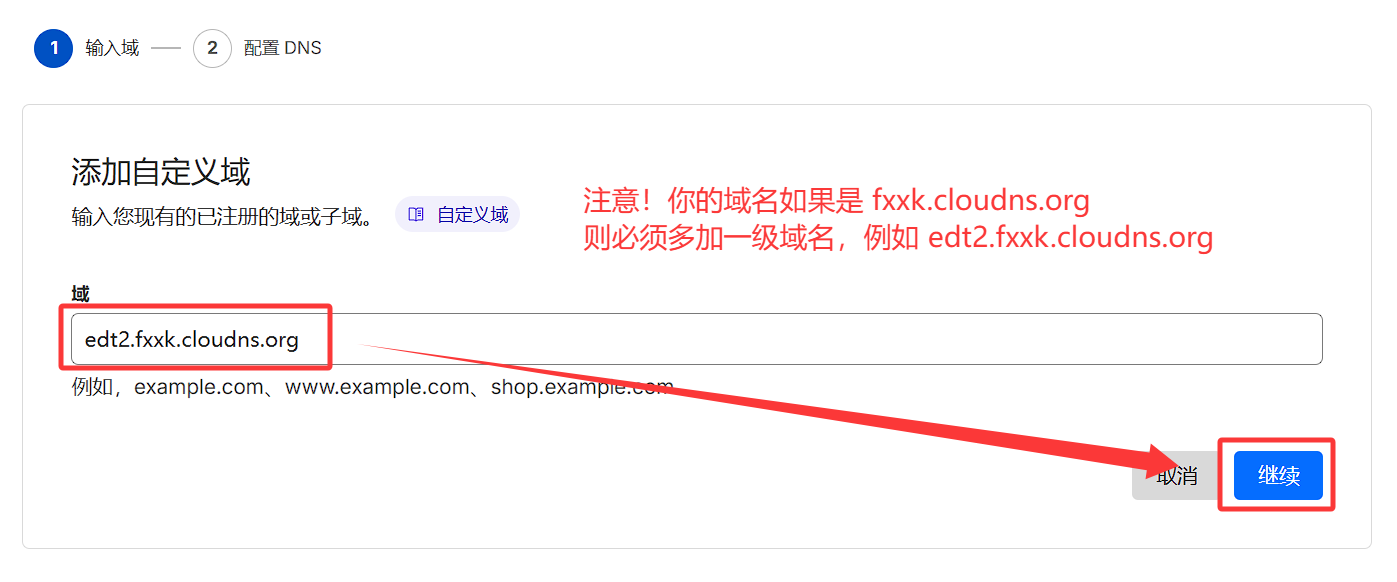
- 注意!你的域名如果是 fxxk.cloudns.org ,则必须必须必须多加一级域名,例如 edt2.fxxk.cloudns.org
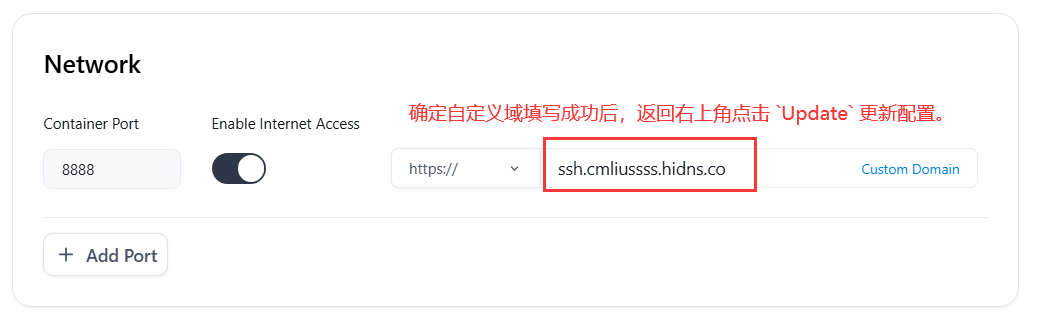
选择
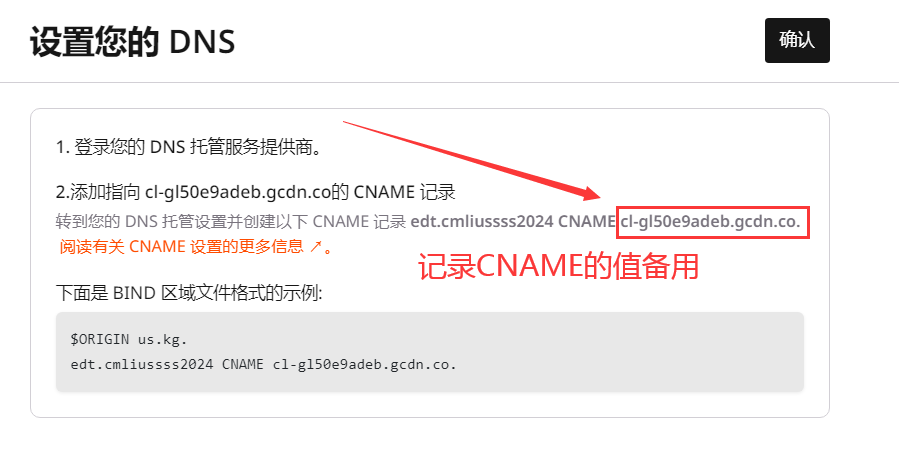
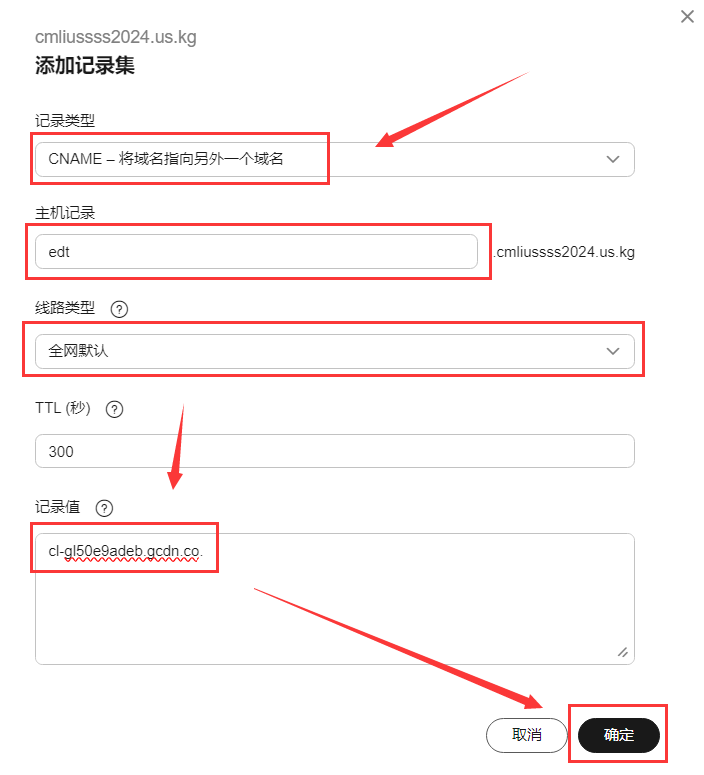
开始 CNAME 设置;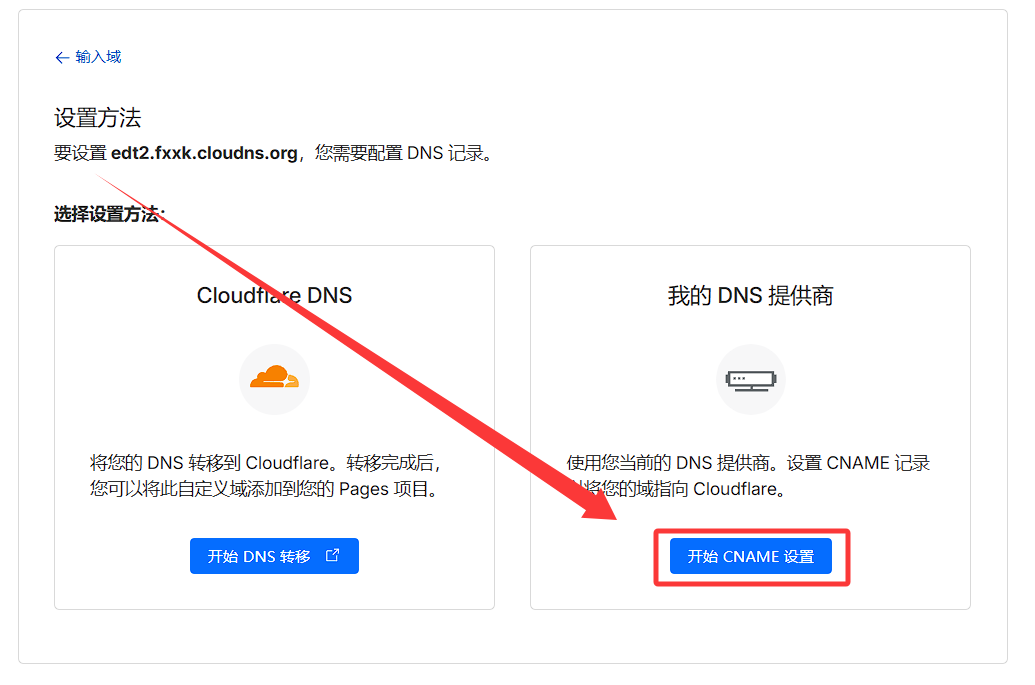
记录名称
edt2和 CNAME 记录值edt123123123.pages.dev;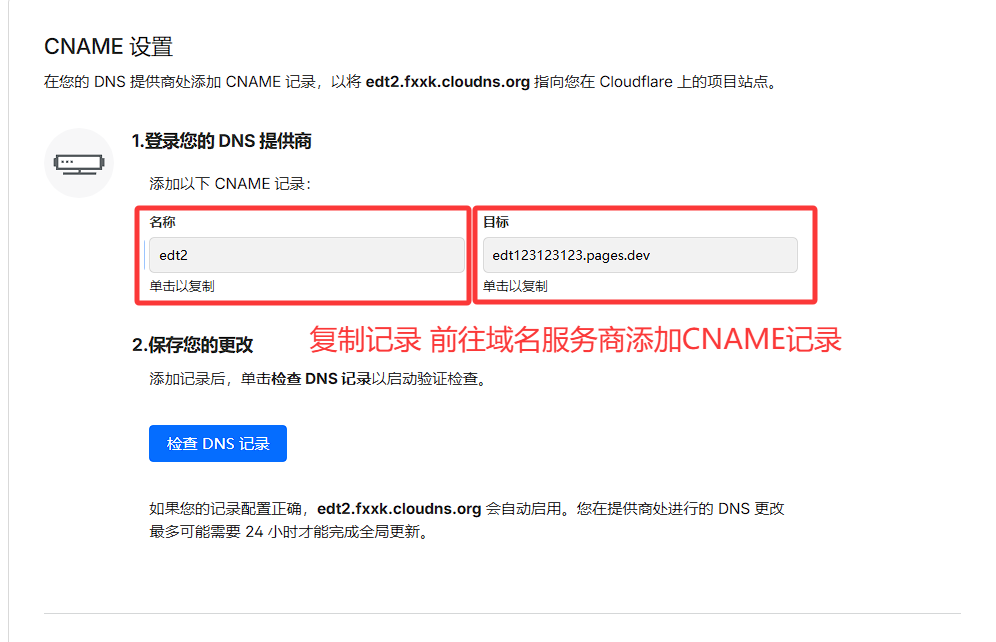
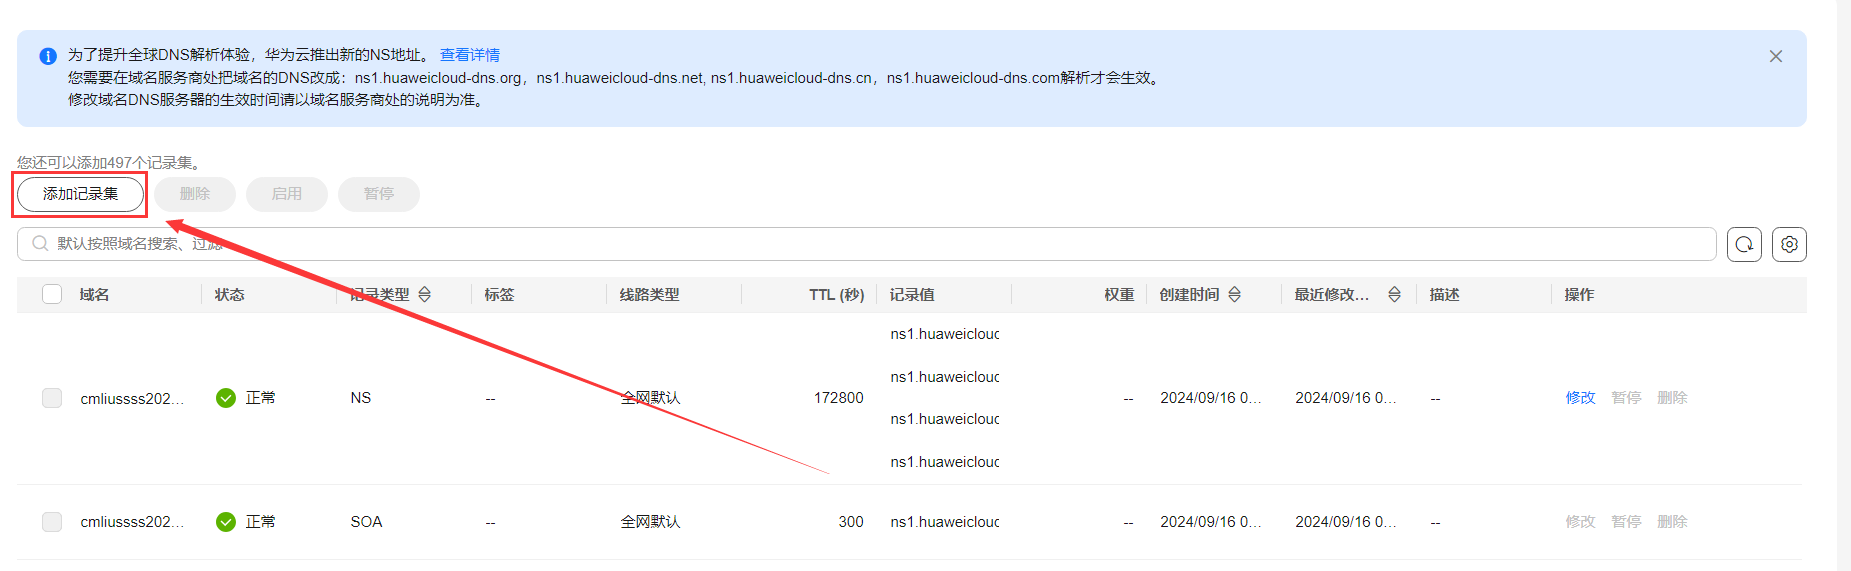
添加前往域名服务商添加CNAME记录;
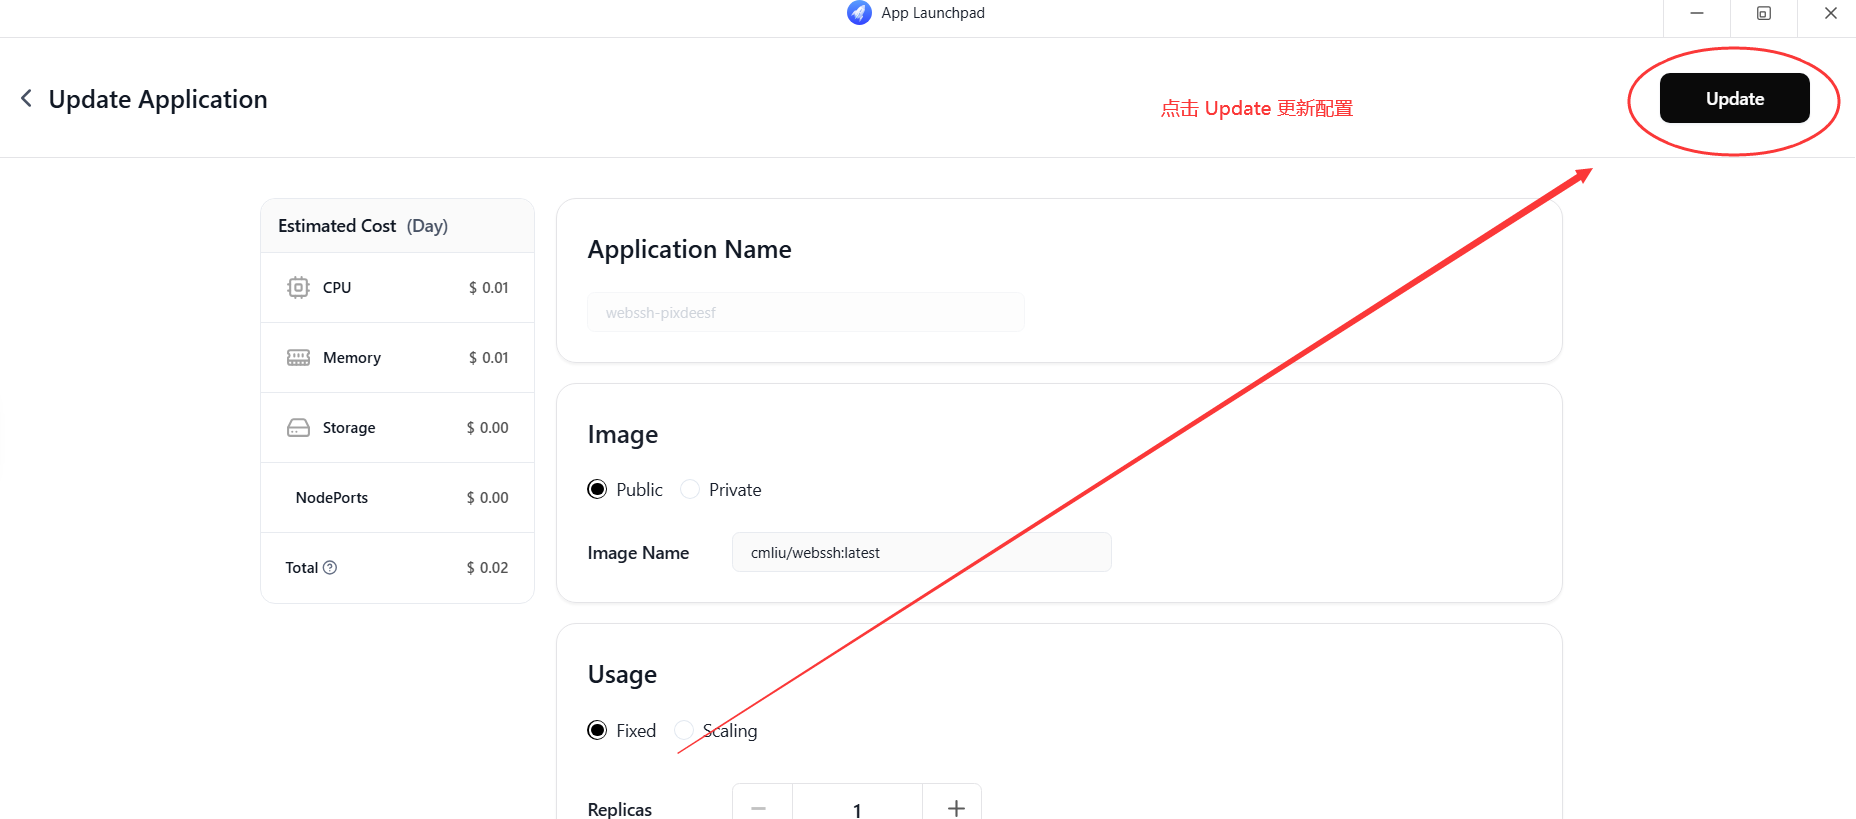
返回
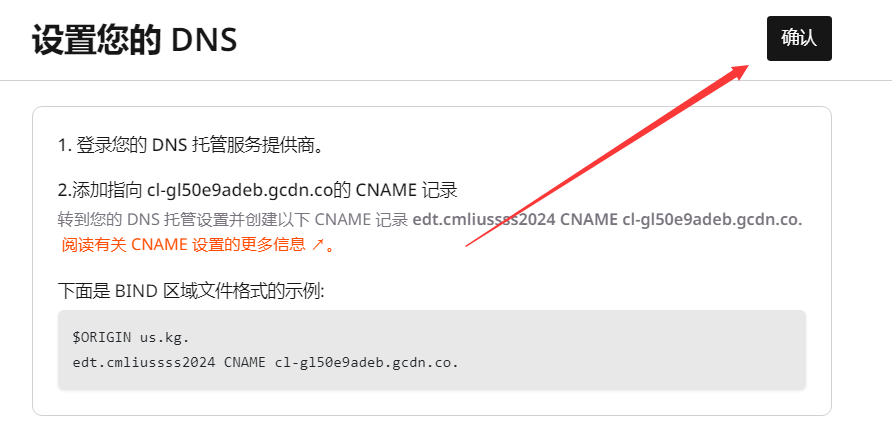
自定义域选项卡,点击稍后完成 DNS 设置等待域名验证成功;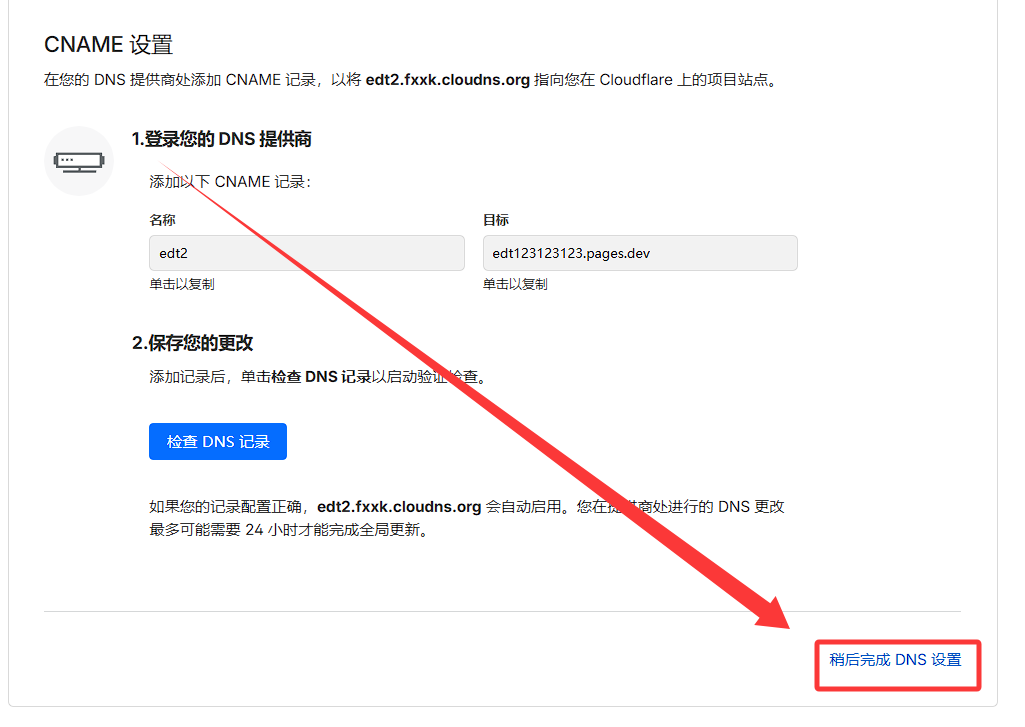
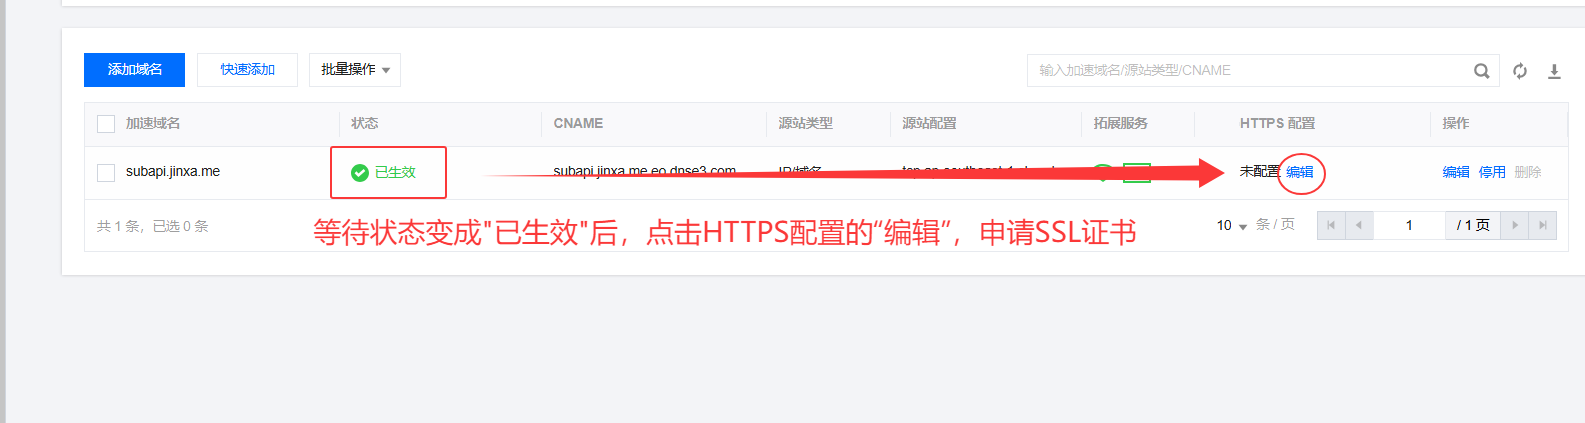
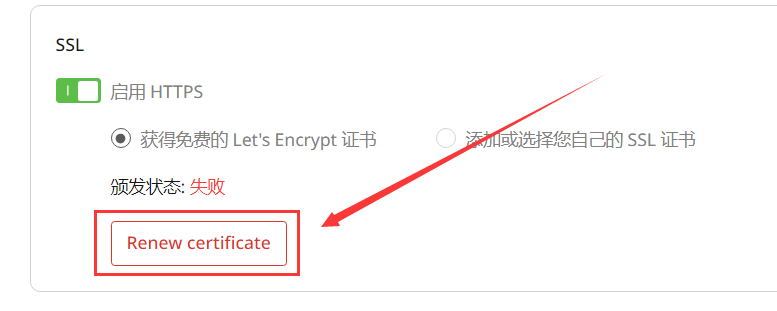
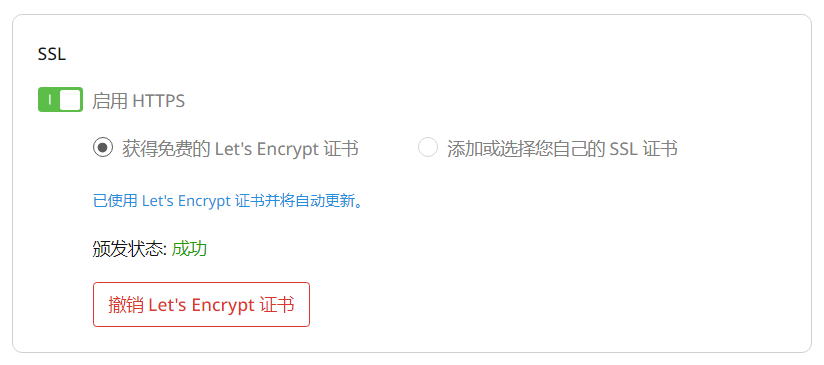
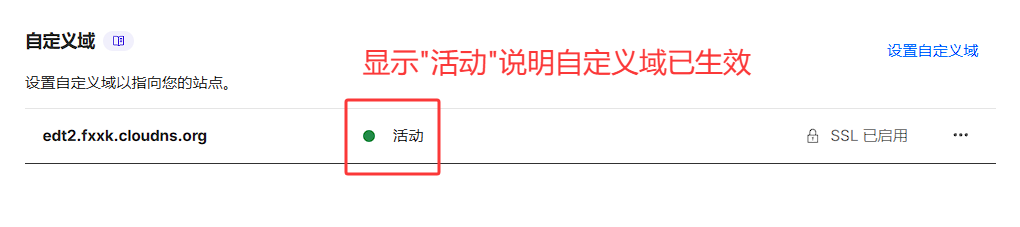
等待10~30分钟,域名验证成功后即可看到域名绑定成功提示;
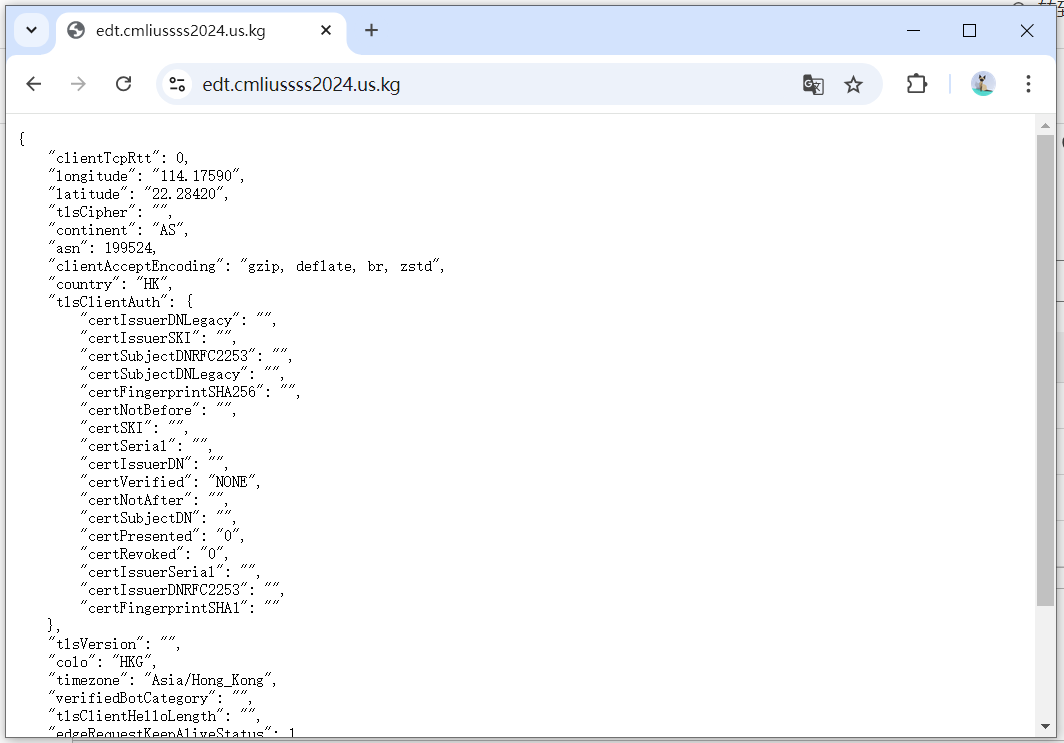
6️⃣ 登录 EDT2 管理页面
- 访问
/admin即可登录管理页面,例如您绑定的自定义域名edt2.fxxk.cloudns.org,则您需访问https://edt2.fxxk.cloudns.org/admin;
输入管理员密码,点击
登录即可进入管理页面;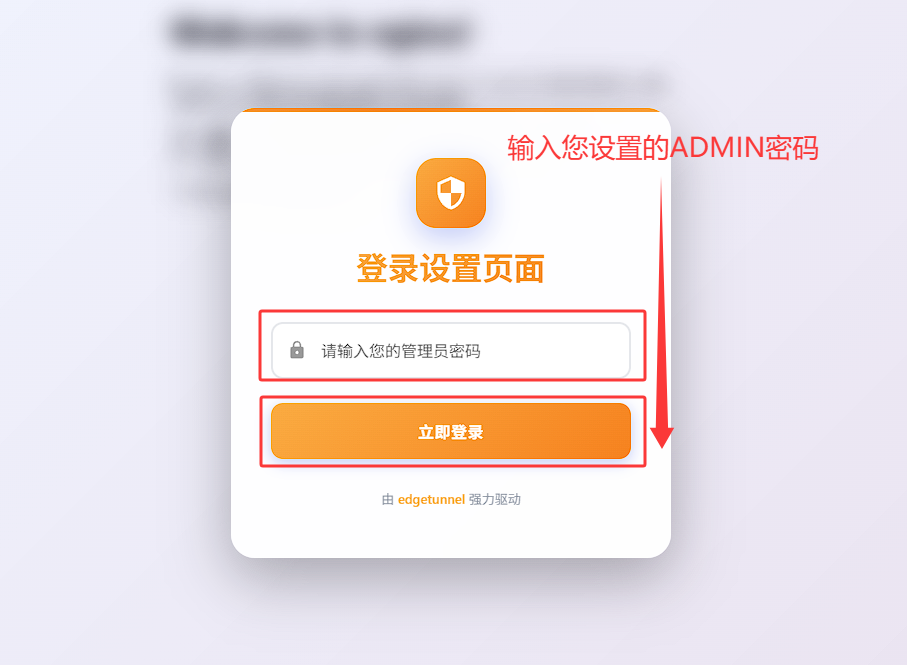
登录成功后,即可看到管理页面,如果您是小白,无需折腾直接订阅使用即可;
⚠️ 注意事项
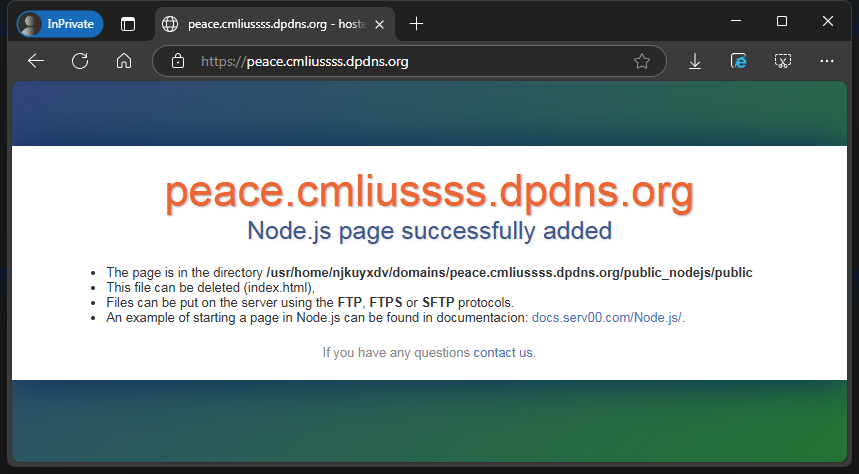
- 部署成功后访问主页提示
Welcome to nginx!,这只是默认伪装页,说明你已部署成功,请访问/admin进入管理页面;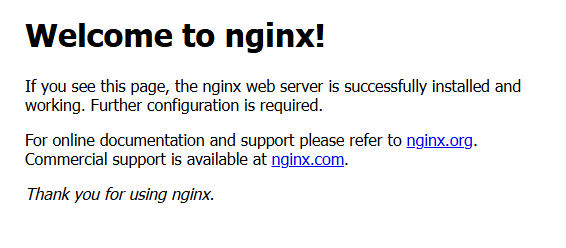
🔀 自助优选订阅
当前 Edgetunnel2.0 自带了三种优选订阅生成方式,分别是:
🎲 随机优选 - 简单
- 内置三网优选IP,根据订阅时的网络自动自动分配对应三网优选IP,优选IP想要多少就有多少!
「 🚀 点击展开 随机优选 图文教程 」
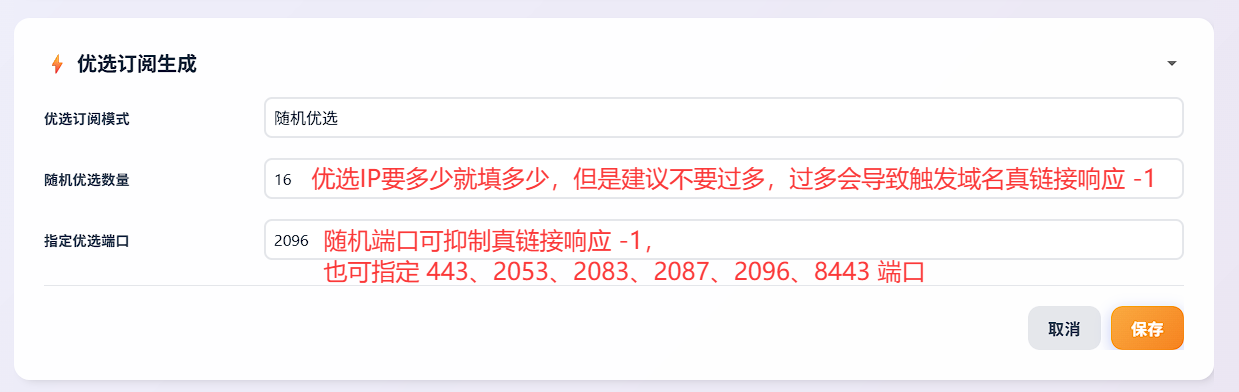
随机优选数量:优选IP要多少就填多少,但是建议不要过多,过多会导致触发域名真链接响应-1;指定优选端口:随机端口可抑制真链接响应-1,也可指定443、2053、2083、2087、2096、8443端口;
注意:更新订阅时不可使用代理更新订阅,否则会导致无法识别对应三网优选IP,会自动降级为三网优选订阅!也就是会同时下发所有三网优选IP!
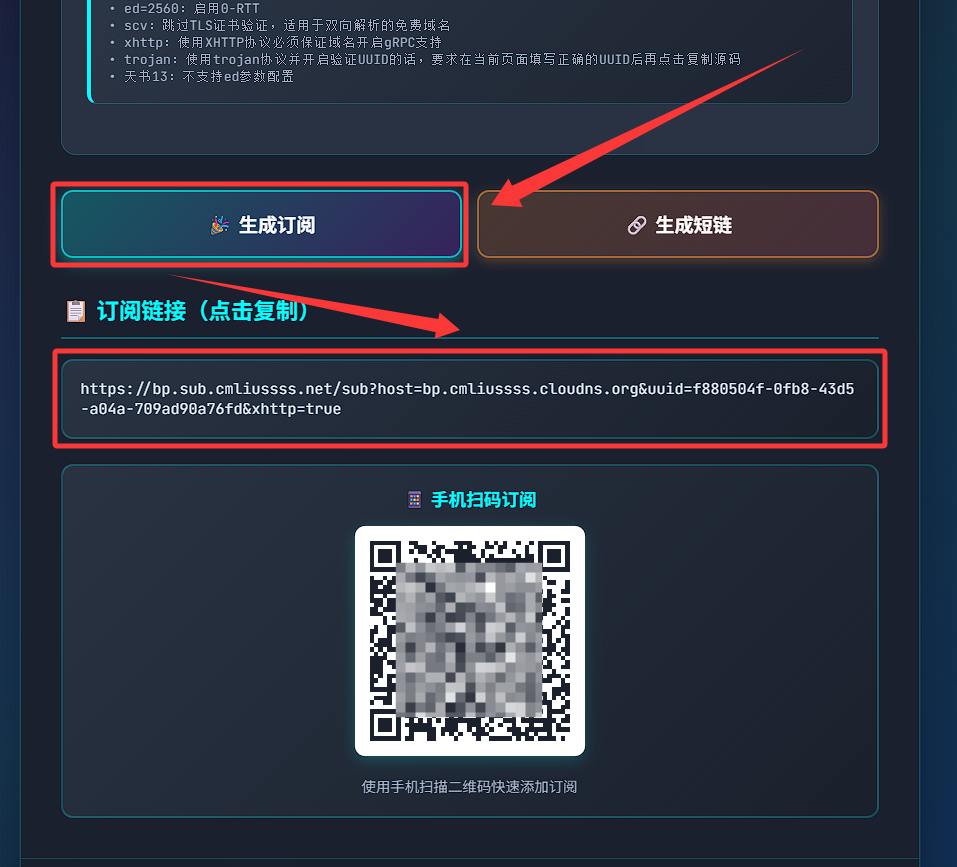
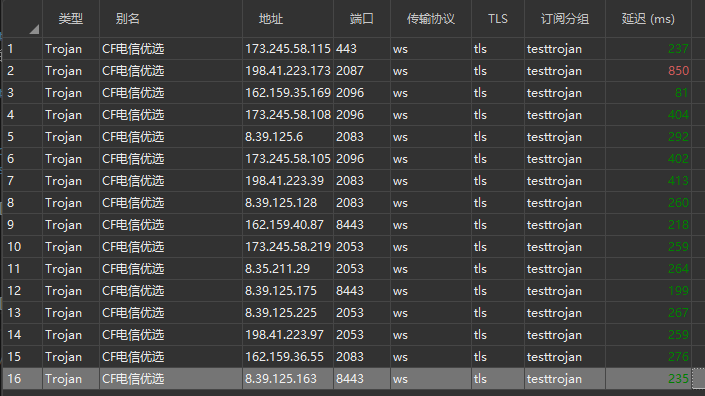
- 订阅呈现的效果如下:
⚙️ 自定义优选 - 折腾
- 自由度最高,适合喜欢折腾的选手,提供在线优选和优选API,等多种优选接入方式,在线优选可以自选落地国家,使用优选API可以实现自动化实时优选!
「 ✍️ 点击展开 自定义优选 - 手动添加 图文教程 」
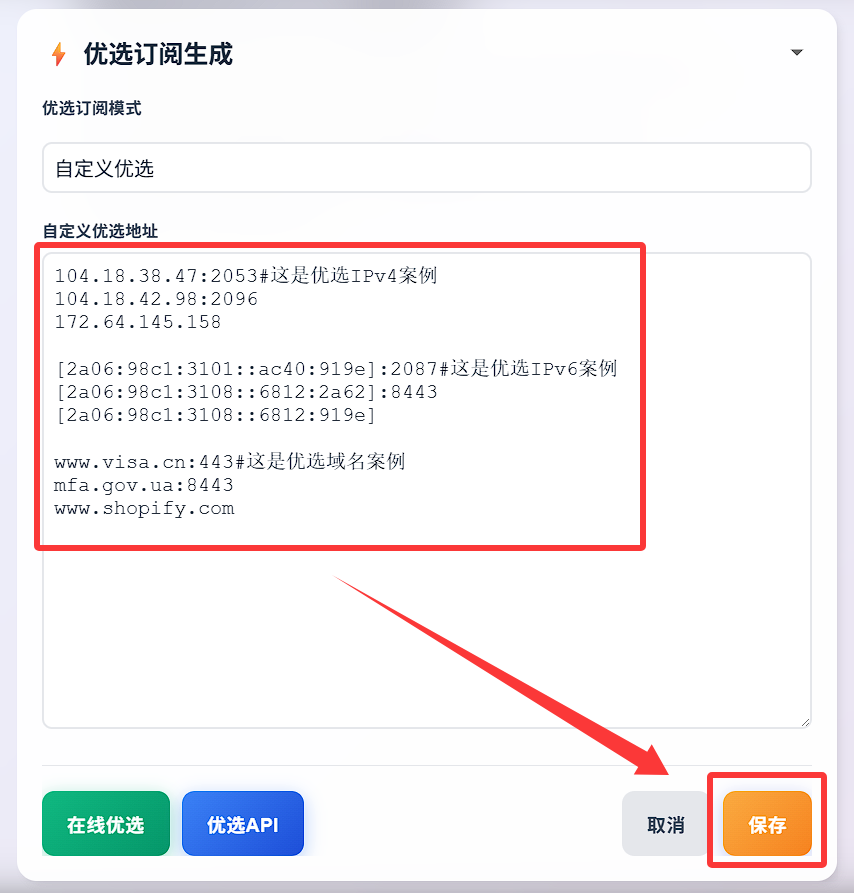
✍️ 手动添加
- 您可以手动添加你的优选域名IP,格式:
IP域名:端口#备注,每行一条记录,例如:1
2
3
4
5
6
7
8
9
10
11104.18.38.47:2053#这是优选IPv4案例
104.18.42.98:2096
172.64.145.158
[2a06:98c1:3101::ac40:919e]:2087#这是优选IPv6案例
[2a06:98c1:3108::6812:2a62]:8443
[2a06:98c1:3108::6812:919e]
www.visa.cn:443#这是优选域名案例
mfa.gov.ua:8443
www.shopify.comIPv6地址必须使用方括号
[]括起来。
缺少端口时,默认为443。
缺少备注时,将直接显示IP域名。更多优选域名可通过CloudFlare 优选域名汇总获取;
- 订阅呈现的效果如下:

- 订阅呈现的效果如下:
「 🌐 点击展开 自定义优选 - 在线优选 图文教程 」
🌐 在线优选
在线优选:点击
在线优选按钮,注意必须关闭代理并且使用国内网络直连,才能进行在线优选!- IP库:默认为
CF官方列表,推荐使用CM整理列表即可,该列表包含了大部分三网优选IP段,且会不定期更新维护; - 端口:默认为
443,可自行修改为其他端口; - 测试线程数:默认为
8,电脑浏览器推荐16线程以上,手机浏览器推荐8~16线程;
- 选择好参数后,点击
开始优选按钮,等待优选结果;

- 点击你所需国家的标签,点击
追加保存按钮后点击关闭返回上级菜单;
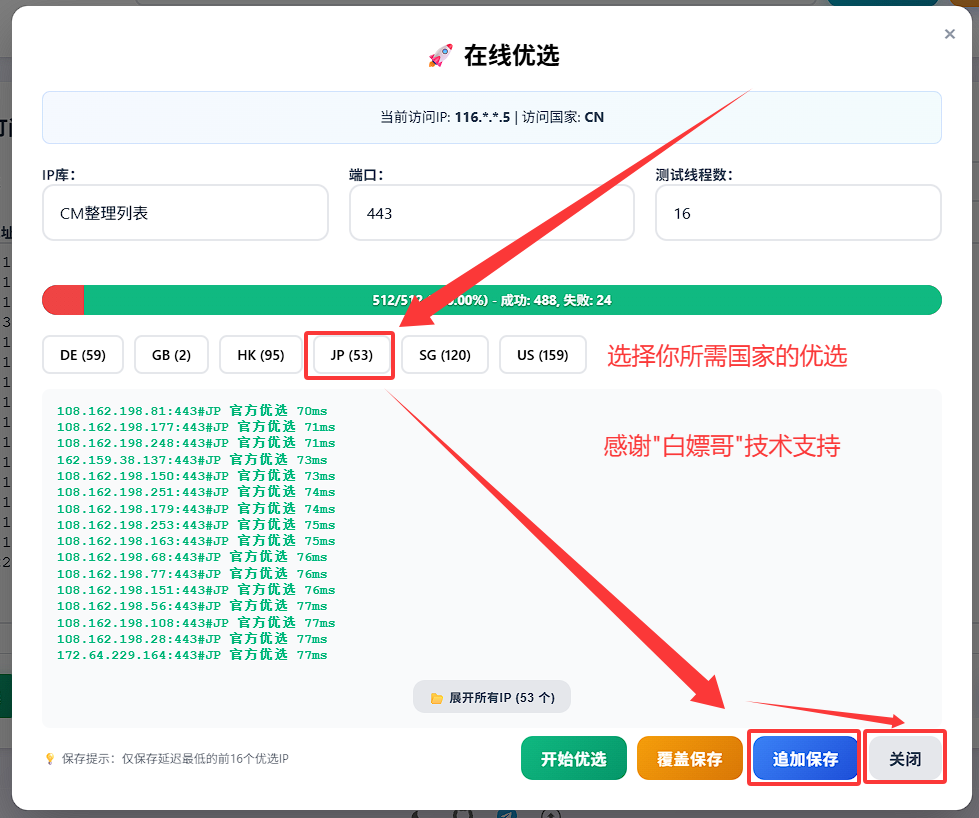
- 点击
保存自定义优选结果;
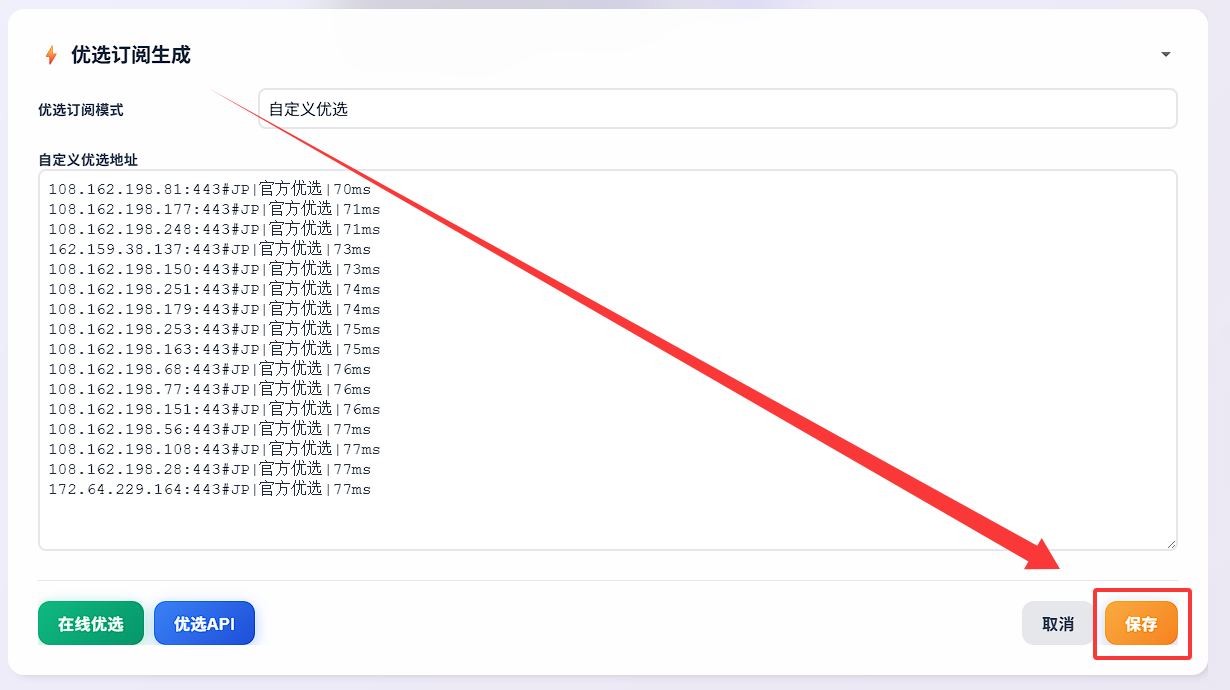
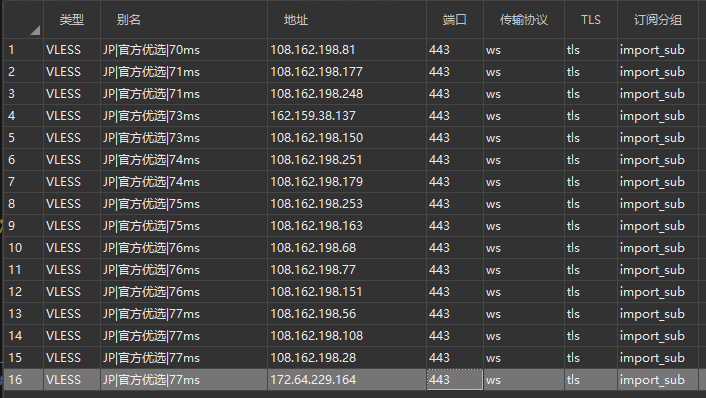
- 订阅呈现的效果如下:
- 如果你当前网络再非
CN环境下,将不被允许使用在线优选功能,因为在代理环境下进行在线优选只会得到你代理的优选,选出来的地区基本上都是你代理所属地区,而延迟也是你代理延迟,可以说是毫无意义的。 - 如果你是身处国外并且直连尝试在线优选,也毫无意义,因为也就只有在
CN环境下,因为国内没有CF数据中心,所以才能实现直连多国数据中心,所以才需要优选。
- IP库:默认为
「 🔌 点击展开 自定义优选 - 优选API 图文教程 」
🔌 优选API
- 接入普通文本API
例如
https://cf.090227.xyz/ct,后点击可用性验证按钮;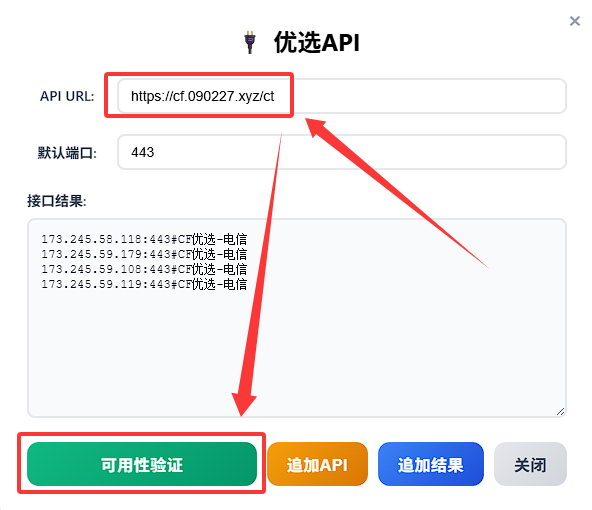
如返回格符合
IP域名:端口#备注,每行一条记录格式,则代表API可用;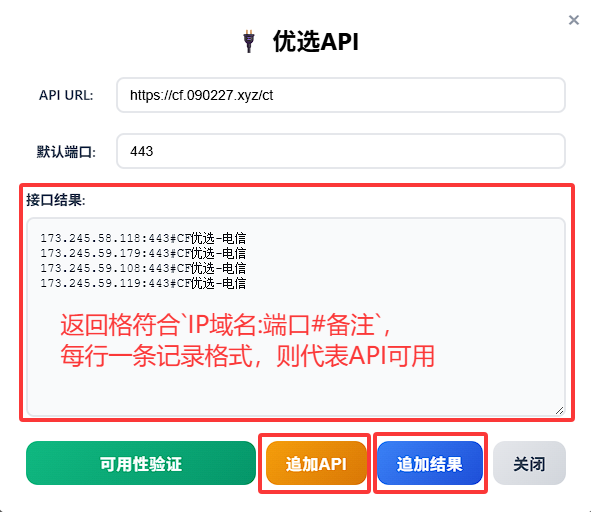
如果仅是一次性导入,无需实时自动更新,则点击
追加结果,需要实时获取数据,则点击追加API,然后点击保存;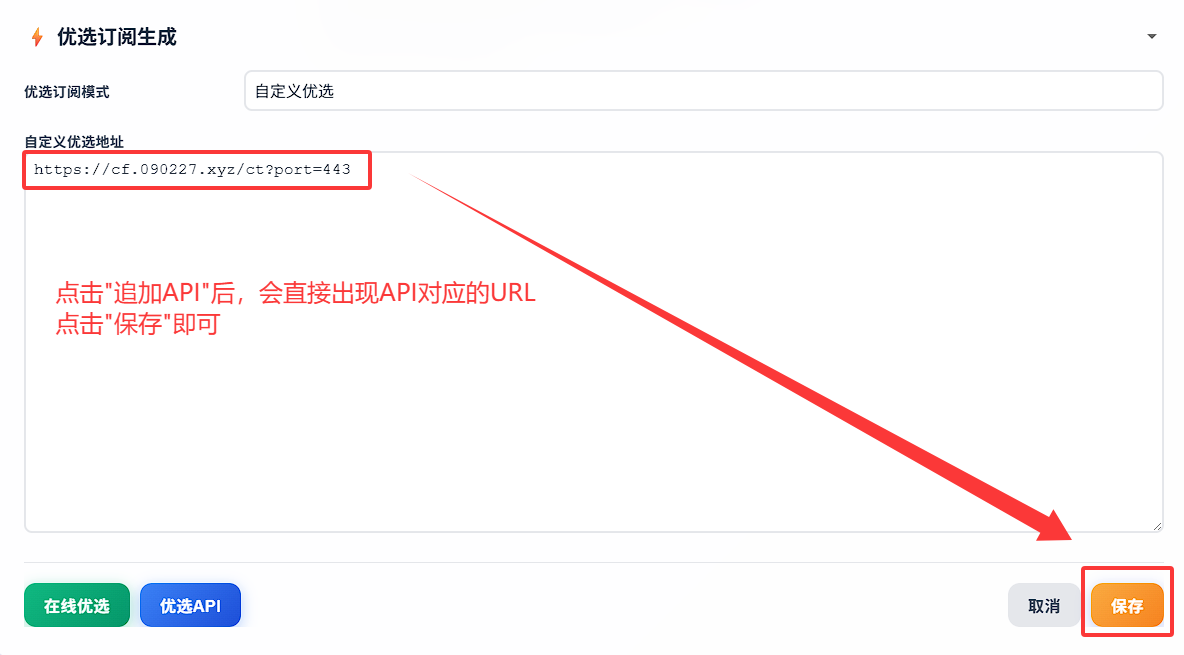
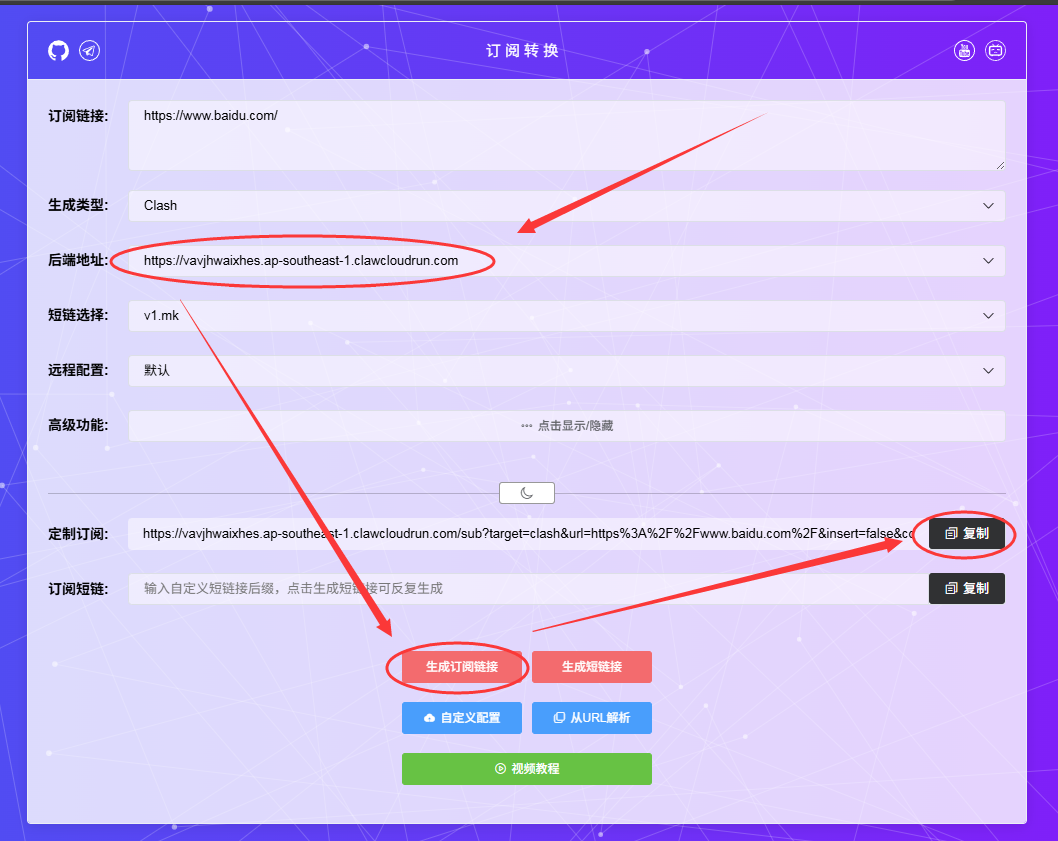
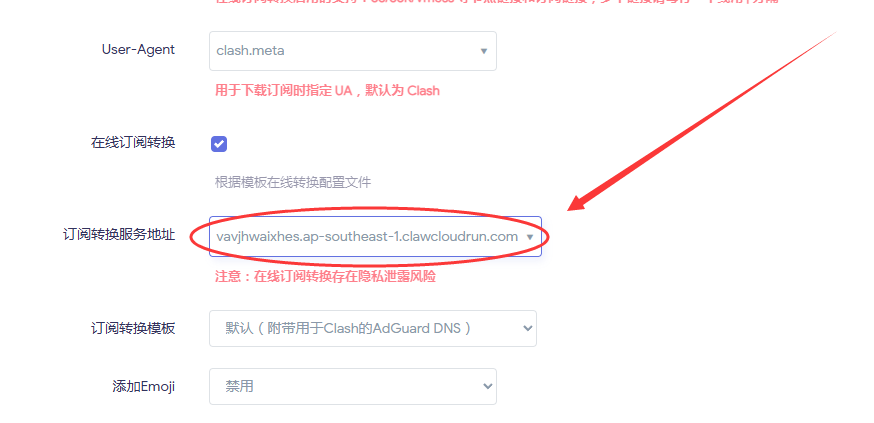
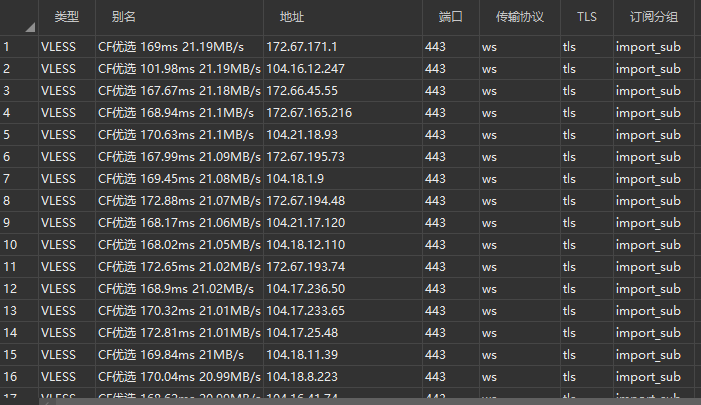
订阅呈现的效果如下:

- 接入XIU2/CloudflareSpeedTest项目,测速csv结果文件
例如
https://github.com/cmliu/WorkerVless2sub/raw/refs/heads/main/CloudflareSpeedTest.csv,填写测速对应的默认端口后,点击可用性验证按钮;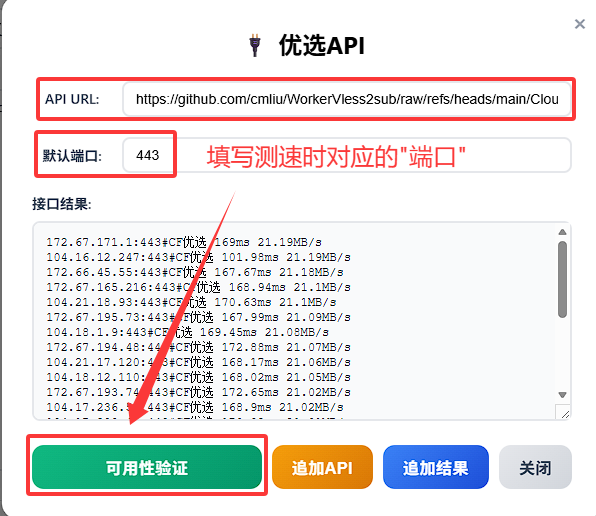
如返回格符合
IP域名:端口#备注,每行一条记录格式,则代表API可用,;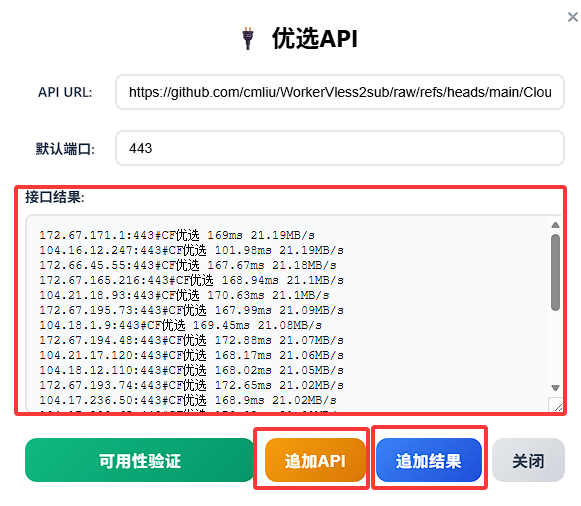
如果仅是一次性导入,无需实时自动更新,则点击
追加结果,需要实时获取数据,则点击追加API,然后点击保存;
订阅呈现的效果如下:
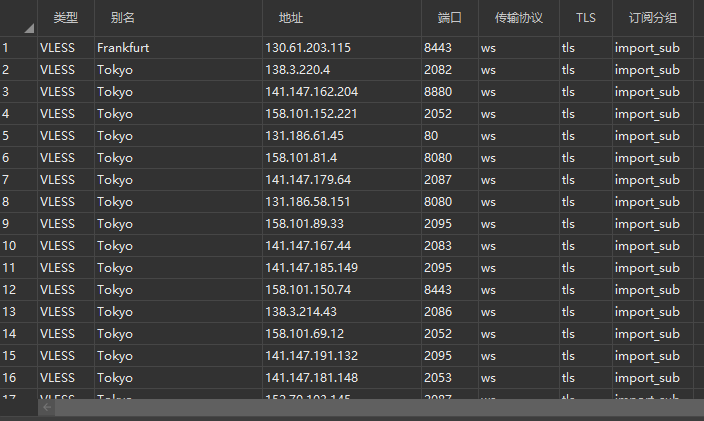
- 接入iptest项目,测速csv结果文件
例如
https://raw.githubusercontent.com/cmliu/WorkerVless2sub/refs/heads/main/addressescsv.csv,点击可用性验证按钮;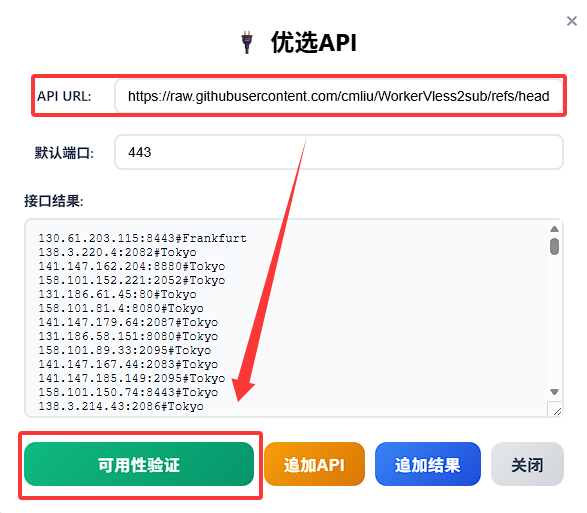
如返回格符合
IP域名:端口#备注,每行一条记录格式,则代表API可用;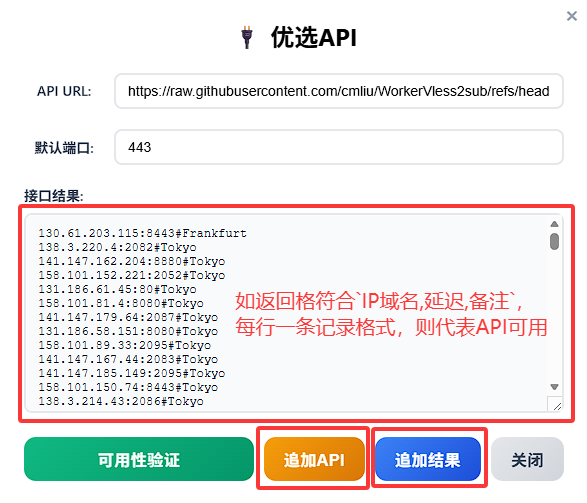
如果仅是一次性导入,无需实时自动更新,则点击
追加结果,需要实时获取数据,则点击追加API,然后点击保存;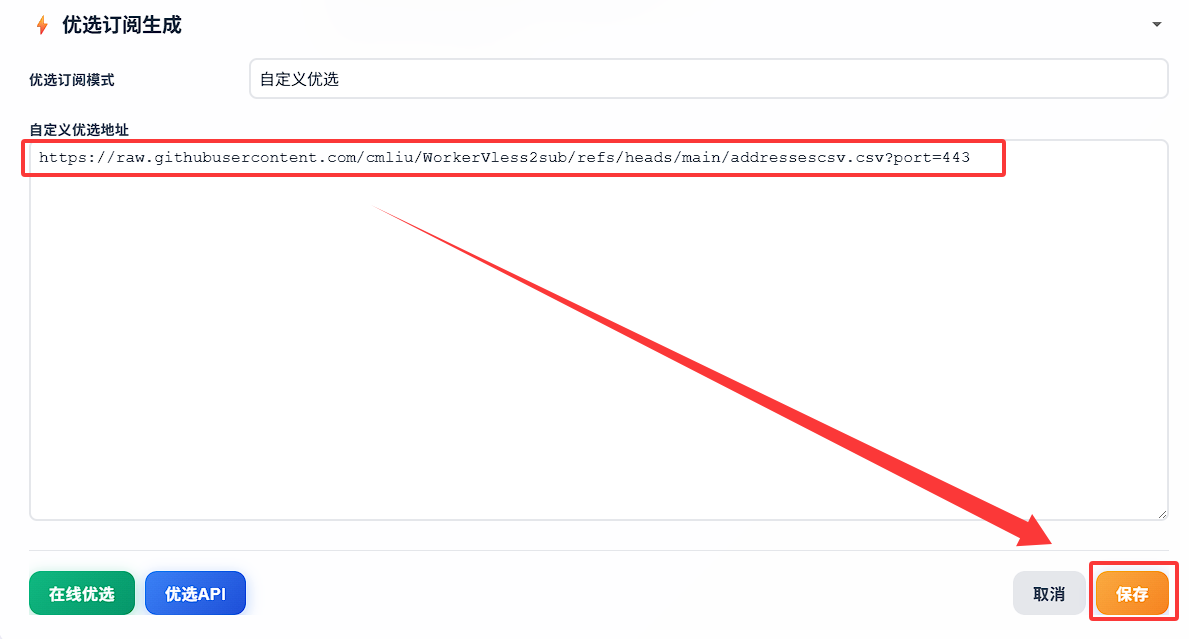
订阅呈现的效果如下:
🛋️ 优选订阅生成器 - 偷懒
- 让大佬坐上来自己动,站在巨人的肩膀上,直接使用大佬的优选订阅生成器的优选结果,CMLiussss 技术交流群置顶里收集了众多大佬的优选订阅生成器,大家可以自行选择。
「 🚀 点击展开 优选订阅生成器 图文教程 」
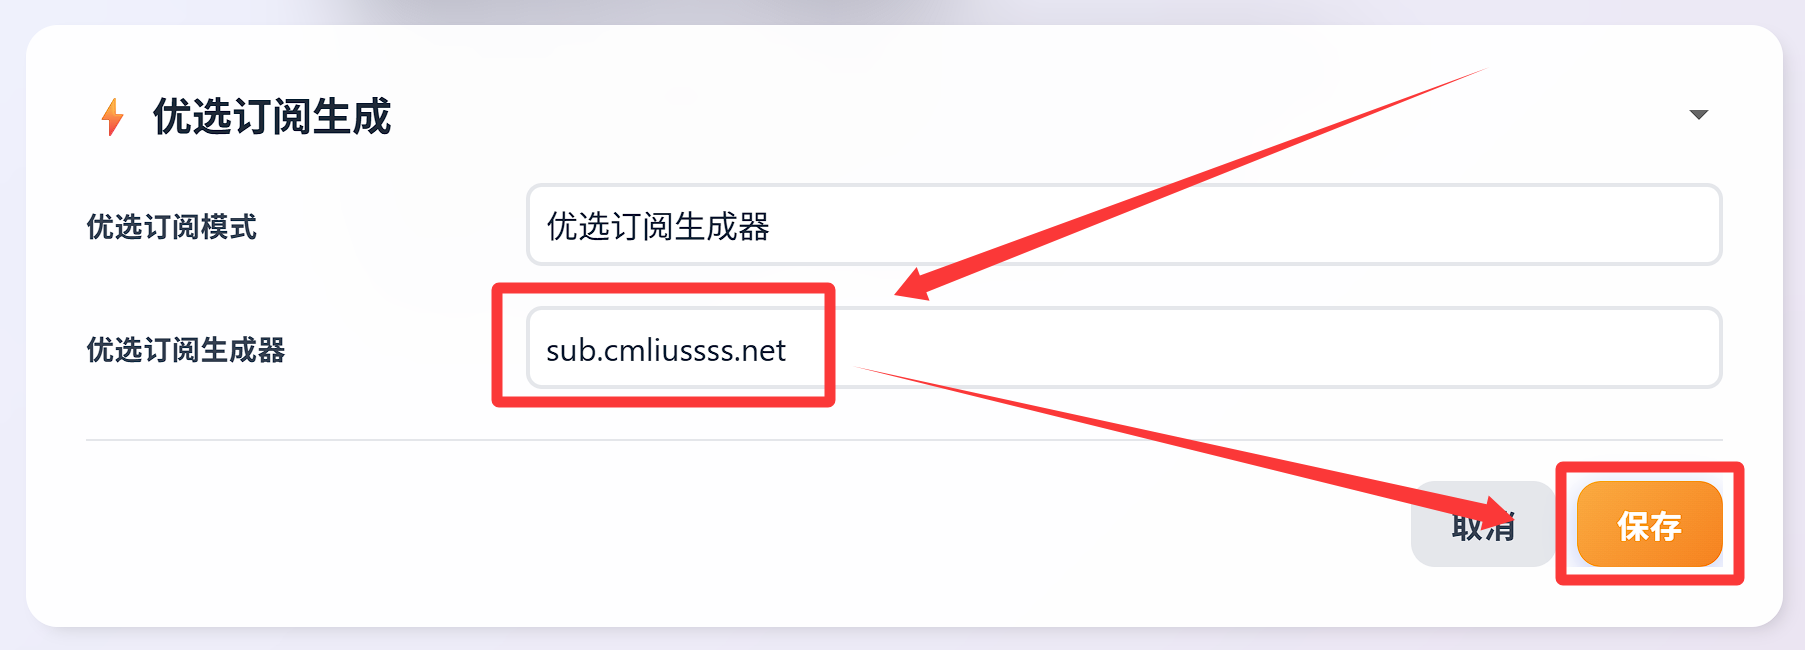
加入CMLiussss 技术交流群,在群组置顶信息里找到优选订阅按钮
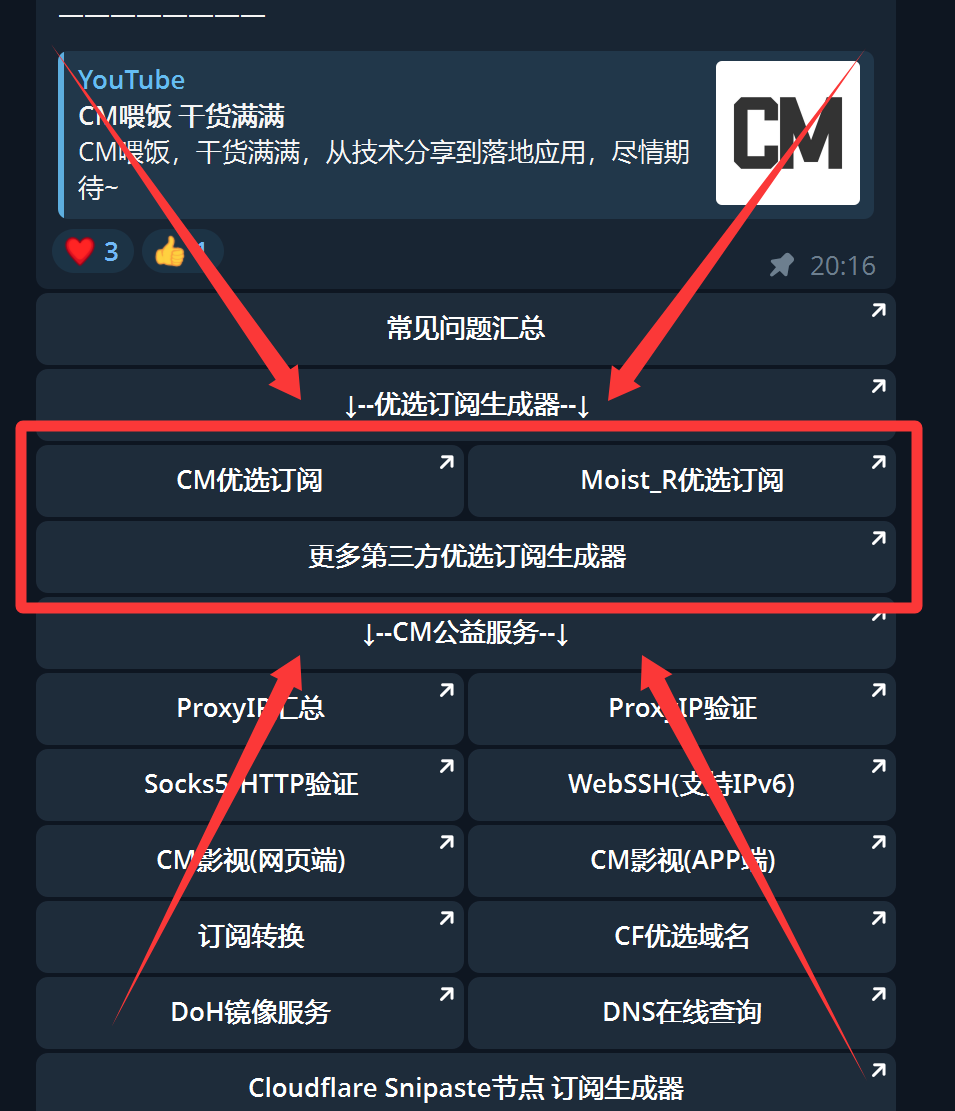
复制优选订阅器的
变量SUB对应的值备用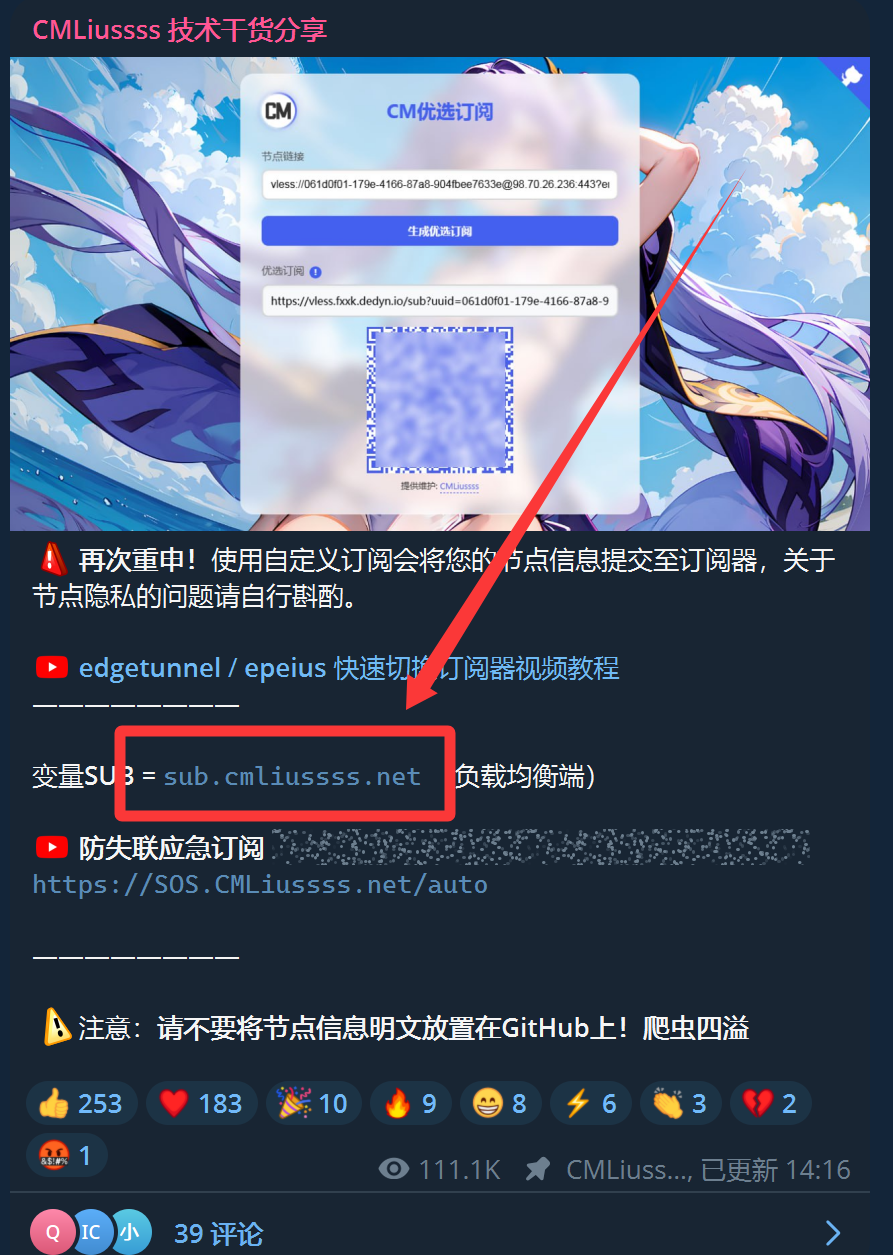
填入优选订阅生成器,点击保存即可
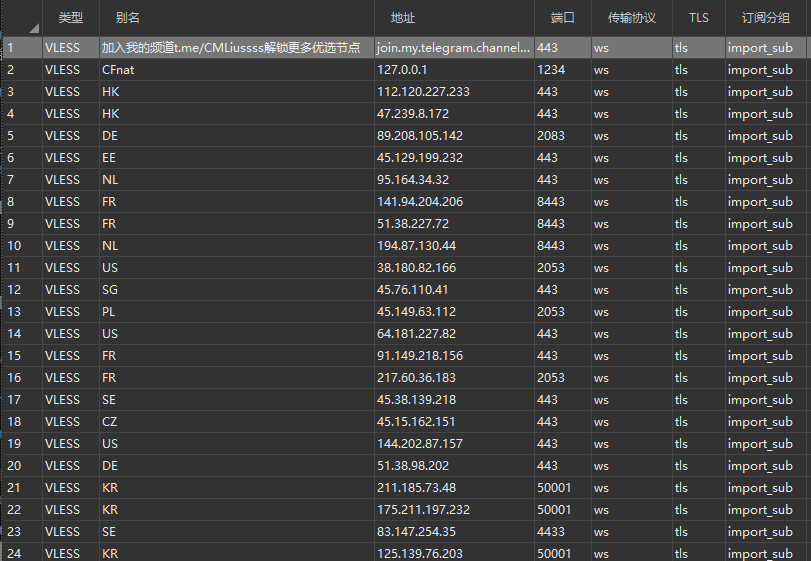
- 订阅呈现的效果如下:
🧪 VLESS/Trojan 协议切换
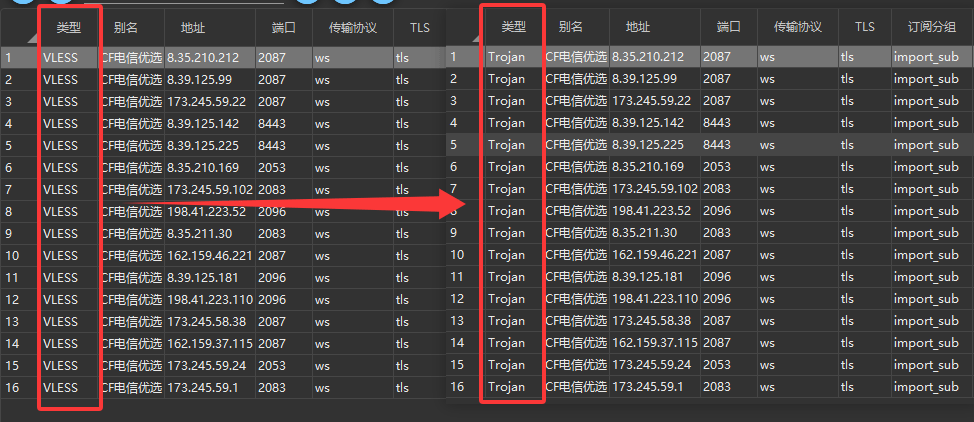
「 🚀 点击展开 VLESS/Trojan 协议切换 图文教程 」
返回 Edgetunnel2.0 管理页面,
⚙️ 详细配置信息>节点协议,选择你需要的代理协议后,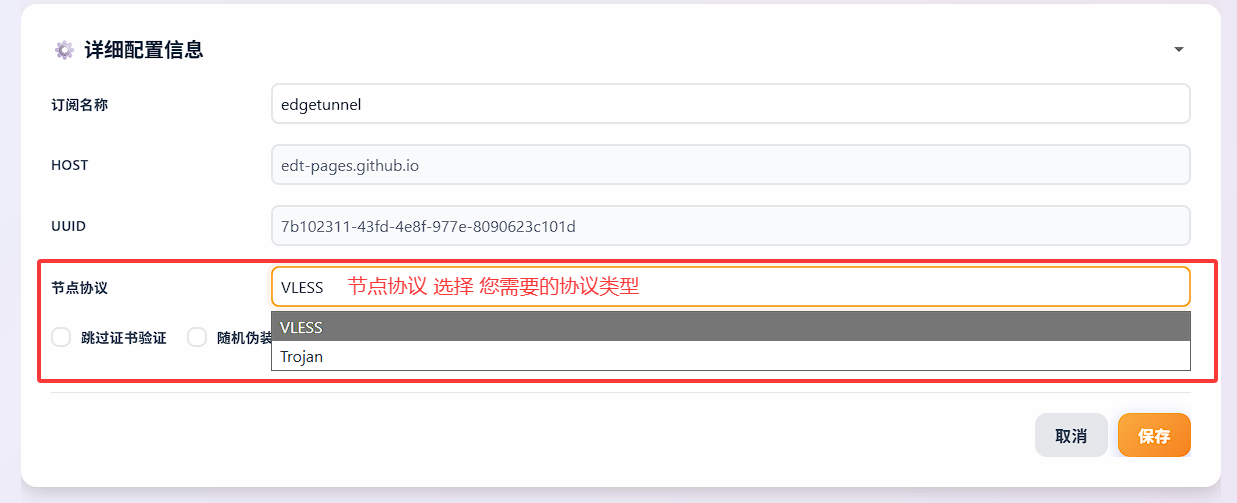
点击
保存后,更新订阅即可生效;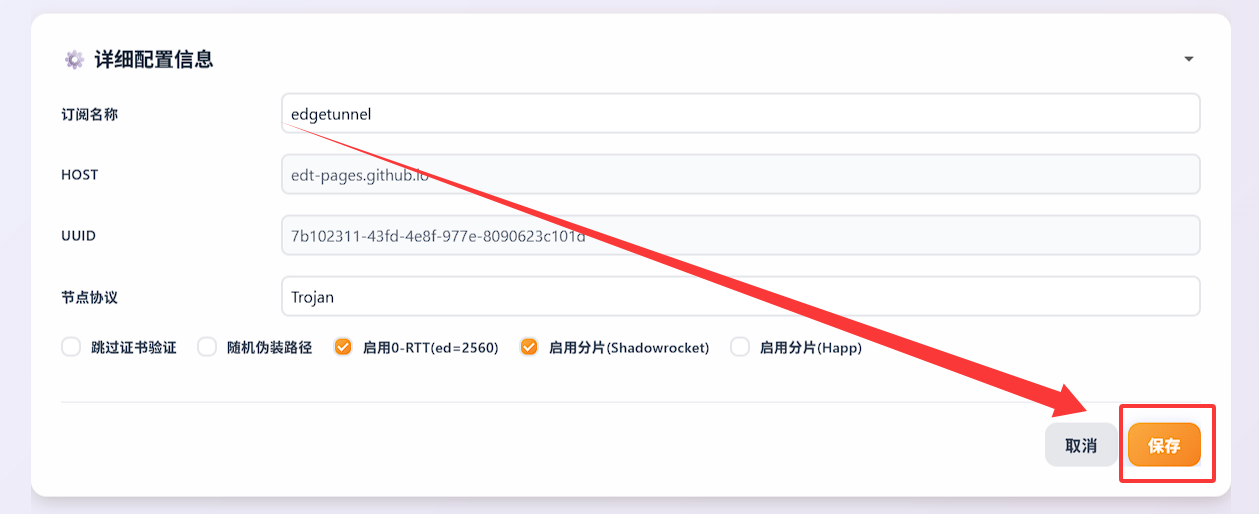
🔔 设置 Telegram Bot 通知
「 🚀 点击展开 Telegram Bot 通知 图文教程 」
添加 @BotFather ,发送
/newbot创建Bot,复制Bot Token备用;- 例如:
8598918055:AAH50RfGC9tGTRoNKu9GaNSWcEfawUk5eh0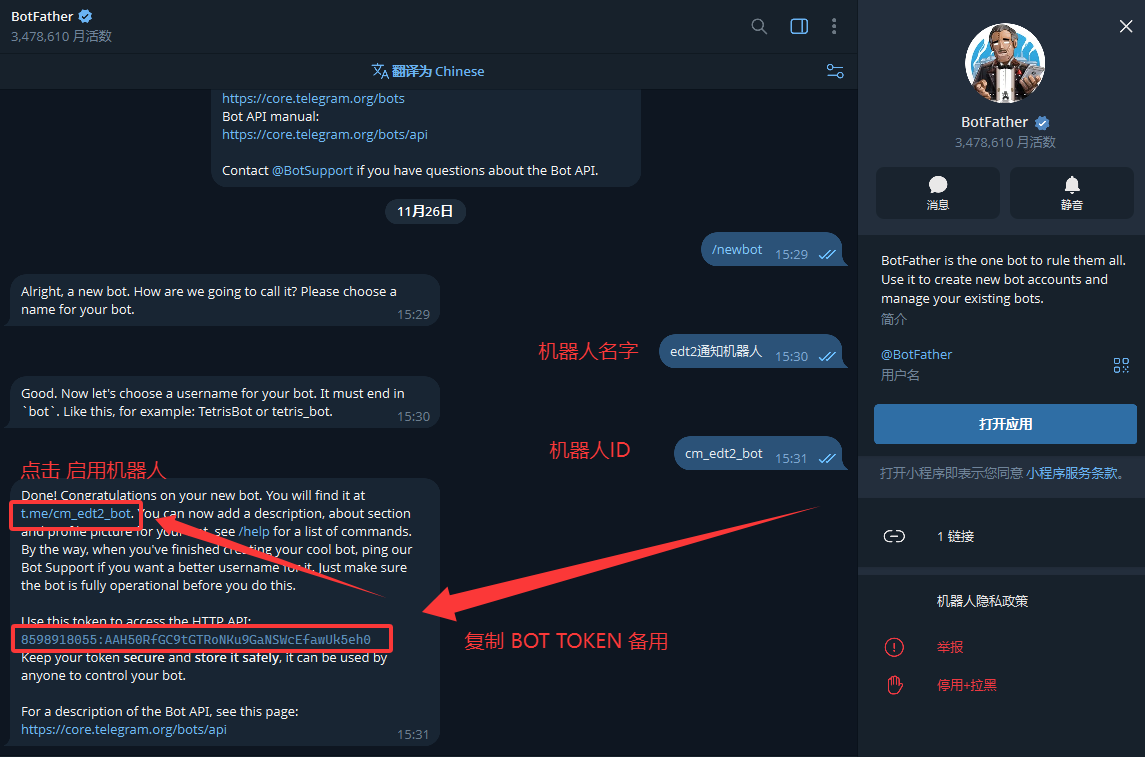
- 例如:
点击你的bot链接,例如
t.me/cm_edt2_bot,点击开始 / start按钮,启用你的机器人;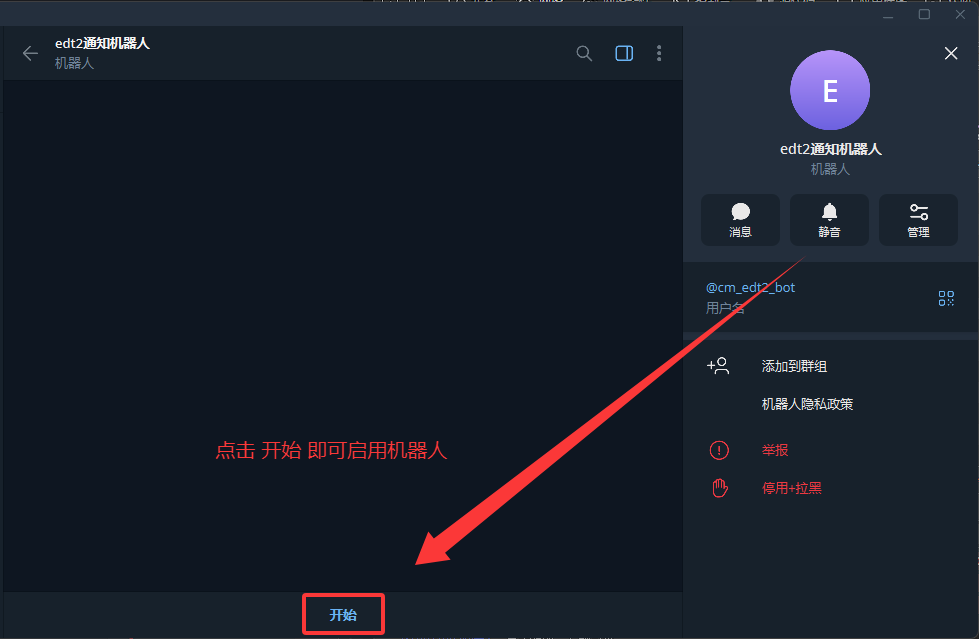
加入 CMLiussss 技术交流群,发送
/id@nmnmfunbot命令获取你的Chat ID,复制备用;- 例如:
6946996027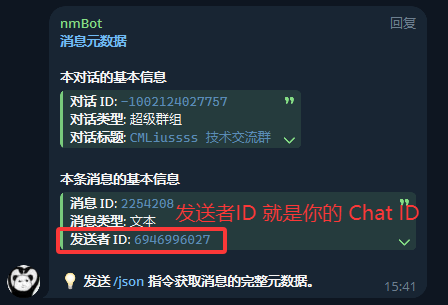
- 例如:
返回 Edgetunnel2.0 管理页面,
🔔 消息通知设置>Telegram Bot 通知>⚙️参数配置,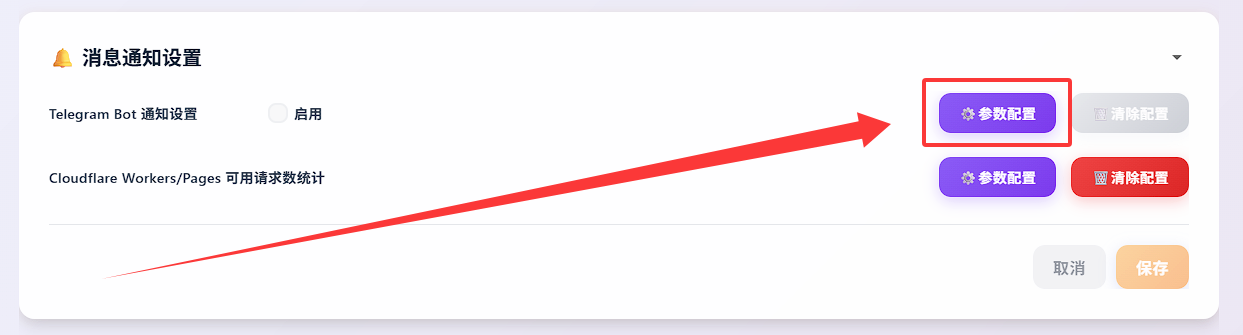
填写
Bot Token和Chat ID参数,并点击可用性验证;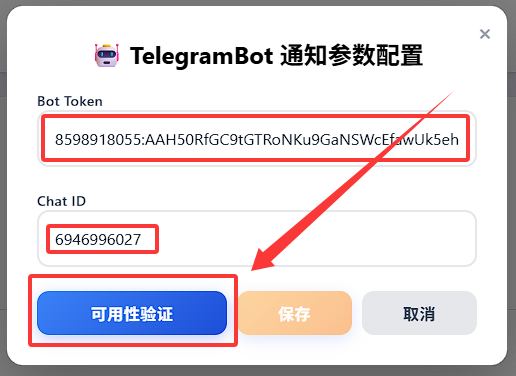
如提示
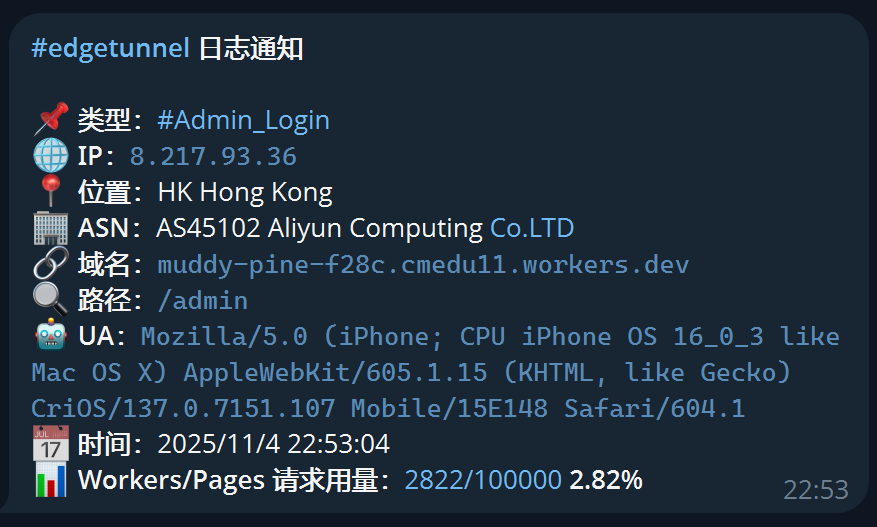
✅ Bot Token 和 Chat ID 均有效,则代表配置无误,点击保存即可,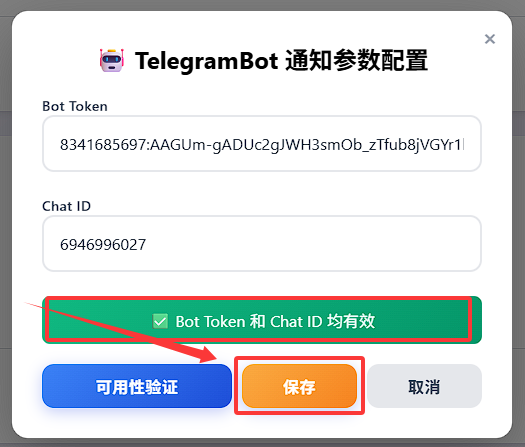
- 同时机器人也会同步提示
✅ Telegram 通知配置已验证成功!;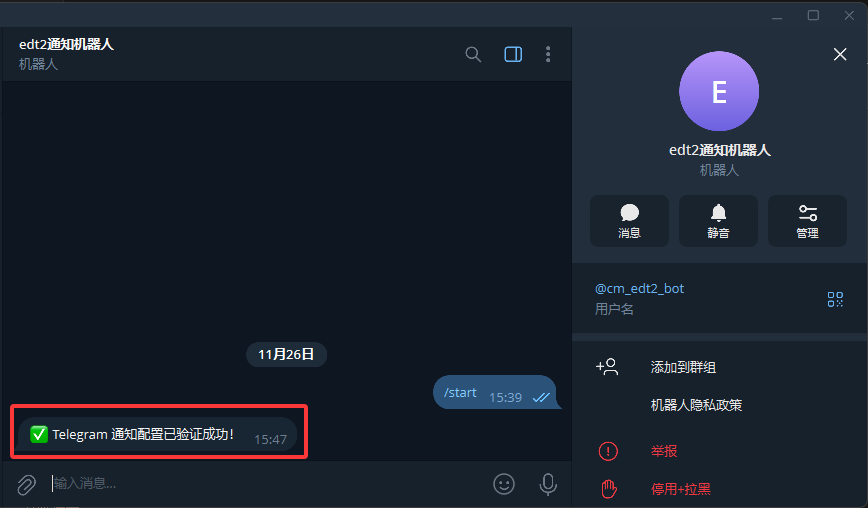
- 同时机器人也会同步提示
配置完成后,勾选
Telegram Bot 通知>启用>保存即可,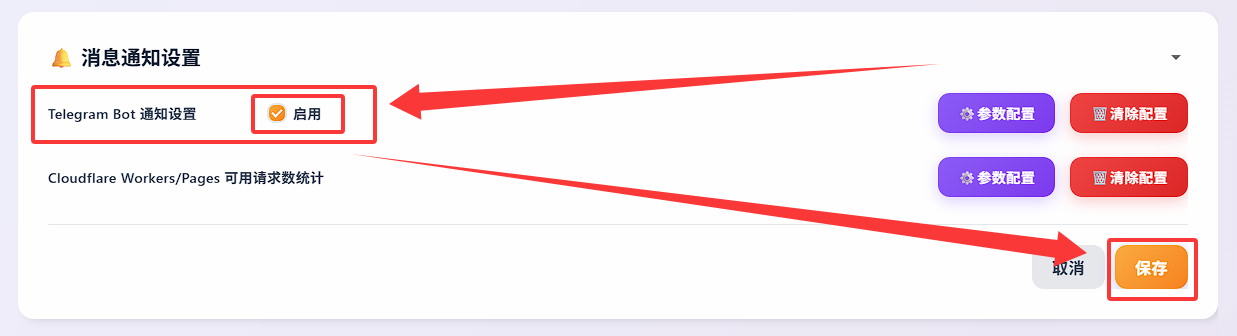
- 之后登录管理页面或获取订阅等操作时,均会同步收到机器人通知;
📊 设置 Workers/Pages 可用请求数统计
「 🚀 点击展开 Workers/Pages 可用请求数统计 图文教程 」
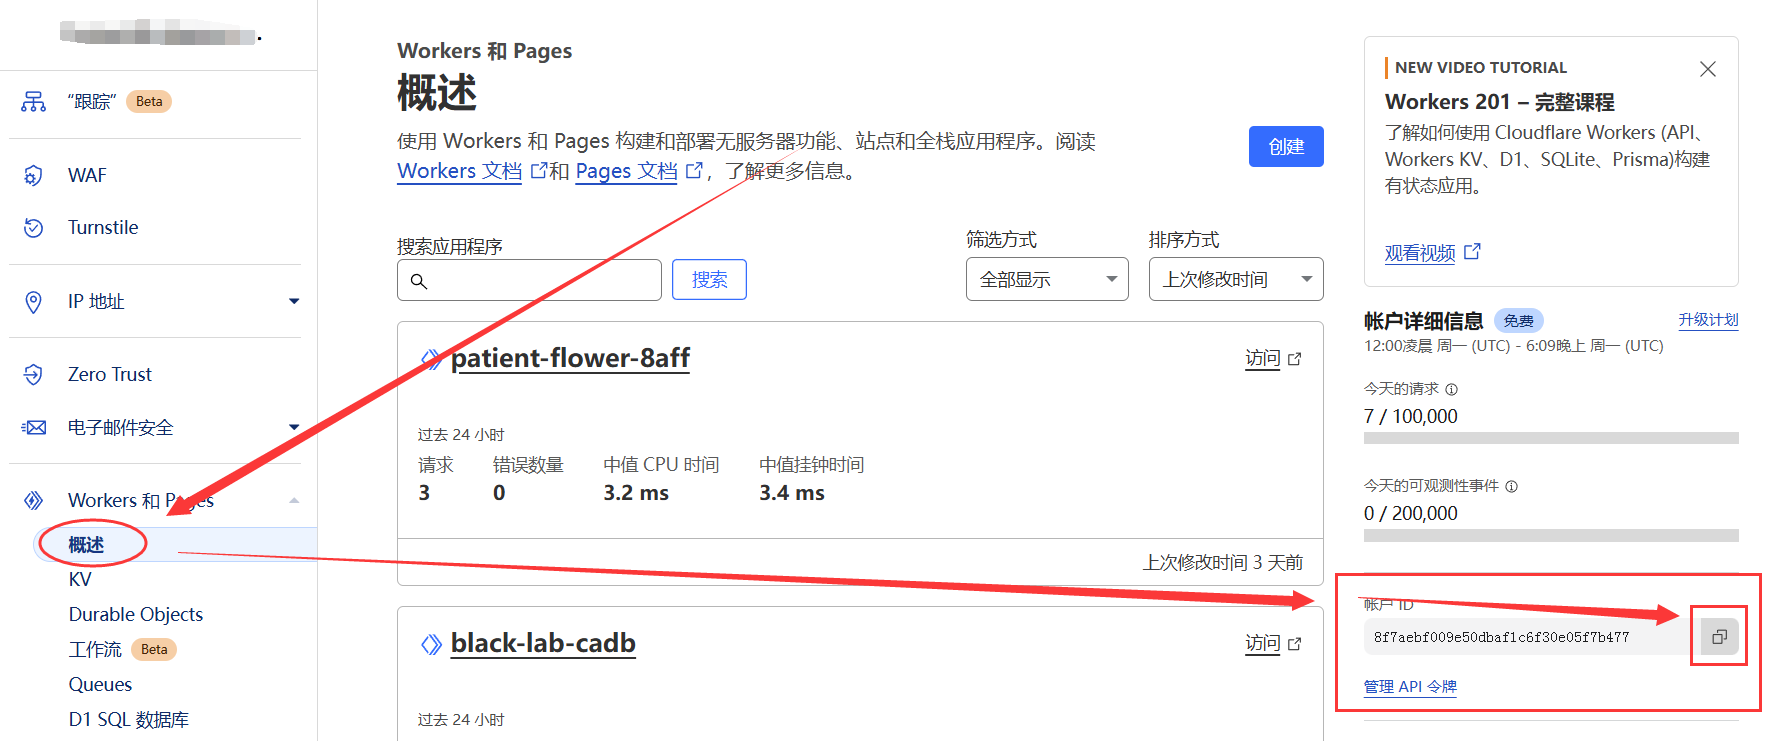
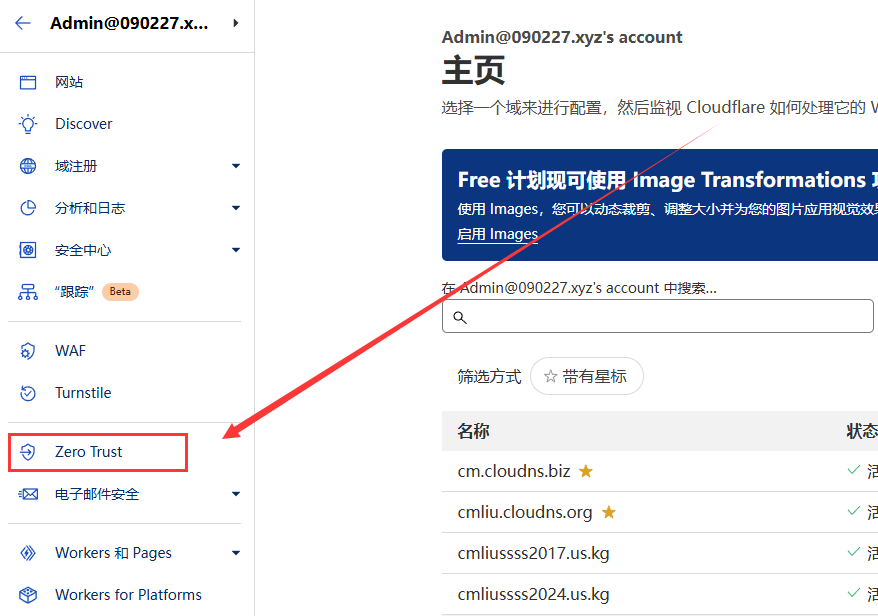
登录 Cloudflare,点击
计算和 AI>Workers 和 Pages,复制右下角Account ID备用;- 例如:
9b03a30c471a952197b8b8bb6f113456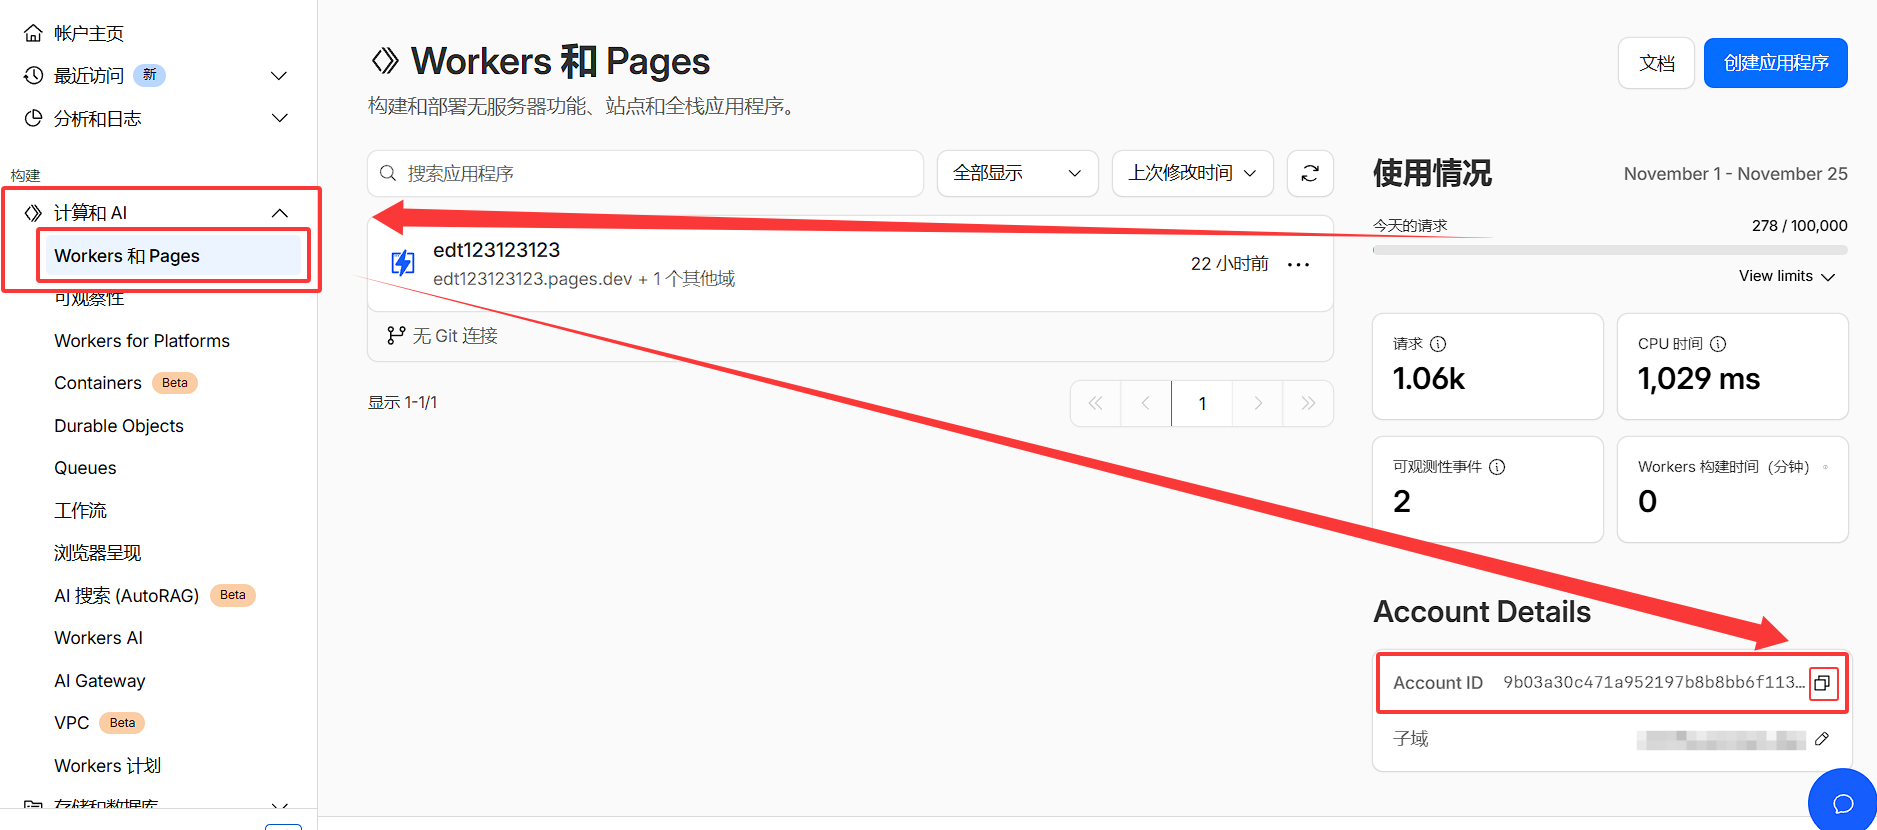
- 例如:
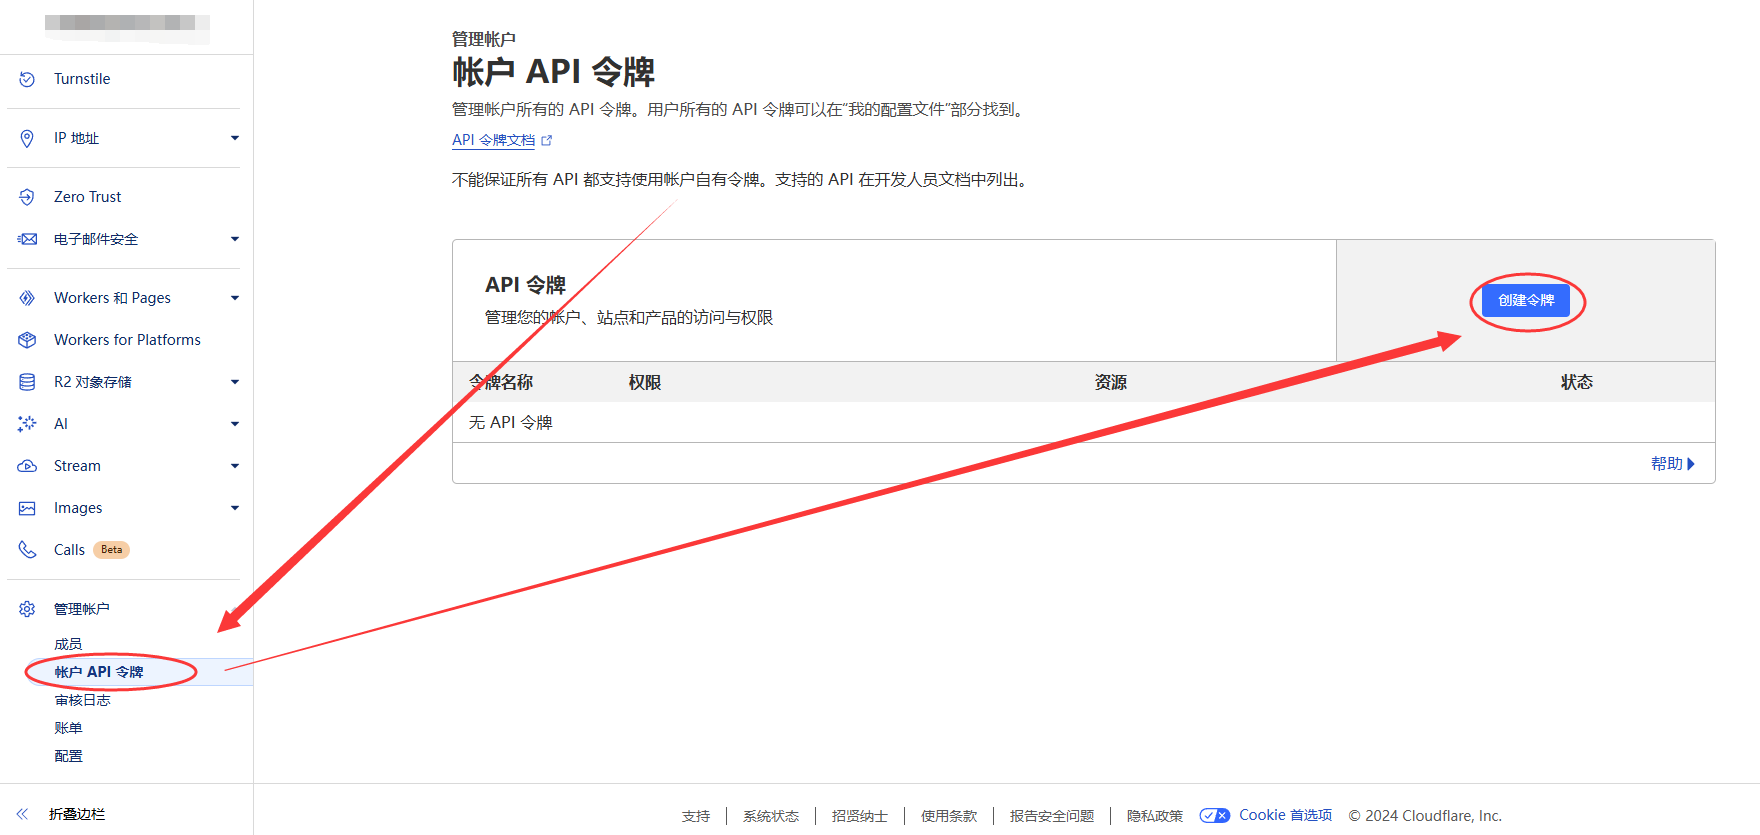
点击左侧
管理账户>账户 API 令牌>创建令牌;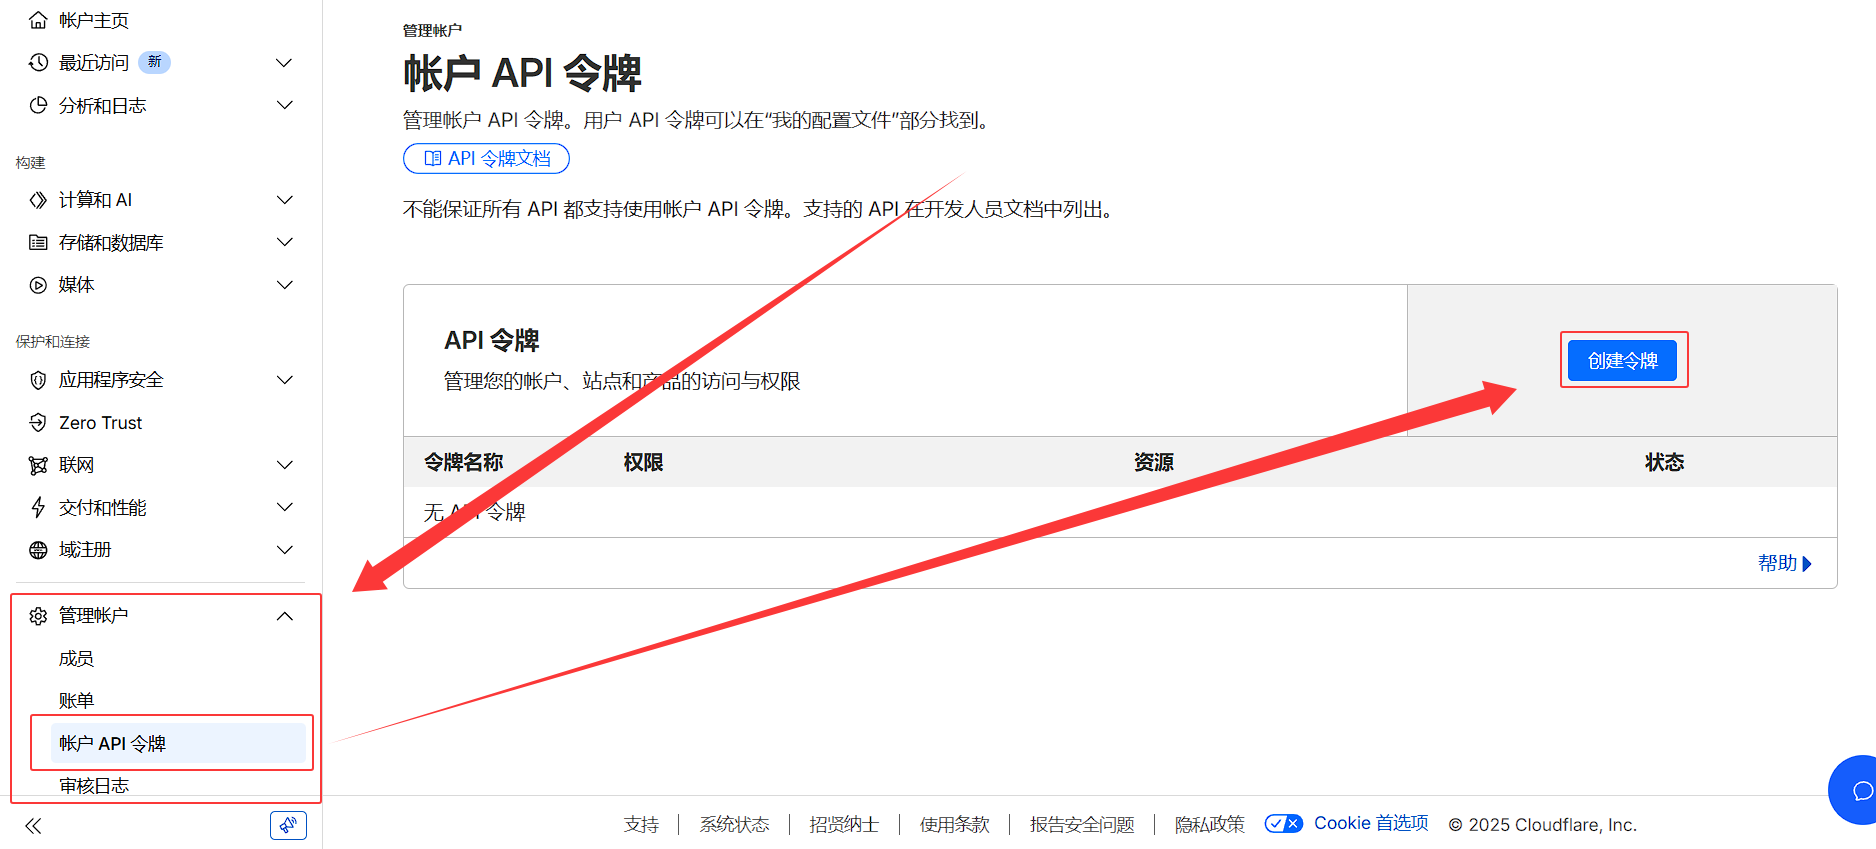
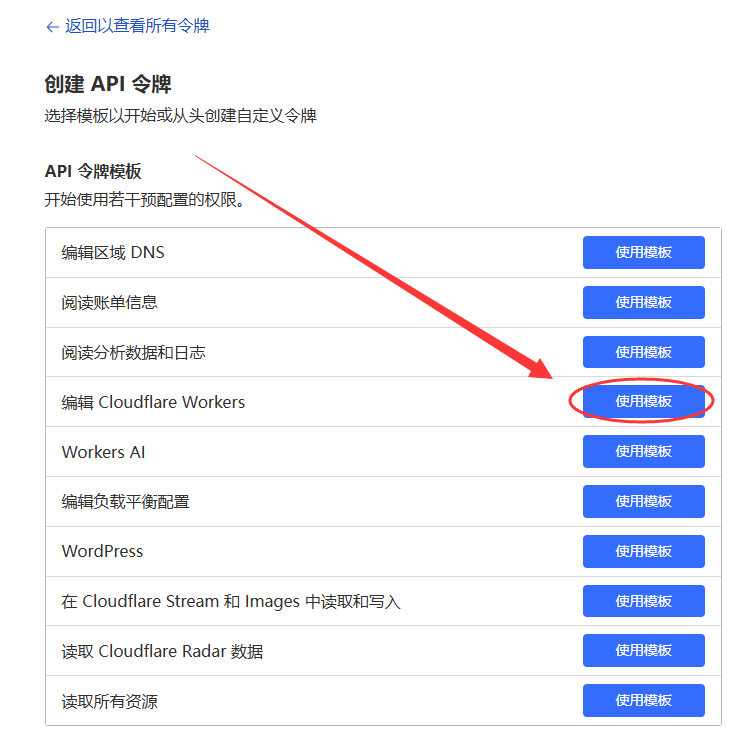
API 令牌模板选择
阅读分析数据和日志,点击使用模板;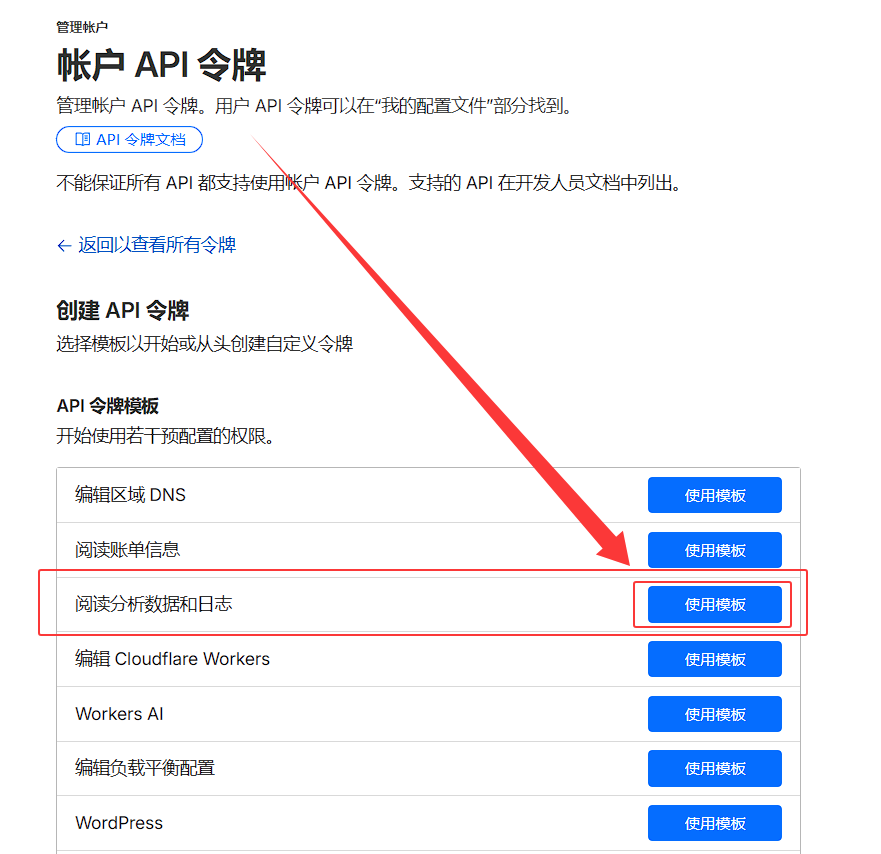
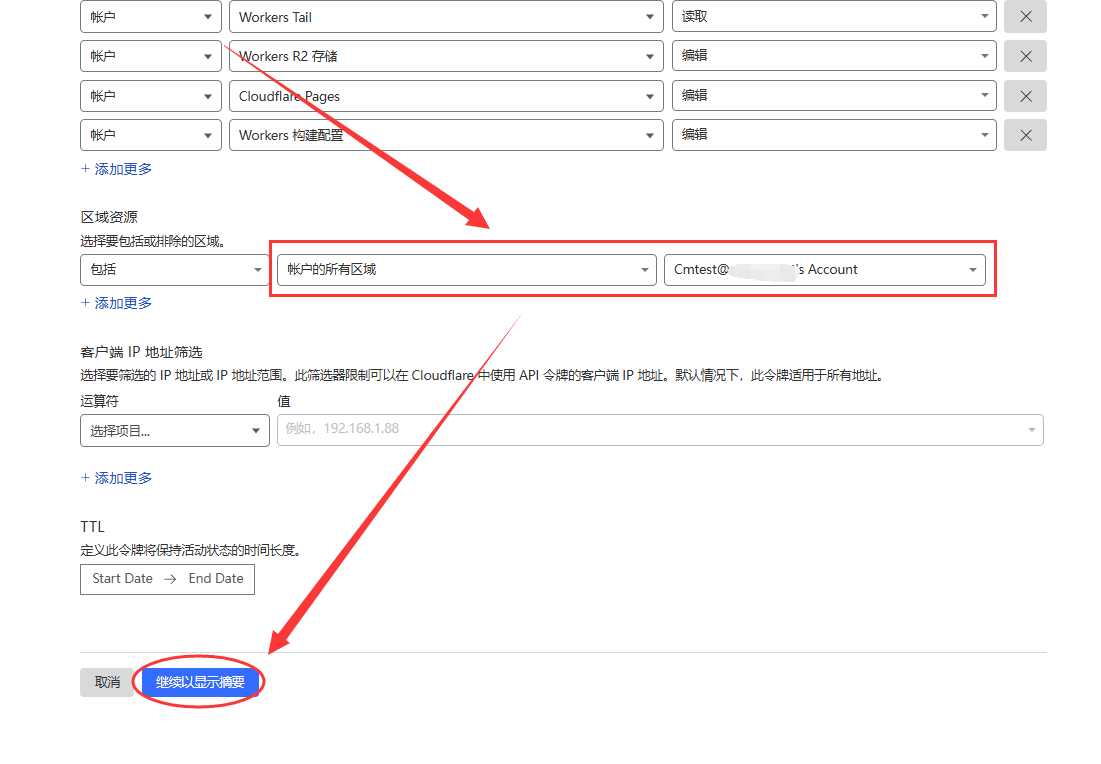
区域资源选择
账户的所有区域,再选择你的CF账户邮箱后,点击继续以显示摘要;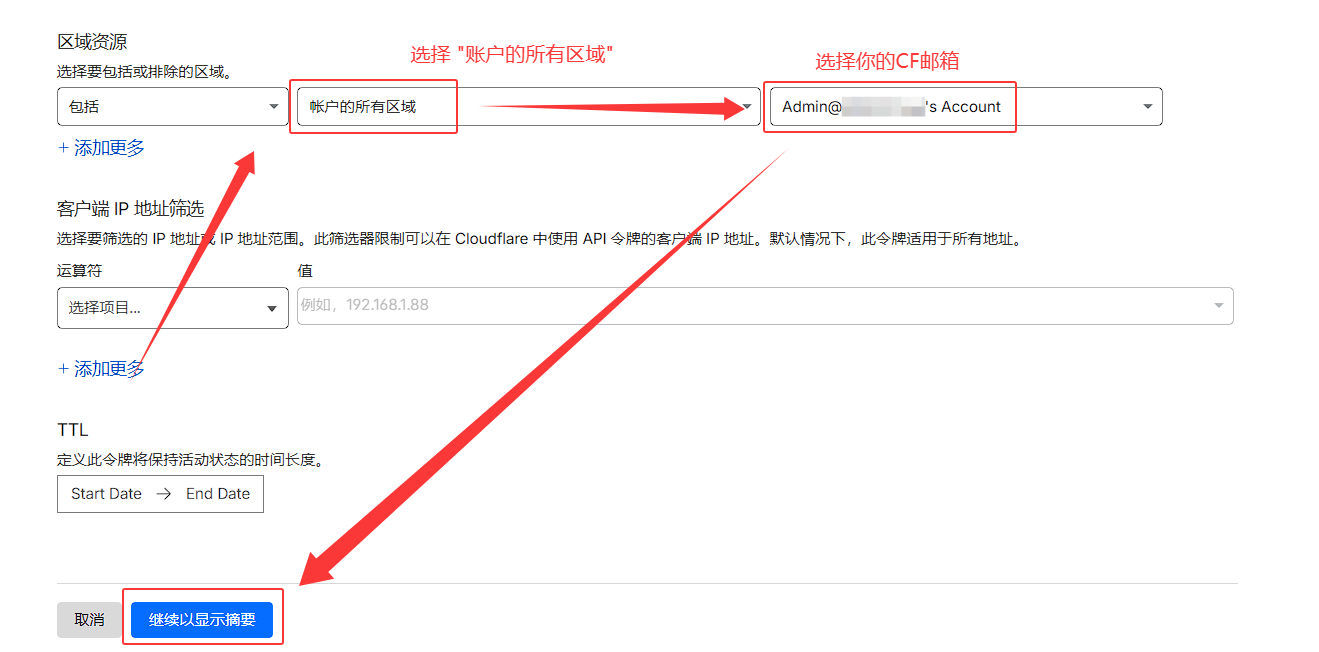
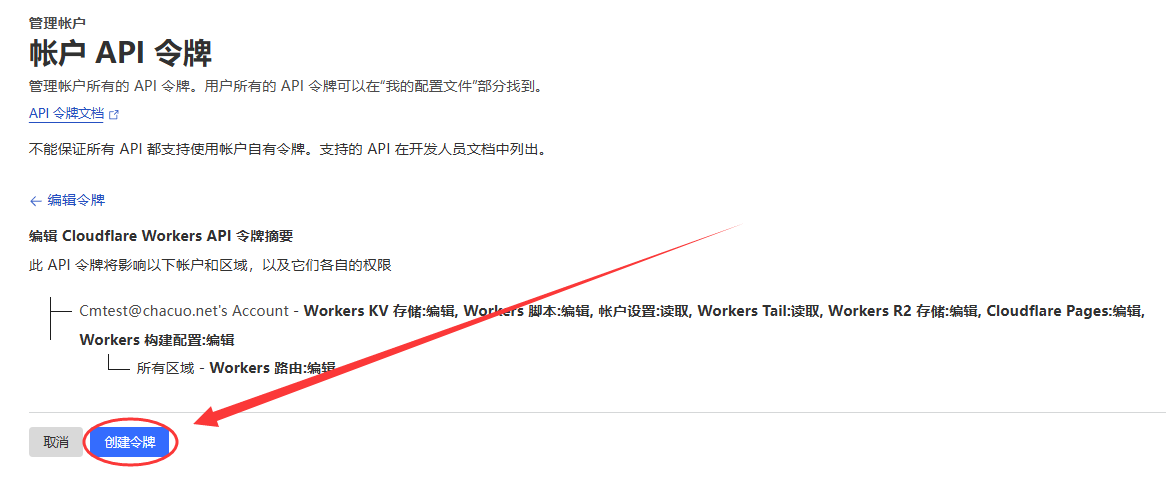
点击
创建令牌;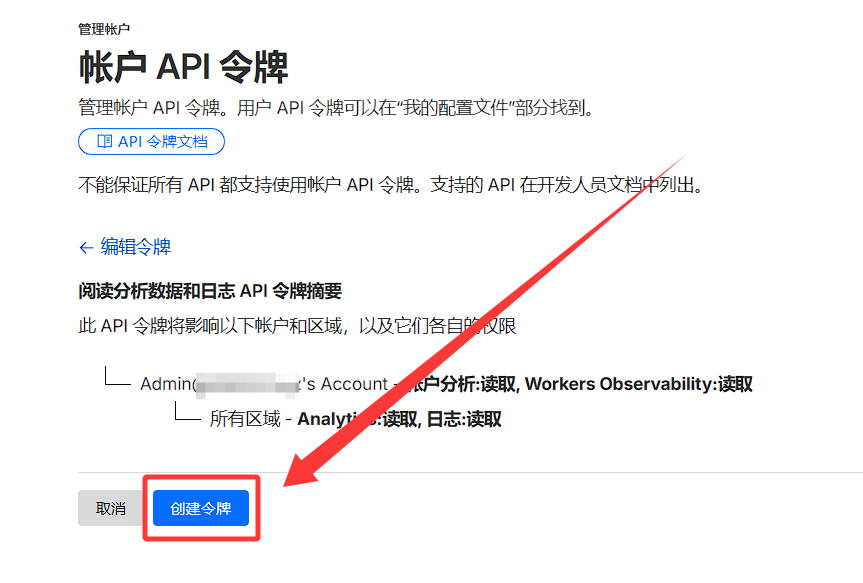
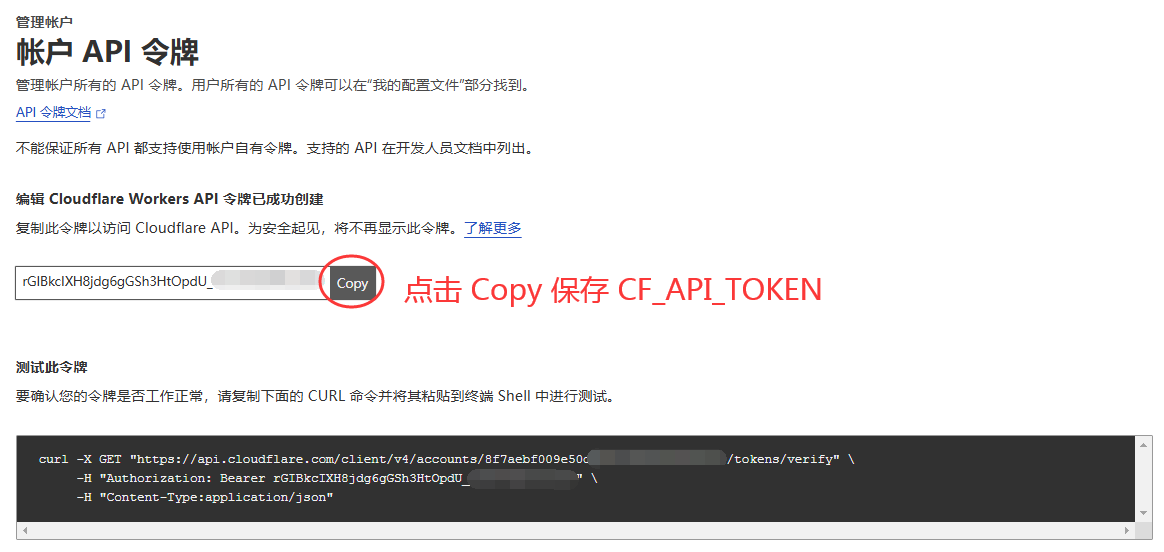
复制
API 令牌备用- 例如:
UQjdE9xzvK4oq32IaYRX7Z1-123YQvl3qLNwLQxE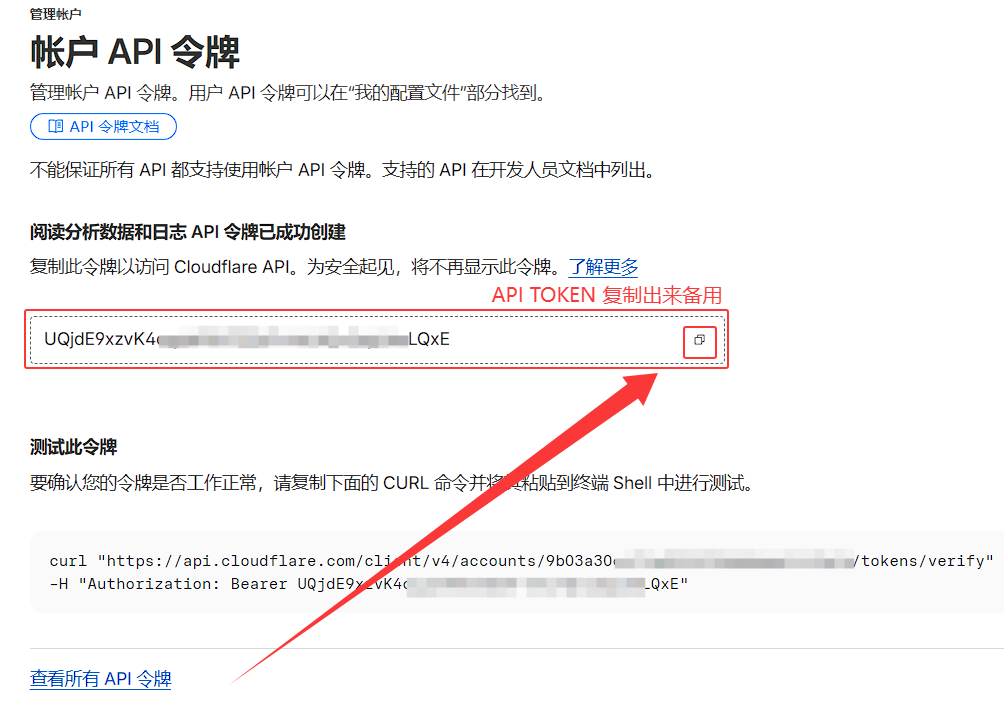
- 例如:
返回 Edgetunnel2.0 管理页面,
🔔 消息通知设置>Cloudflare Workers/Pages 可用请求数统计>⚙️参数配置;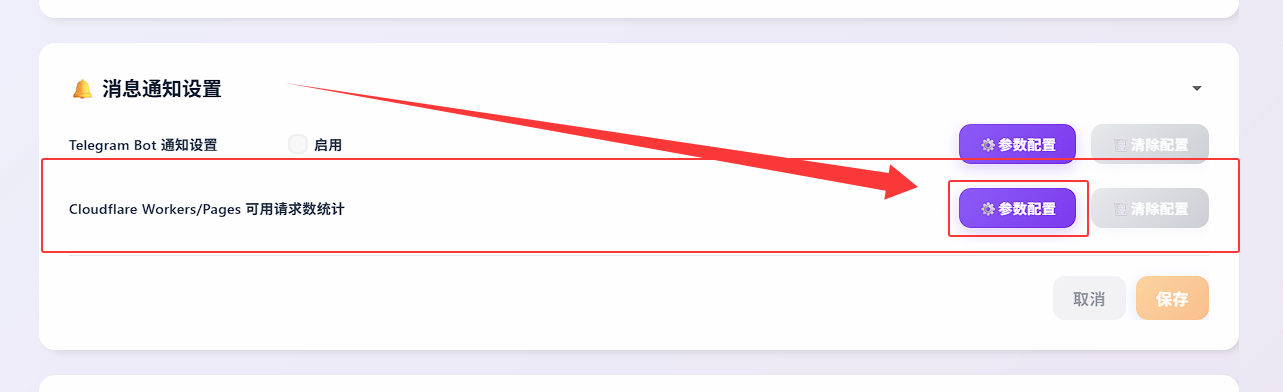
填写
Account ID和API Token参数,并点击可用性验证;
如提示
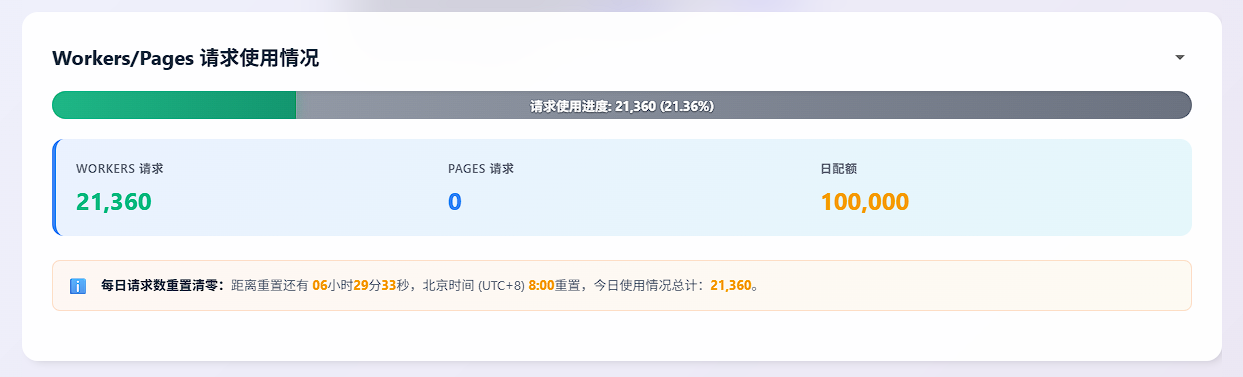
✅ 验证成功!并显示出今天的请求配额,则代表配置无误,点击保存即可;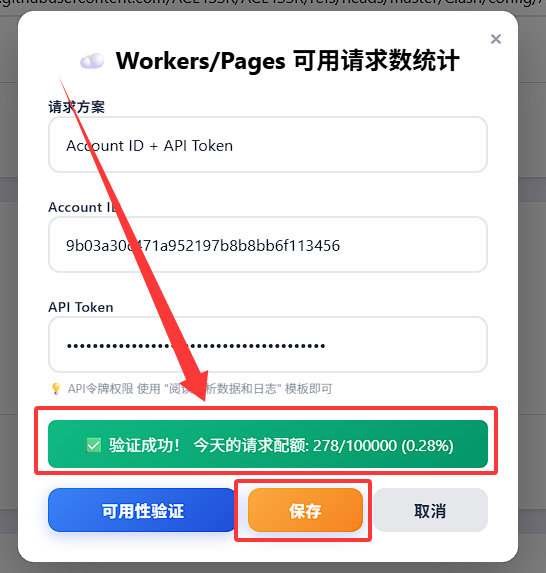
等待保存成功后自动刷新加载页面,即可看到
Workers/Pages 可用请求数统计信息;
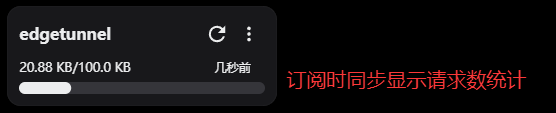
- Clash订阅呈现的效果如下:
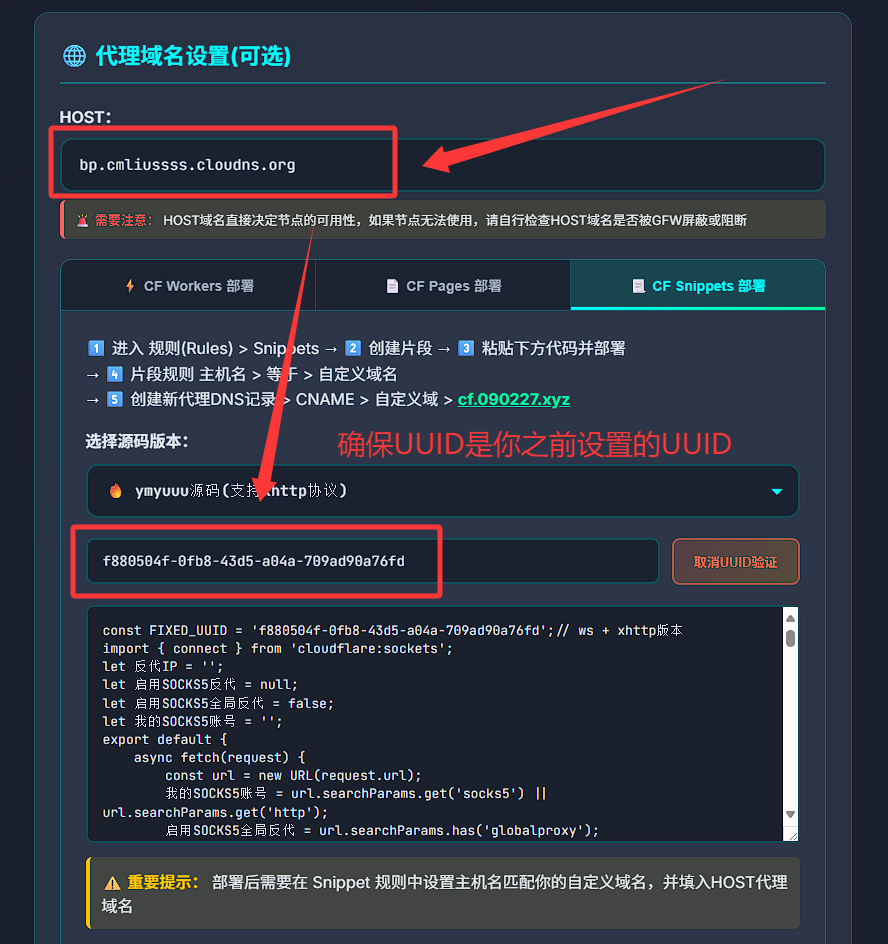
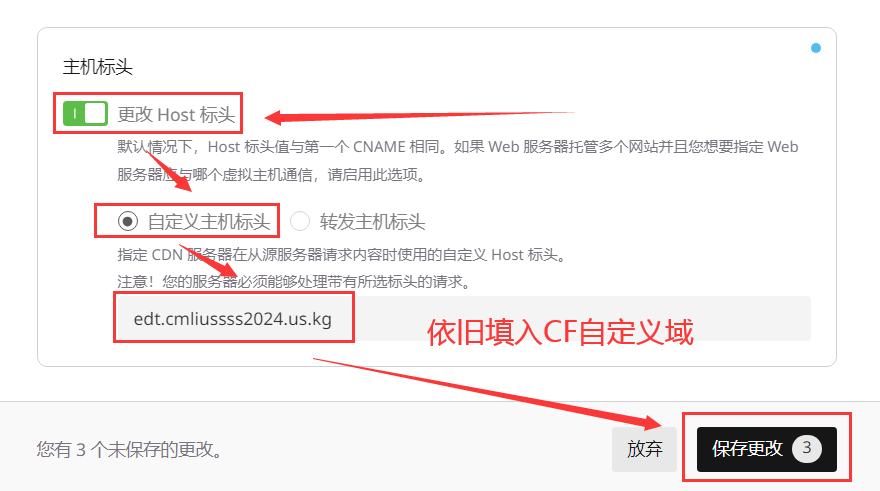
🎉 彩蛋:10w请求次数不够用?单面板管理多节点!
- 无敌!且可以有效降低SNI域名阻断情况(就是批量测试会出现-1的情况),就是这么简单!就是这么方便!!!
2个账号部署即可实现20w请求数,同理3个就是30w,不够就自行续杯;
- 域名可以使用同一个域名绑定多个自定义域,如:
edt2.fxxk.cloudns.org绑定 第一个 EDT2.0 作为 面板edt2-2.fxxk.cloudns.org绑定 第二个 EDT2.0 作为 节点edt2-3.fxxk.cloudns.org绑定 第三个 EDT2.0 作为 节点- …
「 🚀 点击展开 部署EDT2.0节点 绑定EDT2.0面板 图文教程 」
前往 Edgetunnel2.0 管理页面,复制保存
⚙️ 详细配置信息内的UUID参数备用,例如:UUID:8fc6a982-9862-4362-846f-a7039c5e2e47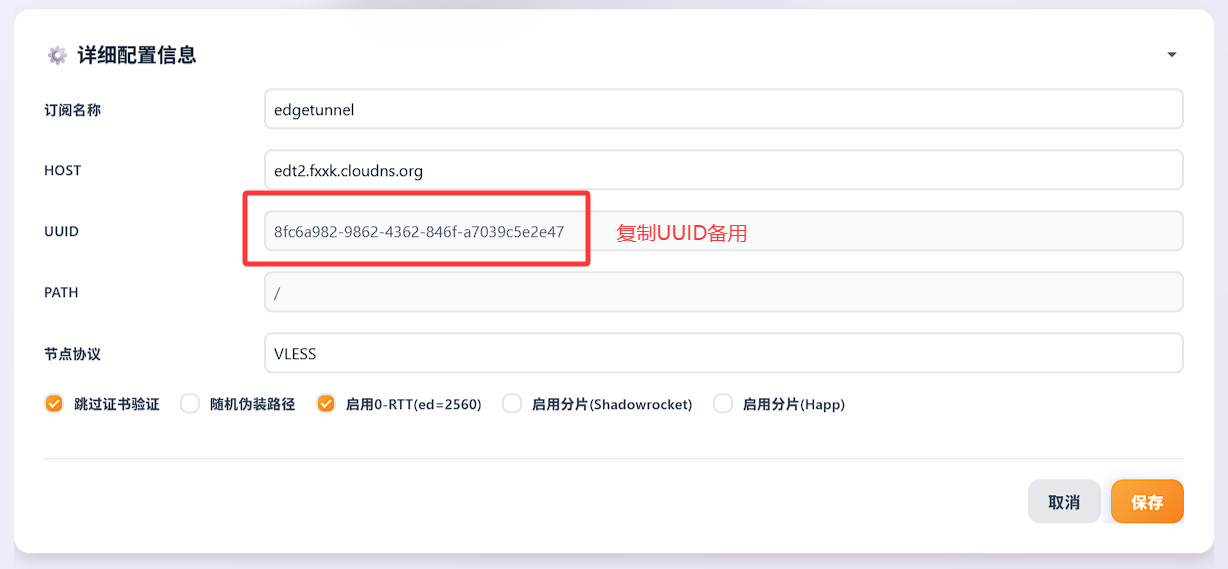
换号换号换号,用第二个CF账号部署第二个 Edgetunnel2.0 节点,依旧需要 edgetunnel-main.zip 压缩包:


进入项目设置页面,点击
设置选项卡,添加变量和机密:点击
+ 添加,类型文本变量名称UUID变量,变量值为刚才复制出来备用的UUID后,点击保存;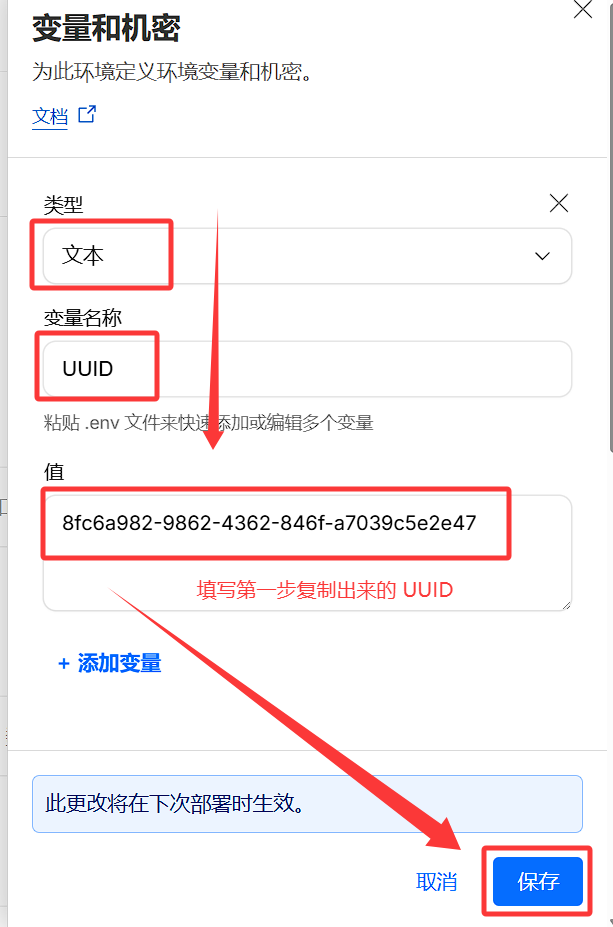
点击右上角
创建部署,重新上传项目压缩包edgetunnel-main.zip;部署环境选择
生产,点击从计算机中选择>上传压缩文件,选择第一步下载的edgetunnel-main.zip压缩包,等待上传完成;点击
保存并部署,等待部署完成;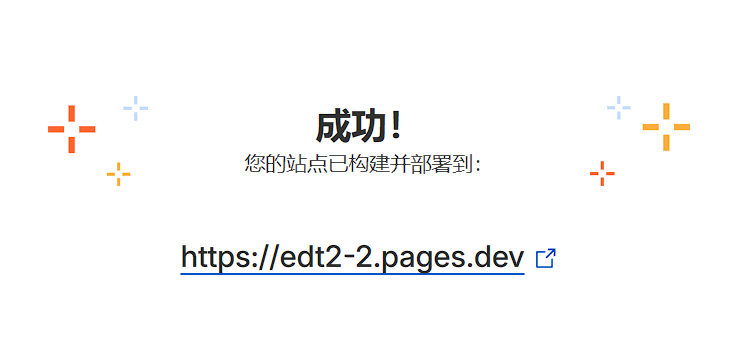
进入 Pages 应用程序,点击
自定义域选项卡,点击设置自定义域;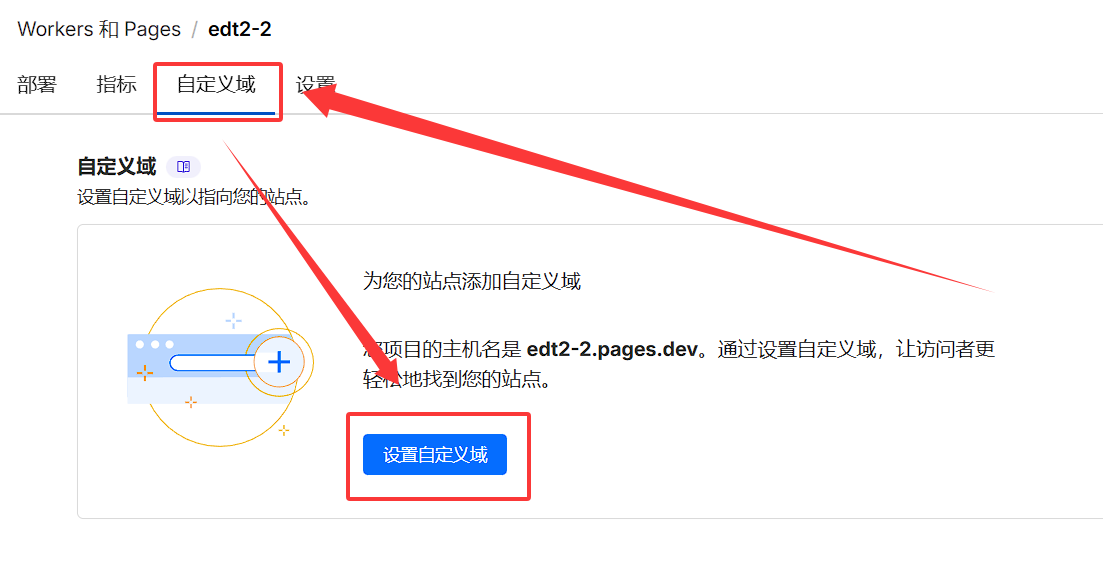
添加自定义域,必须必须必须不和面板域名一样即可,例如 edt2-2.fxxk.cloudns.org
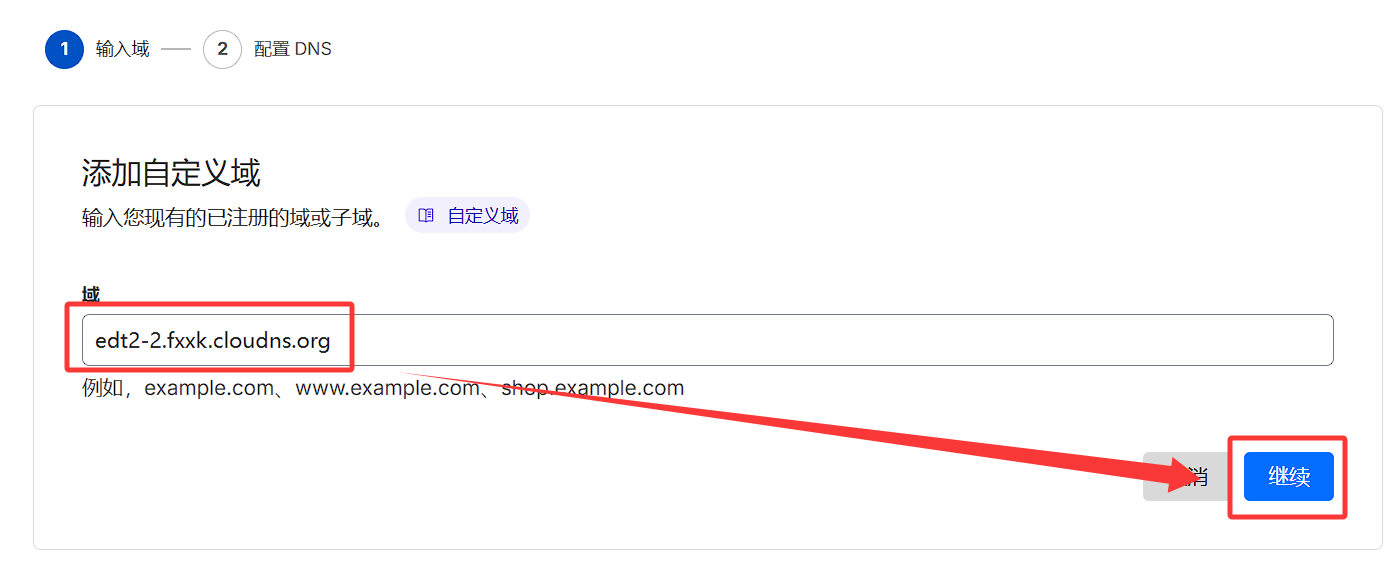
- 后续步骤同上绑定CNAME记录,等待域名验证成功即可;

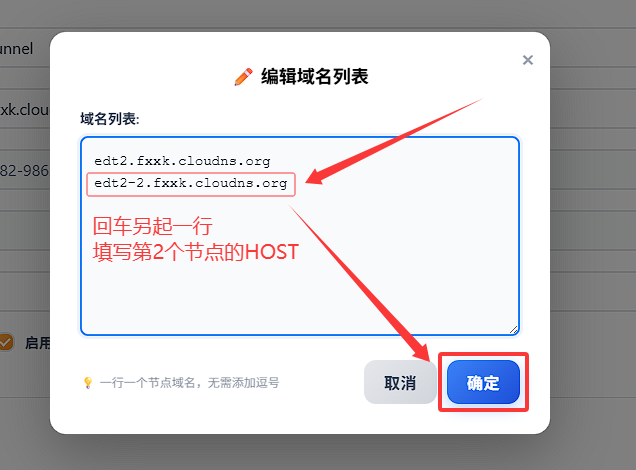
- 点击修改
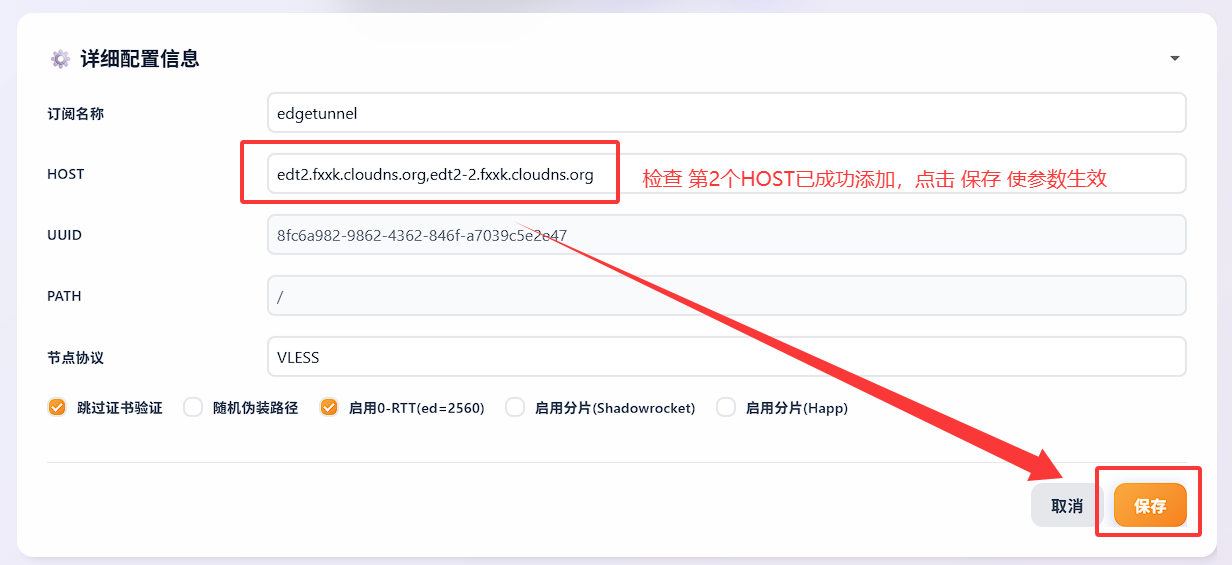
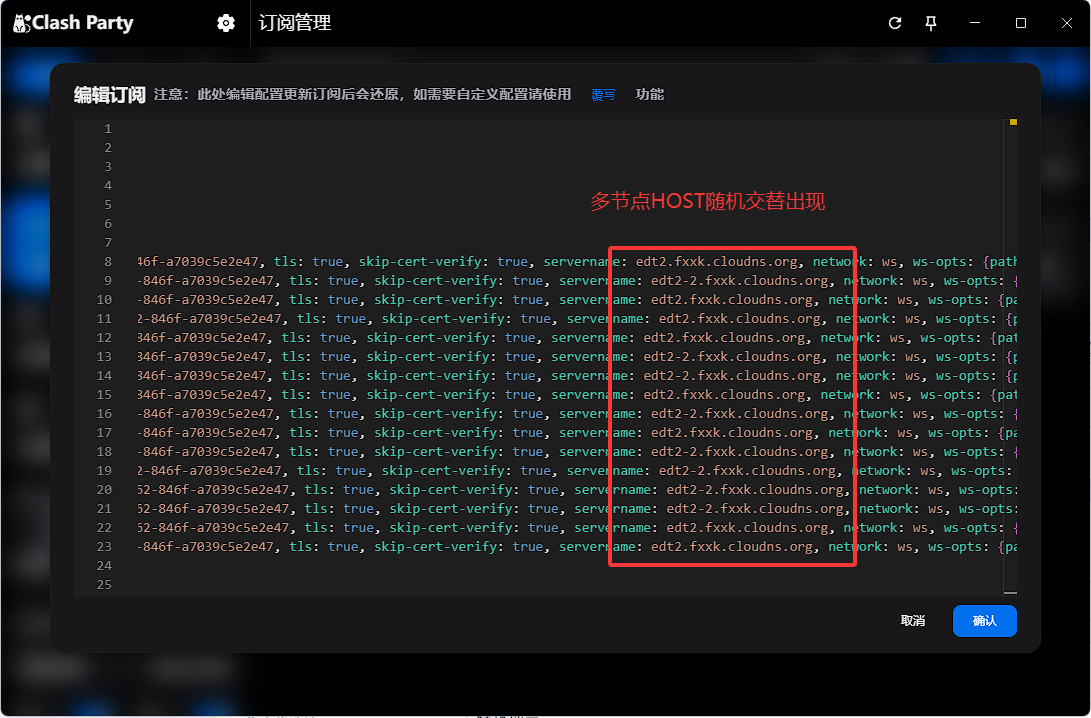
⚙️ 详细配置信息内的HOST参数,加上你的 第二个EDT2 节点 的 HOST,例如edt2-2.fxxk.cloudns.org,然后点击保存即可;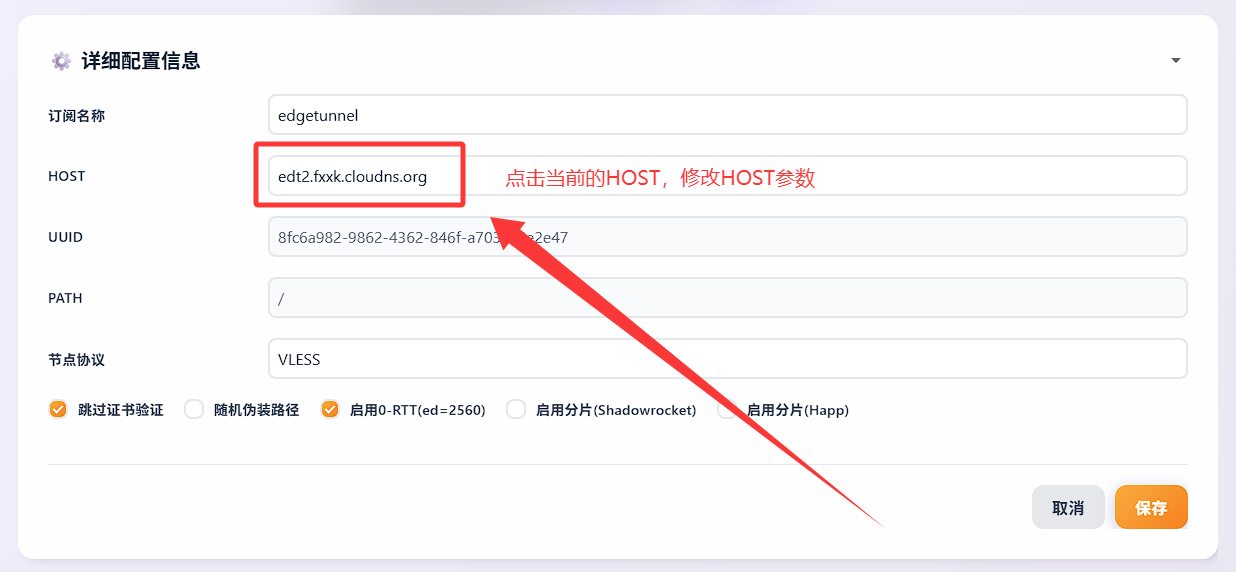
- 订阅呈现的效果如下:
新人Youtuber,需要您的支持,请务必帮我点赞、关注、打开小铃铛,十分感谢!!!
]]>